HRT216SDA Won't Start

firedawgsatx

Member
Joined
Oct 23, 2012
Threads
3
Messages
34
Ok, can you give me a brief explanation on how to do this? Thanks

There are many approaches to check for and correct a sticky valve. The easiest method to check for a stuck intake valve is to remove the carburetor and shine a flashlight into the intake port. If it's sticky, it will look brownish inside the port and on the valve stem. Carb cleaner sprayed inside the port and on the stem will normally fix it. To check for a sticking exhaust valve remove the muffler and do the same procedure in the exhaust port. Spray inside the port and the exhaust valve stem and spring with carb cleaner. Remove the spark plug and gently turn the flywheel to see if the valves open and close. If you want to get a little more into it you can remove the valve cover (the part in the front with OHC on it) to expose the rocker arms, the valve springs and the ends of the valve stems. While you have the valve cover off you can check and adjust your valve lash as you should be adjusting your valve lash on a regular basis. There was a Honda bulletin I came across once that says to free a stuck valve, remove the rocker arm and seal. Then carefully heat the valve stem with a heat gun until the valve starts to move . Then oil the stem and reassemble. The heating process only takes 5 min. Be CAREFUL if you decide to do this!!!!! Don稚 forget that if you remove your valve cover you will need to use Honda Bond or another sealant on the cover. I use Permatex Ultra Grey and it works very well. There are some good videos on youtube that will help you if you search for adjusting valves on a Honda GCV160.
 

exotion

Lawn Addict
Joined
Jun 24, 2012
Threads
66
Messages
3,444
Way over complicated.. take the valve cover off and pull the cord you can easily see the valves moving. If they are not it is stuck. Make sure engine is off and push on the valve that is Stuck until its moving pull cord it should be moving. Throw some 2 cycle oil in gas a very very small amount and that'll lube it up
 

motaro38

Member
Joined
May 16, 2014
Threads
5
Messages
35
Way over complicated.. take the valve cover off and pull the cord you can easily see the valves moving. If they are not it is stuck. Make sure engine is off and push on the valve that is Stuck until its moving pull cord it should be moving. Throw some 2 cycle oil in gas a very very small amount and that'll lube it up

Won't I need to them use the Permatex to reattach the valve cover?
 

exotion

Lawn Addict
Joined
Jun 24, 2012
Threads
66
Messages
3,444
Probably not if your careful taking it off the gasket should be fine... I have never had to replace or use a sealer with a lawn mower valve cover
 

motaro38

Member
Joined
May 16, 2014
Threads
5
Messages
35
Probably not if your careful taking it off the gasket should be fine... I have never had to replace or use a sealer with a lawn mower valve cover

Took the 4 bolts off the valve cover but damn this thing doesn't wanna come off! That sealant is strong.

I removed the carburetor and shined a flashlight into the intake port, saw that little rod which was all black, moved the flywheel and the rod did move. I then removed the muffler(what a pain it was to get at that bottom bolt) and saw the same thing, blackened rod that moved when I turned flywheel.
 
Last edited:

motaro38

Member
Joined
May 16, 2014
Threads
5
Messages
35
Ok I got the valve cover off, and of course all the oil spilled out, which isn't a bad thing because I was due for an oil change anyway. Due to not knowing the names of all the parts behind the valve cover, I'll just call them the "insides", which looked really healthy. When I turned the flywheel, the valves moved in and out just fine. Must be a fuel delivery problem then? Here are some pics:

valves1.jpg


valves2.jpg
 

exotion

Lawn Addict
Joined
Jun 24, 2012
Threads
66
Messages
3,444
If they move then they are good. Engine needs fuel, compression, and spark to run. Need to test these three things and you will find your problem. Put valve cover back on tight but not to tight it is aluminum afterall. Pull spark plug out reconnect to the boot hold the spark plug to metal of the engine and pull starter or move flywheel. If you have spark put it back in. Next is compression this one requires a compression tester can get one at harbor freight for about 15$. Follow instructions if your engine is equipped with compression release it should read in the 60's if it doesn't have a release the compression should be above 100. If those are correct your problem lies in fuel. Disconnect tank empty it. Blow air into the outlet for the hose. Get a new hose and probably just replace carb. Make sure its connected correctly
 

motaro38

Member
Joined
May 16, 2014
Threads
5
Messages
35
It works, finally! I did as you all advised and took the tank off, washed it out good, then used low pressure air to clean out the filter. A few dead spiders came out. I let it dry out in the sun afterwards. I actually lost the fuel hose that went from the tank to the carb in the process of cleaning everything, so just ordered a new one on ebay for 5 bucks, probably not a bad thing to have a new hose anyway. I also replaced one of the gaskets since it was badly torn(one between carb and the metal plate that meshes with air filter housing). I took the blades off, too, and used a wire brush attachment on my drill to get all the dried grass/rust off, then gave them 3 coats of paint, then hand sharpened them with a flat file. After reassembly it started right up, cuts great.

The only problem now, though, is surging, which I think is being caused by one of the gaskets between carb and engine. They looked a little worn and in retrospect I should have replaced all of those gaskets not just one. I might order them and do that. What a pain replacing the carb is though, lining up all the holes in all the parts to get to the engine. Thanks for all your help everybody and if you have any ideas on what else might be causing the surging let me know.
 

firedawgsatx

Member
Joined
Oct 23, 2012
Threads
3
Messages
34
What a pain replacing the carb is though, lining up all the holes in all the parts to get to the engine.

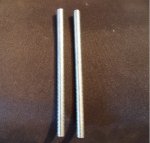
Glad to hear you got it running again. Here is a link to a thread that has a great method to facilitate lining up the carb and all the gaskets: http://www.lawnmowerforum.com/small-engine-mower-repair/15442-honda-gcv160-5-5hp.html I have used this method for years. I have attached a photo of the 6 x 83 threaded rod I keep in my tool box. As far as the surging it has been my experience that either all the holes in the gaskets are not lined up, one of the gaskets is leaking or the carb has some debris in one of the small carb jets. Since you replaced the carb before you cleaned the tank and filter in the tank and replaced the fuel line, there is a good possibility some debris entered the carb. I hope you decided to put an in-line filter in the fuel line also. This will help eliminate a lot of carb related problems.
 

Attachments

  • HondaCarbBolts.jpg
    HondaCarbBolts.jpg
    155.6 KB · Views: 6

motaro38

Member
Joined
May 16, 2014
Threads
5
Messages
35
That's a great tip firedawg, I'm gonna buy those threaded rods. Yeah I took apart the new carb and inspected it for debris but saw nothing. Could an air leak in the seal between valve cover and engine cause surging? I guess I'd know if there was a leak there since there'd be oil coming out. I'm just going to buy the other 3 carb gaskets so then I'll have all new gaskets, pretty sure one of the others was torn too.

On a side note, I often have to tune the high and low speed needles on my 2 stroke engine carbs. Do lawn mower carbs(specifically this Honda carb) ever have to be tuned? Thanks
 
Top