Drive pulley removal

Cobra2411

Forum Newbie
Joined
May 23, 2021
Threads
0
Messages
1
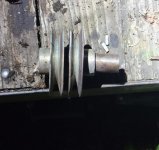
I was just struggling with this pulley and was looking for answers when I decided to try two pry bars. Turns out the pulley has a stub shaft for the PTO clutch. I was using a bearing splitter and a balancer puller but the pulleys were never going to come off that way...


I know it's an old thread and I'm not sure it's the same issue but I figured it may help someone out.

It was on a Toro zero turn. Screenshot_20210523-205653_Photos.jpg
 

Berniebac

Well-Known Member
Joined
Apr 8, 2012
Threads
25
Messages
180
I know this is an old thread but I thought I would post an update.

Late last summer my B&S 14.5 HP engine started smoking like crazy when I mowed downhill or side hill. Checked this site and Youtube and I figure it is a blown head gasket. I limped thru the remainder of the summer with it smoking and kept a close check on the oil level. I pulled the engine out of the tractor in January thinking I would bring it home and do the head gasket repair. The mower lives at my cottage all year so removing the engine was the simplest approach to completing the repair.

I thought while I had the engine out and was tearing it apart to do the head gasket, that old pulley was going to have to come off. It is the pulley that came with the engine when I bought it used to replace the original engine that broke its connecting rod. The used engine pulley is the wrong size for the belt used on the tractor. I had kept the original pulley when I did the engine swap a few years ago. When I started this thread a few years back I was seeking advice on how to remove a frozen pulley and despite my attempts I never did get it off. I decided this time it was coming off.

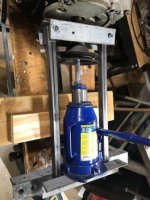
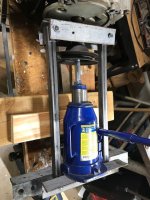
So I watched a few more Youtube vids on pulley removal and tried their techniques. I drilled two holes thru the deck pulley close to the drive shaft and put my puller on it. Cranked it down as tight as I could and it was a no go. Then I turned the engine upside down so the pulley was facing up and started soaking it with Liquid Wrench for a few days. Put the puller back on and it was a no go. Then I tried to soak it in acetone and transmission fluid for a few days. Put the puller on it and it was a no go. So I decided I would make a pulley puller that could utilize my 20 ton hydraulic jack and see if that would take it off.
PulleyPuller.jpg
This puller pushed up on the drive shaft while pulling down on the spacer between the engine and the pulley. The pulley did not budge. The jack simply bent the 2" x 2" x 1/4" angle iron I used to make it up with. Pulley removal, still a no go!

I tried heating it with a map torch every time I put a puller on it and it had no effect at all. That was the most heat I could apply. No oxy/acetelene here for me to use.

So I finally decided I would have to grind it off. (Sorry, no pics of this process. I was afraid I would ruin the drive shaft and was concentrating on what I was doing as opposed to taking pics). I started with a thin cutting blade in my mini grinder and I cut the main portion (bell) of the deck pulley off. Then I cut the drive pulley off leaving me with just the pulley shaft that was frozen on the drive shaft. Next I cut a slot up the pulley shaft right above the key way on the drive shaft. I could hold the cutting disk above the key way and cut thru the pulley shaft without damaging the driveshaft. Then I put a small cold chisel in the slot I cut and drove it up the key way trying to open the slot wider. Nope that didn't work. I went to a point on the pulley shaft that was located 90 degrees to the key way. Using a grinding disk I started to thin the wall of the pulley shaft. I knew the inside and outside diameters of the drive shaft and the pulley shaft and kept checking the depth I was grinding into the pulley shaft with my calipers. When I was about 1/100th of an inch wider than the drive shaft I stopped grinding.

Then I went to a point on the pulley shaft directly opposite where I was grinding (i.e. 180 degrees opposite to where I first thinned the wall of the pulley shaft). I ground that spot on the pulley shaft down till I was about 1/100th of an inch wider than the drive shaft. So, at this point, I had cut a slot up the pulley shaft and weakened it in two places that were about 90 degrees each side of the key way. I put the cold chisel in the slot I cut in the pulley shaft and started driving it up the key way. The slot started to open up. Then I put a couple pry bars in the slot, pried the slot a little wider and the pulley shaft started to pop off. I kept prying and it finally let go. I hope my descriptions helps explain what I did. Without any pics it is hard to explain.

It probably took me about an hour and a half to cut the pulley completely off the drive shaft but I was going slow and careful with the mini grinder trying not to damage the drive shaft. After all that I wished I had simply cut it off to begin with and not wasted days on penetrating oil and pullers.

Oh well, the update is complete and it's time to do the head gasket. Hope this helps someone in the future.

Edit: it does not want to show the pic I have of my home made hydraulic jack puller.
 

bertsmobile1

Lawn Royalty
Joined
Nov 29, 2014
Threads
64
Messages
24,705
Welcome to the real world of small engine technicians
Many a time drive shafts have to be heated red hot to get them off
And the story is the same for rear wheels
Many times I have to pull them while heating because once cool they just won't budge .
Nice job with the cut off , same way as I do here when needed ( and it is ) .
Before you put the new pulley on polish the PTO shaft and give it a good coating of anti-seize , filling up the key way so when the key goes in it will fill the key way on both sides at the top .
I like to replace the key with a longer one that goes full length .

When servicing a customers mower I remove the pulleys & grease the shaft every 2nd drive belt or 4th blade belt to avoid repeat performances .

I have some Allan bolts that are kept with the air tools and these are used for the air hammer to bang against.
Things that are rusted on respond much better to 20,000 little taps / minute than I big heavy one, or slow hydraulic loading .
Done in a similar fashion, support the pulley and hit the shaft .

Now as for photos
The forum only accepts images that are JPEG format
Most phone store in RAW format.
When the forum computer sees a small RAW image it reads the data as being massive so rejects it
Thus to put images into the forum they have to be opened in some sort of photo editing app then SAVED as a JPEG / JPG to Windoze users .There is also a maximum size so I resize photos to 12" along the longest side @ 72 DPI and save this image as a JPEG. These load easily and display well .
 

Berniebac

Well-Known Member
Joined
Apr 8, 2012
Threads
25
Messages
180
Another attempt to show my home made puller. Thanks Bertsmobile for the explanation on the need to compress the picture first.

PulleyPullerComp.jpg
 

Berniebac

Well-Known Member
Joined
Apr 8, 2012
Threads
25
Messages
180
Welcome to the real world of small engine technicians
Many a time drive shafts have to be heated red hot to get them off
And the story is the same for rear wheels
Many times I have to pull them while heating because once cool they just won't budge .
Nice job with the cut off , same way as I do here when needed ( and it is ) .
Before you put the new pulley on polish the PTO shaft and give it a good coating of anti-seize , filling up the key way so when the key goes in it will fill the key way on both sides at the top .
I like to replace the key with a longer one that goes full length .

When servicing a customers mower I remove the pulleys & grease the shaft every 2nd drive belt or 4th blade belt to avoid repeat performances .

I have some Allan bolts that are kept with the air tools and these are used for the air hammer to bang against.
Things that are rusted on respond much better to 20,000 little taps / minute than I big heavy one, or slow hydraulic loading .
Done in a similar fashion, support the pulley and hit the shaft .

Now as for photos
The forum only accepts images that are JPEG format
Most phone store in RAW format.
When the forum computer sees a small RAW image it reads the data as being massive so rejects it
Thus to put images into the forum they have to be opened in some sort of photo editing app then SAVED as a JPEG / JPG to Windoze users .There is also a maximum size so I resize photos to 12" along the longest side @ 72 DPI and save this image as a JPEG. These load easily and display well .

I have to admit that I was afraid to heat it too much. I don't have much experience with that and I wanted to save the seal in the bottom of the engine so I was gentle with the heat.

I have polished the shaft and will put the anti-seize to it when I put the pulley on.

Now I have a new problem. The new pulley won't slip on to the drive shaft. It goes on about 1/3 of the way then stops. I think I will have to file the punched in key on the pulley shaft in order to get it to slide on.

I'd love to know how you replace the key with a longer one. The old pulley and the new pulley have a key that is simply a punched indentation in the pulley shaft. When I look inside the new pulley you can esily see that the key is punched more to one side as opposed to strait down the middle. They have to find ways to make things cheap, just to make it so that the job is harder to do.
 

bertsmobile1

Lawn Royalty
Joined
Nov 29, 2014
Threads
64
Messages
24,705
I have to admit that I was afraid to heat it too much. I don't have much experience with that and I wanted to save the seal in the bottom of the engine so I was gentle with the heat.

I have polished the shaft and will put the anti-seize to it when I put the pulley on.

Now I have a new problem. The new pulley won't slip on to the drive shaft. It goes on about 1/3 of the way then stops. I think I will have to file the punched in key on the pulley shaft in order to get it to slide on.

I'd love to know how you replace the key with a longer one. The old pulley and the new pulley have a key that is simply a punched indentation in the pulley shaft. When I look inside the new pulley you can esily see that the key is punched more to one side as opposed to strait down the middle. They have to find ways to make things cheap, just to make it so that the job is harder to do.
Not all pulleys are made that cheaply
Some have a key way broached into pulley as well as the milled slot in the crankshaft .
 
Top