Endless Summer
Member
- Joined
- Feb 16, 2020
- Threads
- 1
- Messages
- 15
Did you pay any attention to the last sentence in reply #4 ?
Yes. Thanks. It does move freely.
Did you pay any attention to the last sentence in reply #4 ?
Thanks!No harm in admitting you are over your head. I wish a lot my customers would, it save me a lot of undo their attempts.
Just you are interested the circle is the where the adjustment is. Even I admit it is not the easiest adjustment to get to or to adjust.
View attachment 50971
Looks like Star beat me to posting the parts break down .
To understand why your mower is slow you have to understand how it works.
And it all comes down to spring tension .
When you changed the belts did you check that the sliding element in the sheave # 78 moved fully from top to bottom ?
People who use the cruise control for hours & hours will end up wearing a little notch in the sheave which stops the sliding element moving all the way up or down.
No solution for that apart from replacement $$$$$$$$ .
In the diagram, spring # 39 is connected to pulley # 64 and over time it wears a groove where either end is anchored.
This drops the tension in the upper belt # 60 which usually stops the mower going slow, if it has been put back into the wrong hole so it is too tight then the sheave will not be able to get to the top and the mower will go too slow .
The same thing happens to either end of spring # 20 in fact I have had a couple in where the spring cut right through the speed controler # 5 and fell off.
If the controller can not put more tension in the lower belt # 61 than is in the upper belt #60 then the controller will not be able to force the sliding element to move up & down.
The sliding element moving up & down is what changes the speed just the same as a pair of stacked pulleys on a bench drill except there is an infinate number of combinations of pulley sizes.
Tightening the control rod # 55 will mean that there is more tension on the lower belt # 61 at every position of the speed control pedal # 42.
While this is a bog simple system there are a lot of places where small amounts of wear will create a bit difference to the speed attainable.
Parts to look at are the bushes # 51 ( 2 of them )
Pivot holes in # 72 & # 69 & # 70
And lastly the idler pulleys # 63 ( 2 ) & # 64 .
As a rule they rarely outlast 2 sets of belts.
They must be in good condition externally with no groves or flat spots and spine both freely & quietly.


Thanks for all the pics/diagrams!As Bert said it is a simple system on the surface but just like a two cycle engine everything got to be right and working together for things to work correctly. This is where an experience mechanic has an advantage just a trained tech. We run so many different problems with a system like the CVT system that we check things out a nature troubleshooting skill. With a system this it is a lot easier for me to actually put my hands on it.
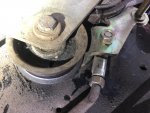
Also here some additional info that might help. It is assumed you have the correct PTO (engine pulley) to Variable pulley installed.
Actual under carriage location of adjustment. Note some layout different layouts had been seen as actual pull off springs can be positioned differently for an example..
View attachment 50978
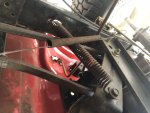
factory setting of auto drive linkage
View attachment 50979
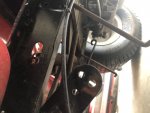
View attachment 50980
View attachment 50981
Thanks.The nut on the linkage rod is a lock nut. You must remove the nut holding the linkage rod to the plate. This will allow you to remove the rod, back the tie rod end out one full revolution and re install. This will allow for more tension on the belt and reduce slippage, allowing the unit to move faster. Might have to do this a couple of times. To me that belt looks worn and if so I would replace it first.
Looks like Star beat me to posting the parts break down .
To understand why your mower is slow you have to understand how it works.
And it all comes down to spring tension .
When you changed the belts did you check that the sliding element in the sheave # 78 moved fully from top to bottom ?
People who use the cruise control for hours & hours will end up wearing a little notch in the sheave which stops the sliding element moving all the way up or down.
No solution for that apart from replacement $$$$$$$$ .
In the diagram, spring # 39 is connected to pulley # 64 and over time it wears a groove where either end is anchored.
This drops the tension in the upper belt # 60 which usually stops the mower going slow, if it has been put back into the wrong hole so it is too tight then the sheave will not be able to get to the top and the mower will go too slow .
The same thing happens to either end of spring # 20 in fact I have had a couple in where the spring cut right through the speed controler # 5 and fell off.
If the controller can not put more tension in the lower belt # 61 than is in the upper belt #60 then the controller will not be able to force the sliding element to move up & down.
The sliding element moving up & down is what changes the speed just the same as a pair of stacked pulleys on a bench drill except there is an infinate number of combinations of pulley sizes.
Tightening the control rod # 55 will mean that there is more tension on the lower belt # 61 at every position of the speed control pedal # 42.
While this is a bog simple system there are a lot of places where small amounts of wear will create a bit difference to the speed attainable.
Parts to look at are the bushes # 51 ( 2 of them )
Pivot holes in # 72 & # 69 & # 70
And lastly the idler pulleys # 63 ( 2 ) & # 64 .
As a rule they rarely outlast 2 sets of belts.
They must be in good condition externally with no groves or flat spots and spine both freely & quietly.