Snapper Friction Wheel Replacement

oldlawnguy

Well-Known Member
Snapper 1695734 M1227E 27in 11.5HP Snowblower (2009 model) bought in 2010

The friction wheel axle is mounted with flanges on the inside rather than outside so the axle doesn't slide right out.

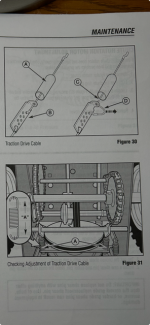
What's the easiest way to replace the friction wheel? Do I just remove bolts of flanges on both sides and jimmy out the wheel and axle? Owners manual only shows how to adjust traction cable tension.

Replaced both belts this year, however with the long cold and snow here in the northeast the traction slips in the bitter cold. I have a flat driveway. I used today at 38 degrees and she was just fine. At 8 degrees she get cranky. Noticed the tension in traction cable is loose, but might as wheel replace the friction wheel in her 16th season. Plan on cleaning disk with brake cleaner too.

Thanks
 

Attachments

  • IMG_3491.jpeg
    IMG_3491.jpeg
    135 KB · Views: 38
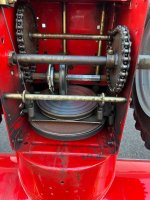
With my poor eyes and the included pic, the driven rubber ring "looks" ok. Get us a more close up shot of the rubber ring and steel driven ring. Side shot of the rubber sidewall too.

Are you losing forward propulsion or why do you need to replace it?
 
Fiction wheel does looks glazed and worn to me.

It does looks like that both bearings has to come out with the shaft. Should be enough end play to allow this. Check that chain on the left of the image for a separator link. Also that spring link rod and springs needs to come out so the fiction assy can be slide out.

I don't have snow blowers here nor could I find a service manual on that Snapper/Simplicity blower. Looks like the techs are on their own figuring this out. Hopefully with actual experience can chime in to help.
 
Is the rubber ring contaminated with grease and or oil? I see the shiny part Star noticed. Clean it off if so with alcohol or soap and water.
 
This is from Google AI.

Replacing the rubber driven disk (also known as the friction wheel or rubber ring) on a Snapper 1695734 (M1227E) snowblower involves accessing the traction drive system, usually by tipping the unit forward onto its auger housing to access the underside.
Key Information & Parts
  • Part Number: The friction wheel is part #722185 (often replaced by #1501435MA or equivalent).
  • Related Parts: It is recommended to check the friction disc ring (often #76-075 or similar) and the drive disc itself (1739282) for wear.
  • Access: The machine must be in service mode (tipped forward) to access the traction drive assembly.
Steps for Replacement
  1. Safety First: Disconnect the spark plug wire to prevent accidental starting.
  2. Access the Drive: Remove the bottom cover plate on the chassis of the snowblower to expose the drive mechanism.
  3. Remove the Drive Assembly:
    • Disconnect the traction cable.
    • Remove the bolts holding the axle or the swing plate assembly in place.
    • Slide the axle/swing plate assembly out to access the friction wheel.
  4. Replace the Rubber Disk:
    • Remove the bolts securing the rubber ring to the aluminum carrier disk.
    • Replace the old rubber disk with the new one.
    • Ensure the new disk is seated correctly and tighten the bolts in a star pattern to ensure even pressure.
  5. Reassemble:
    • Reinstall the drive assembly.
    • Check for proper alignment and clearance.
    • Reinstall the bottom cover.
  6. Adjustment: Reconnect the spark plug and adjust the traction cable tension if necessary to ensure the drive engages correctly, as noted in the user manual.
 
Replaced my sure of those wheels and they can be real fun, depending on your patience. First thing I do is to unbolt the wheel from its holder, can remember if it is three or four bolts. You need to remove the bearing caps on each end of the shaft. With the caps loose you will now be able to move the shaft around to remove left hand bearing cap and sprocket. Slide the shaft to the left to remove the friction wheel. At this time I clean everything before reassembly in reverse order. I began by saying they can be fun, or some say a pain in the butt. I’ve done so many that it takes me less that an hour to accomplish. More than once I’ve had them brought to me in boxes from guys who gave up. One tip, remove the tires to get them out of the way, patience, patience, patience is your best friend with this project.

That friction wheel does not look that bad, I would tell the customer changing it is totally up to him, does he want to spend the money today or down the road. Depending on use I’d say it has about two years of life left. Definitely need to clean friction disc. Good luck and have fun. Does you unit have an adjustment on the drive cable?
 
Alcohol will damage the rubber disc. Clean disc after removing friction disc or spray your cloth and not disc when cleaning.
 
Replaced my sure of those wheels and they can be real fun, depending on your patience. First thing I do is to unbolt the wheel from its holder, can remember if it is three or four bolts. You need to remove the bearing caps on each end of the shaft. With the caps loose you will now be able to move the shaft around to remove left hand bearing cap and sprocket. Slide the shaft to the left to remove the friction wheel. At this time I clean everything before reassembly in reverse order. I began by saying they can be fun, or some say a pain in the butt. I’ve done so many that it takes me less that an hour to accomplish. More than once I’ve had them brought to me in boxes from guys who gave up. One tip, remove the tires to get them out of the way, patience, patience, patience is your best friend with this project.

That friction wheel does not look that bad, I would tell the customer changing it is totally up to him, does he want to spend the money today or down the road. Depending on use I’d say it has about two years of life left. Definitely need to clean friction disc. Good luck and have fun. Does you unit have an adjustment on the drive cable?
Thanks (slomo, star and rivets ) fellas. It looked like a jimmy this way that way thing given "how hard can 4 flange bolts and 3 friction wheel bolts be..." It kinda like the belts, auger belt easy, drive belt less intuitive unless you've done many. :oops:

The part is B&S 1501435MA 3-bolt $28.36

The customer is me, figured I'd change it at 65 rather than at 75 :) She has some meat left and yes the drive cable has adjustment tabs and it could definitely be tightened 1 tab.
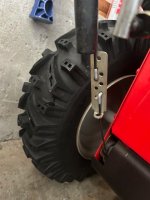
How do you put slack in the cable to be able to adjust tab? I guess you could clamp down traction handle and then strict the tab plate from moving when you release the handle but how?
 

Attachments

  • IMG_3673.jpeg
    IMG_3673.jpeg
    85.7 KB · Views: 12
  • View recent photos.png
    View recent photos.png
    325.4 KB · Views: 13
Back
Top