You are using an out of date browser. It may not display this or other websites correctly.
You should upgrade or use an alternative browser.
You should upgrade or use an alternative browser.
Export thread
OK no hotwire
#1

bbbobbbo69
bbbobbbo69
G'day gang,
Yes I now fully agree my last posted question re: 'how to hotwire' my Toro ride-on was foolish & not well thought through. Possibly bordering on sacrilegious to some members. Panic & lack of knowledge got better of me & no disrespect intended.
So.... I'm hoping some good folk on here might give me a huge hand & educate me as to why my Z master's electrical's are sketching out ? Please !
I have a Toro Z Master 6000 series. Model no. 74960. serial no. 316000440.
I have a working multi-meter but very limited knowledge of all things electrical/circuitry .( very, very limited )
I believe my battery is sufficiently charged.
Some time ago on turning of the key, occasionally I would hear the loud clunk from behind me & no start. I could turn key to off & try again & get nothing or could get same clunk.
Recheck that everything was in order for starting procedure -handles/brake/seat/PTO & persevere..
By accident I found a " sweet spot " when turning key to start- but not all the way, whereby it would crank & fire up & away I'd go.
It would be hit or miss whether next start would be 'normal start' or 'sweet spot' start.
Around same time after unscrewing bolts holding that rhs panel down & having a look I encountered a different noise when the loom was nudged.
The noise was more of a " crackling bacon " sound that would sporadically blank out the hour meter numbers & symbols. A wiggle of loom would see all return.
I lazily continued this way until recently, in regrettably one of my dopiest & bored moments I thought I'd take the ignition module out to have a closer look &/or clean up presumably dirty contacts .
I proceeded to drop said module( bastard mozzies were infesting me ! ), on gravel AT NIGHT-TIME !
Needless to say an E-bay purchase was the next move.
New Ignition module arrived , plugged in & nothing !
Still getting the "crackling" noise which my gut tells me is coming from behind the fuses.
But i wouldn't wager my nads on that. Mess around with it for 5 minutes & i could just as easily lean towards the ' Hour meter' unit at fault.
The Leo man that i am saw me "searching online" expecting a model wide common fault with accompanying easy fix, to which my addictive personality flaw dragged me further down the research rabbit hole & shone a spotlight onto the fact I am a complete dumb *** when it comes to ALL things electrical !
I cleaned up the battery terminals & clamps as well as cleaning up the grounding spot & 3 leads that bolt down onto engine, still to no avail.
So hence here I am seeking a helping hand on what step by step action to do now to , i assume, deduce which faulty part or wire i need to find.
Any help /suggestions greatly appreciated.
Cheers guys
#3
A
Auto Doc's
I have replaced quite a few main fuse holders for the problem you described.
The next suspect is the ignition switch but be careful to get the correct one. Each pin has a specific letter stamped into it or on the housing.
Just because they might look the same, they are not. There are about 10 different ones that are commonly used on rider mowers.
There is no such thing as a GENERIC starter switch.
A
Auto Doc's
Hello B,G'day gang,
Yes I now fully agree my last posted question re: 'how to hotwire' my Toro ride-on was foolish & not well thought through. Possibly bordering on sacrilegious to some members. Panic & lack of knowledge got better of me & no disrespect intended.
So.... I'm hoping some good folk on here might give me a huge hand & educate me as to why my Z master's electrical's are sketching out ? Please !
I have a Toro Z Master 6000 series. Model no. 74960. serial no. 316000440.
I have a working multi-meter but very limited knowledge of all things electrical/circuitry .( very, very limited )
I believe my battery is sufficiently charged.
Some time ago on turning of the key, occasionally I would hear the loud clunk from behind me & no start. I could turn key to off & try again & get nothing or could get same clunk.
Recheck that everything was in order for starting procedure -handles/brake/seat/PTO & persevere..
By accident I found a " sweet spot " when turning key to start- but not all the way, whereby it would crank & fire up & away I'd go.
It would be hit or miss whether next start would be 'normal start' or 'sweet spot' start.
Around same time after unscrewing bolts holding that rhs panel down & having a look I encountered a different noise when the loom was nudged.
The noise was more of a " crackling bacon " sound that would sporadically blank out the hour meter numbers & symbols. A wiggle of loom would see all return.
I lazily continued this way until recently, in regrettably one of my dopiest & bored moments I thought I'd take the ignition module out to have a closer look &/or clean up presumably dirty contacts .
I proceeded to drop said module( bastard mozzies were infesting me ! ), on gravel AT NIGHT-TIME !
Needless to say an E-bay purchase was the next move.
New Ignition module arrived , plugged in & nothing !
Still getting the "crackling" noise which my gut tells me is coming from behind the fuses.
But i wouldn't wager my nads on that. Mess around with it for 5 minutes & i could just as easily lean towards the ' Hour meter' unit at fault.
The Leo man that i am saw me "searching online" expecting a model wide common fault with accompanying easy fix, to which my addictive personality flaw dragged me further down the research rabbit hole & shone a spotlight onto the fact I am a complete dumb *** when it comes to ALL things electrical !
I cleaned up the battery terminals & clamps as well as cleaning up the grounding spot & 3 leads that bolt down onto engine, still to no avail.
So hence here I am seeking a helping hand on what step by step action to do now to , i assume, deduce which faulty part or wire i need to find.
Any help /suggestions greatly appreciated.
Cheers guys
I have replaced quite a few main fuse holders for the problem you described.
The next suspect is the ignition switch but be careful to get the correct one. Each pin has a specific letter stamped into it or on the housing.
Just because they might look the same, they are not. There are about 10 different ones that are commonly used on rider mowers.
There is no such thing as a GENERIC starter switch.
#4

bbbobbbo69
bbbobbbo69
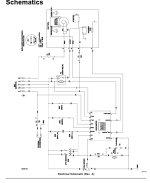
Thanks brother.much appreciated.Here is a starting point
View attachment 71987
But from your description I would say the ignition switch acting up in the past would be a starting point. But the crackling sounds like broken wire or loose connection which will take some visual inspection of the wiring connectors etc.
#5

bbbobbbo69
Iust tried looking up a part number & cant find one just for the fuse holder.
There is one for the harness wire-main 116-6009 but being a plug in seperate unit surely that would have its own part number ?
Or do i have to get the whole harness ?
Cheers
bbbobbbo69
You're a champion Auto.Hello B,
I have replaced quite a few main fuse holders for the problem you described.
The next suspect is the ignition switch but be careful to get the correct one. Each pin has a specific letter stamped into it or on the housing.
Just because they might look the same, they are not. There are about 10 different ones that are commonly used on rider mowers.
There is no such thing as a GENERIC starter switch.
Iust tried looking up a part number & cant find one just for the fuse holder.
There is one for the harness wire-main 116-6009 but being a plug in seperate unit surely that would have its own part number ?
Or do i have to get the whole harness ?
Cheers
#8
A
Auto Doc's
Trying to replace a whole harness is overkill. Most of the time it only requires some simple repairs such as a wire connection or a fuse and fuse holder that can be replaced by itself.
You need to inspect and confirm the issue before blindly ordering and parts.
According to the wiring diagram provide, this has just a single power fuse inline. Most parts store have these in stock, but they have to be spliced in.
If you know even a part time hobby auto mechanic or DIY person, they may be able to help you.
A
Auto Doc's
Hello B,You're a champion Auto.
Iust tried looking up a part number & cant find one just for the fuse holder.
There is one for the harness wire-main 116-6009 but being a plug in seperate unit surely that would have its own part number ?
Or do i have to get the whole harness ?
Cheer
Trying to replace a whole harness is overkill. Most of the time it only requires some simple repairs such as a wire connection or a fuse and fuse holder that can be replaced by itself.
You need to inspect and confirm the issue before blindly ordering and parts.
According to the wiring diagram provide, this has just a single power fuse inline. Most parts store have these in stock, but they have to be spliced in.
If you know even a part time hobby auto mechanic or DIY person, they may be able to help you.
#9

StarTech
StarTech
Auto Doc this mower has 4 fuses.
Fuse 1 Main Power
Fuse 2 Voltage Regulator
Fuse 3 Electric PTO Clutch
Fuse 4 Accessories
All contained in a 4 Position fuse block.; not separate fuse holders.
Fuse 1 Main Power
Fuse 2 Voltage Regulator
Fuse 3 Electric PTO Clutch
Fuse 4 Accessories
All contained in a 4 Position fuse block.; not separate fuse holders.
#10
A
Auto Doc's
A
Auto Doc's
Thanks StarTech,
The diagram that ILENGINE post was hard for me to read without being able to expand the view. I studied again a little harder with a magnifying glass to see the other fuses you mentioned.
The diagram that ILENGINE post was hard for me to read without being able to expand the view. I studied again a little harder with a magnifying glass to see the other fuses you mentioned.
#11

StarTech
StarTech
That's why I dl the owners manual so I could enlarge and rotate the diagram. That diagram is not even in the service manual.Thanks StarTech,
The diagram that ILENGINE post was hard for me to read without being able to expand the view. I studied again a little harder with a magnifying glass to see the other fuses you mentioned.
#13

bbbobbbo69
bbbobbbo69
thanks guys. i've gotta ask, is there a way to check the wiring on the back side of this fuse holder ?
Also would it pay to check if its maybe a contact issue(?) to do with the metal tabs where the fuses slot into & make contact with ?
As stated i have a multi meter but also a store near me is selling a knock off of the "power probe" tool in case i need that type of tool to test as opposed to the multi meter.
cheers for taking the time to follow this.
#14

bbbobbbo69
Pico 1598D, Aptiv 12020321-L, 16-14 awg. "
refer to please
cheers
bbbobbbo69
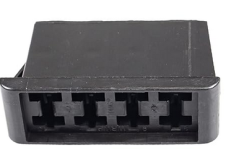
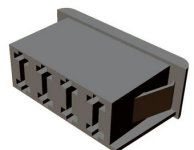
excuse my ignorance star tech but what do "The fuse holder is Exmark/Toro 32160-258
View attachment 71993View attachment 71994
If I am right the terminals should be
Pico 1598D, Aptiv 12020321-L, 16-14 awg.
If the fuse holder is un-damaged then only the terminals need replacing. And also need an open barrel crimper.
Pico 1598D, Aptiv 12020321-L, 16-14 awg. "
refer to please
cheers
#15

bbbobbbo69
cheers
bbbobbbo69
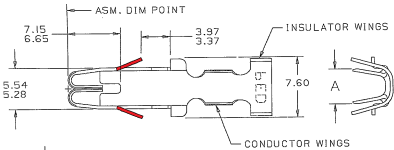
Lastly, would an electronics store such as Jaycar stock one of the " u shape extraction tools " ?And to remove the current terminals you need to depress both retaining wings highlighted in Red in the following image at the same time. U shaped extraction tool.
View attachment 72000
cheers
#16
A
Auto Doc's
A
Auto Doc's
I'm all for getting the parts information as you study this issue, but the actual problem has not been identified yet.
I suggest you turn the key on, connect the test light to the battery negative post and check each fuse for power on each of the tiny, exposed areas on the back of each fuse.
If they all seem good, pull out one at a time and then reinstall to see if anything activates.
I suggest you turn the key on, connect the test light to the battery negative post and check each fuse for power on each of the tiny, exposed areas on the back of each fuse.
If they all seem good, pull out one at a time and then reinstall to see if anything activates.
#17

bbbobbbo69
bbbobbbo69
thanks for that. the problem i'm having though is that the fuse holder is intermittently making the "crackling" sound. Just the action of pulling fuse can trigger it .
**** just looking at it has set it off !
Instinct is telling me a wire that is in back of fuse holder is the fault so is there a way of testing these for continuity please ?
**** just looking at it has set it off !
Instinct is telling me a wire that is in back of fuse holder is the fault so is there a way of testing these for continuity please ?
#18

StarTech
StarTech
Don't know...but I have sent Mouser an email requesting info on a possible tool or at the least specs.Lastly, would an electronics store such as Jaycar stock one of the " u shape extraction tools " ?
cheers
#19

StarTech
StarTech
It is more likely the terminals themselves. I yet to see a properly crimp terminal to be loose and open barrel crimps are very tight or at they are with the tool I have here. Just did 4 wire splices and heat shrink tubing yesterday instead using butt connectors. Butt connectors tend to be loose when crimped.thanks for that. the problem i'm having though is that the fuse holder is intermittently making the "crackling" sound. Just the action of pulling fuse can trigger it .
**** just looking at it has set it off !
Instinct is telling me a wire that is in back of fuse holder is the fault so is there a way of testing these for continuity please ?
#20
F
Freddie21
F
Freddie21
One thing about this original post and the engine starting 1st try, I have three ZT all with different twin cylinder engines. Many times for a 1st start, it will just click the starter and not rotate, after the engine starts, every try is fine. I have 275 CCA batteries on all and they sit a week or two. I have guessed the engines are coming to a rest very close to TDC and the ACR just does not have time to release enough compression. Second turn of the key is always fine.
The crackling noise does sound like electrical arcing.
The crackling noise does sound like electrical arcing.


