Here are my new Hondas!
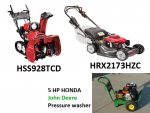
I won't say much about the pressure washer other than it works GREAT...I didn't know much about them other than the electric one I was borrowing from my neighbor was a piece of junk...So I thought...who makes a good little motor?, Honda of course and then I thought Who makes a good VALVE BODY and then it came to me John Deere...they have been building them on their machinery for a lifetime so I just nailed it. You see how big the valve body is compared to the 5 Hp motor driving it...Now that works great! The only problem I have had was when I lent it out to people they kept on leaning over it to start it and BURNING their hands because Honda painted the whole motor black and the muffler is right up top (black too)! I painted the muffler with some Chevy block orange heat paint to fix that...This thing works awesome though!
Ok on to the mower and blower TOGETHER:
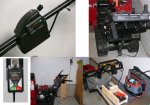
I bought the electric starting rigs that have their own battery BUT because MAINTENANCE and taking care of things is so important to me I just had to improve on my chances to keep the batteries in shape especially when one or the other is out of use by season...So I thought how the heck do I know the condition of the battery? There is no gage or indication on either Sooo I really researched a lot and found a GREAT battery gage and put one on each machine! The gage actually will beep if the battery is getting way down low and is completely a weather sealed unit so all I had to do was mount and hook up the wires....I also made a universal jack system with "Battery Minder" cord ends so whenever I want to charge either I can just plug in the jack and start charging or maintaining the batter immediately! So simple...I didn't want to have to take the mower case apart every time I wanted to charge it or same for the snowblower so a universal system that works for both works great! For more in-depth charging instead of just maintaining I hook up my OPTIMA computerised battery charger and it's computer analyzes and charges the batterie accordingly and perfectly! I made a wooden block that has a battery minder cord attached to it so I can hook up the OPTIMA charger to either easily! Here is a link to look at the battery gage. The whole system works great!
http://www.batterymart.com/p-bfg12v-battery-fuel-gauge.html"]http://www.batterymart.com/p-bfg12v-battery-fuel-gauge.html]Page Not Found: BatteryMart.com
So for the mower: I have to say I really like using it as it runs so smoothly. My neighbor has the Honda one with the "thumb control" up top for the drive speed and I like mine better that has the speed controlled by a sliding shift and if you want to go slower for a bit from your set point you can just feather back the drive push bar a bit so that is nice too then you don't have to reset the speed all the time just to slow down for a second!
The mulching works great and you can adjust that with the sliding shift knob behind the motor up top. The bag seems a bit bigger than my last Honda and all and all I really am impressed with the mower
For the snowblower I really like it too as well but it has been a journey trying to make it work for me and not get wrecked...Like I say I try very hard to take care of my things and it was a learning event to get it so I was confident that I would not let it get damaged in any way period. The rig cost 4 grand here in Canada so after spending that much you surely want it to last a lifetime that is for sure!
When I brought it home I unloaded it and sat it in my garage, got a Pepsi and sat beside it and read the manual. Then I noticed a puddle of OIL underneath it...I wiped as best I could underneath with a paper towel cutting up my hands even, but for the life of me it would NOT quit dripping! I eventually took it back to the dealership pretty dissapointed and I think they pressure washed it and it was NOT leaking but the tech had overfilled it and oil had ran underneath where there is no way to wipe...bringing up my first thing I don't like is the OIL adding / checking place is way down low and below...My old Honda mower and Craftsman machines had GREAT tubes up top where you can quickly check or add some oil EFFORTLESSLY...The new blower I have just isn't user friendly here and if HONDA ever made an extension tube kit to make this more user friendly I'd buy it in a second! Here is a pic of my old mower and Craftsman blower...To check or add oil on these machines was so easy...Right up top...No oil going on the floor or under the motor etc!

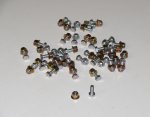
So trying to be prepared I noticed there were only 3 shear pins given with the unit and I recalled with my old Craftsman blower that I`d break them all the time...So I wanted to buy a bunch to put in my bolt bin to have handy and at the ready! I can`t remember the exact prices but it was RIDICULOUS how much the parts department wanted for these at the local Honda...It was something ridiculous like 10.00 for 3 ..Something like that..It was bizarre..There was no way I was paying that for 3 bolts and nuts! I saw on some snowblower forums that other Honda owners had found out the same as I did and what they said to do was to order the exact Honda Shear Pin Bolt from Honda Canada...The part number was there...So I ordered a bag of them and got the Teflon flange nut from another bolt supply place! IDENTICAL....I have over 30 of them now for CHEAP and in stock in my garage. Funny thing though is that I have never needed one BUT I have them!
I have real rough uneven concrete here on the sidewalk and knew from experience that the stock shoes on my Craftsman track drive blower would wear out in just a few passes...EXACT looking ones like my new Honda had so I knew I had to get heavy duty shoes...Once again the price of these shoes was beyond bizarre at the local Honda...I asked if I could buy one pair of heavy duty HONDA shoes they make...They had none in stock, so then I asked if I could buy some regular ones (stock like came with it) I figured them and the first original pair would last me until I got some heavy duty shoes later. So I asked for them..The guy says they are 33.00 I said fine no problem...then he says NO that`s 33.00 dollars a piece! 66.00 for a pair of skid shoes NO WAY I SAID... I left and went back home
Online I found a place that sold the heavy duty HONDA shoes for 20.00.. that`s a pair for 20.00 not one! I bought 5 pair and had them shipped up to me!
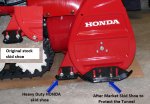
I was also concerned about the tunnel scraping or bumping on uneven sidewalk areas so I found a different place that makes BIG oversized shoes that PROTECT the tunnel from ever being bumped and when a bump comes up they just glide over perfectly! Here is a pic of them!
On a side note HONDA Canada says when you buy the heavy duty shoes you should DRILL into YOUR NEW MACHINE to mount them! No bloody way was I drilling into a machine I just paid 4 thousand dollars for! I made the adjustment on the heavy duty shoes and put them in the back position! `Drill into the machine...I think NOT!
GREASING:
I am hoping that somebody will be able to answer some of my Greasing questions so I do it right!
I will refer to this diagram then:

A: Don`t know what or where this is
B: How much grease do you pump in the TRANSMISSION...I have a Lincoln Digital grease gun and can tell by the tenth of an ounce how much is going in the zerk but don`t know how much goes in there...don`t want to overfill etc
C: To get at the chute drive gear do I take the Plastic 928 decal cover piece off...whish there was an exposed zerk for this.....
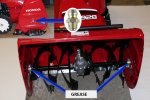
Finally on greasing I see the ends of the tines that do all the spinning have grease in there from the factory...BUT Honda has no zerk there...Wouldn`t it be easier to go to the side of the tunnel and give it a quick pump...the way it is now snow could be in there and you have to get down there and screw around trying to needle feed grease in there...Here`s a pic of what I mean...No zerk!
Lastly for anybody from HONDA who may chime in one thing that comes to mind is this. I want to operate it right so that I don`t break or wear anything out. The issue I am speaking about is going form forward to reverse...In the manual it says before reversing you should let go of the drive clutch then reverse direction and then put the drive clutch back in...So much jerking and jamming of the clutch in and out going back and forth...If you move the leaver slowly, not bang back and forth from forward to reverse it seems to change drive direction seamlessly and smoothly...So what is up with the manual saying to unclutch on the direction change...this is very cumbersome when working in tight spaces where direction change is needed often!
Well these are my Hondas and I just love them!
Just thought I`d share my experiences and see if anybody else has any advice or tips that could help me as well!
Thanks for taking the time to check them out or responding
Ron

I won't say much about the pressure washer other than it works GREAT...I didn't know much about them other than the electric one I was borrowing from my neighbor was a piece of junk...So I thought...who makes a good little motor?, Honda of course and then I thought Who makes a good VALVE BODY and then it came to me John Deere...they have been building them on their machinery for a lifetime so I just nailed it. You see how big the valve body is compared to the 5 Hp motor driving it...Now that works great! The only problem I have had was when I lent it out to people they kept on leaning over it to start it and BURNING their hands because Honda painted the whole motor black and the muffler is right up top (black too)! I painted the muffler with some Chevy block orange heat paint to fix that...This thing works awesome though!
Ok on to the mower and blower TOGETHER:
I bought the electric starting rigs that have their own battery BUT because MAINTENANCE and taking care of things is so important to me I just had to improve on my chances to keep the batteries in shape especially when one or the other is out of use by season...So I thought how the heck do I know the condition of the battery? There is no gage or indication on either
http://www.batterymart.com/p-bfg12v-battery-fuel-gauge.html"]http://www.batterymart.com/p-bfg12v-battery-fuel-gauge.html]Page Not Found: BatteryMart.com

So for the mower: I have to say I really like using it as it runs so smoothly. My neighbor has the Honda one with the "thumb control" up top for the drive speed and I like mine better that has the speed controlled by a sliding shift and if you want to go slower for a bit from your set point you can just feather back the drive push bar a bit so that is nice too then you don't have to reset the speed all the time just to slow down for a second!
The mulching works great and you can adjust that with the sliding shift knob behind the motor up top. The bag seems a bit bigger than my last Honda and all and all I really am impressed with the mower
For the snowblower I really like it too as well but it has been a journey trying to make it work for me and not get wrecked...Like I say I try very hard to take care of my things and it was a learning event to get it so I was confident that I would not let it get damaged in any way period. The rig cost 4 grand here in Canada so after spending that much you surely want it to last a lifetime that is for sure!
When I brought it home I unloaded it and sat it in my garage, got a Pepsi and sat beside it and read the manual. Then I noticed a puddle of OIL underneath it...I wiped as best I could underneath with a paper towel cutting up my hands even, but for the life of me it would NOT quit dripping! I eventually took it back to the dealership pretty dissapointed and I think they pressure washed it and it was NOT leaking but the tech had overfilled it and oil had ran underneath where there is no way to wipe...bringing up my first thing I don't like is the OIL adding / checking place is way down low and below...My old Honda mower and Craftsman machines had GREAT tubes up top where you can quickly check or add some oil EFFORTLESSLY...The new blower I have just isn't user friendly here and if HONDA ever made an extension tube kit to make this more user friendly I'd buy it in a second! Here is a pic of my old mower and Craftsman blower...To check or add oil on these machines was so easy...Right up top...No oil going on the floor or under the motor etc!

So trying to be prepared I noticed there were only 3 shear pins given with the unit and I recalled with my old Craftsman blower that I`d break them all the time...So I wanted to buy a bunch to put in my bolt bin to have handy and at the ready! I can`t remember the exact prices but it was RIDICULOUS how much the parts department wanted for these at the local Honda...It was something ridiculous like 10.00 for 3 ..Something like that..It was bizarre..There was no way I was paying that for 3 bolts and nuts! I saw on some snowblower forums that other Honda owners had found out the same as I did and what they said to do was to order the exact Honda Shear Pin Bolt from Honda Canada...The part number was there...So I ordered a bag of them and got the Teflon flange nut from another bolt supply place! IDENTICAL....I have over 30 of them now for CHEAP and in stock in my garage. Funny thing though is that I have never needed one BUT I have them!

I have real rough uneven concrete here on the sidewalk and knew from experience that the stock shoes on my Craftsman track drive blower would wear out in just a few passes...EXACT looking ones like my new Honda had so I knew I had to get heavy duty shoes...Once again the price of these shoes was beyond bizarre at the local Honda...I asked if I could buy one pair of heavy duty HONDA shoes they make...They had none in stock, so then I asked if I could buy some regular ones (stock like came with it) I figured them and the first original pair would last me until I got some heavy duty shoes later. So I asked for them..The guy says they are 33.00 I said fine no problem...then he says NO that`s 33.00 dollars a piece! 66.00 for a pair of skid shoes NO WAY I SAID... I left and went back home
Online I found a place that sold the heavy duty HONDA shoes for 20.00.. that`s a pair for 20.00 not one! I bought 5 pair and had them shipped up to me!
I was also concerned about the tunnel scraping or bumping on uneven sidewalk areas so I found a different place that makes BIG oversized shoes that PROTECT the tunnel from ever being bumped and when a bump comes up they just glide over perfectly! Here is a pic of them!
On a side note HONDA Canada says when you buy the heavy duty shoes you should DRILL into YOUR NEW MACHINE to mount them! No bloody way was I drilling into a machine I just paid 4 thousand dollars for! I made the adjustment on the heavy duty shoes and put them in the back position! `Drill into the machine...I think NOT!

GREASING:
I am hoping that somebody will be able to answer some of my Greasing questions so I do it right!
I will refer to this diagram then:

A: Don`t know what or where this is
B: How much grease do you pump in the TRANSMISSION...I have a Lincoln Digital grease gun and can tell by the tenth of an ounce how much is going in the zerk but don`t know how much goes in there...don`t want to overfill etc
C: To get at the chute drive gear do I take the Plastic 928 decal cover piece off...whish there was an exposed zerk for this.....
Finally on greasing I see the ends of the tines that do all the spinning have grease in there from the factory...BUT Honda has no zerk there...Wouldn`t it be easier to go to the side of the tunnel and give it a quick pump...the way it is now snow could be in there and you have to get down there and screw around trying to needle feed grease in there...Here`s a pic of what I mean...No zerk!

Lastly for anybody from HONDA who may chime in one thing that comes to mind is this. I want to operate it right so that I don`t break or wear anything out. The issue I am speaking about is going form forward to reverse...In the manual it says before reversing you should let go of the drive clutch then reverse direction and then put the drive clutch back in...So much jerking and jamming of the clutch in and out going back and forth...If you move the leaver slowly, not bang back and forth from forward to reverse it seems to change drive direction seamlessly and smoothly...So what is up with the manual saying to unclutch on the direction change...this is very cumbersome when working in tight spaces where direction change is needed often!
Well these are my Hondas and I just love them!
Just thought I`d share my experiences and see if anybody else has any advice or tips that could help me as well!
Thanks for taking the time to check them out or responding
Ron
