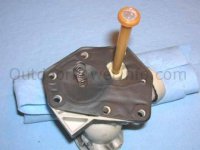
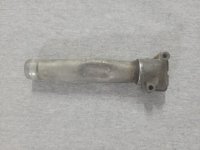
Mountfield Emblem carb diaphragm and intake tube/manifold

brianmk

Forum Newbie
My old 15" Mountfield Emblem has been difficult to start lately.
It has a Briggs & Stratton vacu-jet carb with a choke.
The carb fixes to the fuel tank with 5 fixing screws.

I decided to try changing the diaphragm. I had a spare diaphragm I bought via eBay in 2019. The box was stamped 390834.
When I came to fit it I found it to be a slightly different pattern to the original.
See first attached photo.
The photo shows the two gaskets overlayed on on top of the other (using Photoshop layers).
The 390834 replacement gasket appears to be too small along one side.
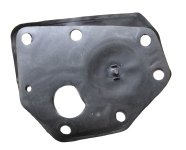
You can see the problem in the second photo (downloaded from https://outdoorpowerinfo.com/repairs/briggs_vacu-jet_vert_auto.asp)
The gasket does not fully cover the base of the carb and fuel leaks out.
Is it the wrong part? Are there two different patterns for the same carb? Did the design change at some point?
I ended up having to order another diaphragm part No. 299637. That matches the original.

Another potential problem is the intake tube / manifold between the carb and the engine.
The one I have is made from steel (not plastic) and comprises two parts: A metal tube that is a push fit into the fixing manifold.
The fixing manifold attaches to the engine with two screws.
This is shown in the third photo.
There is no seal or O ring between the tube and the manifold: When I removed the carb, I found the tube is free to be pulled out.
Is this normal? I would have thought it could give an air leak on the intake that could make the engine difficult to start.
I had no sealant to hand so ended up just pushing the tube back in and hoping for the best.

The mower started after several pulls on the cord but I am not yet sure if the problem has been solved.
 

Attachments
  • Gasket-1.jpg
    Gasket-1.jpg
    373.2 KB · Views: 5
  • _diaphragm.JPG
    _diaphragm.JPG
    21.7 KB · Views: 6
  • s-l960.jpg
    s-l960.jpg
    155.6 KB · Views: 6
Last edited:
I should have added that I had already checked that the choke butterfly was working as expected (i.e. closed on start up) before embarking on the diaphragm change. Although the diaphragm was old, there were no obvious holes or tears.
Once the engine had started it ran ok. It often took a dozen or so pulls on the cord to get it running.
Removing the air filter and squirting some fuel into the carb usually helped.
The fuel is fresh E5 to which I added stabiliser and Castrol lead replacement additive.
When I changed the diaphragm I also cleaned the filter at the bottom of the fuel pick up tube using carb cleaner.
I was able to blow through the tube so it's not blocked.
At the same time I cleaned the air filter even though it already looked clean.
I have also tried cleaning the spark plug and checked the gap. The plug didn't look oily.

Can anyone suggest a suitable gasket sealant I could try between the intake tube and fixing manifold?
 
Last edited:
I suggest that you start by reading the section on carburation, section 3 in the manual I attached. Look carefully at the part which talks about how to preload the diaphragm while assembling. Second, yyou should check the levelness of the tank where the carb is mounted. If it is warped the carb diaphragm and gasket may not seal properly. Start here and report back.

www.tuks.nl/WFCProject/img/Engine_Carburator/81644210-Briggs-Stratton-Service-Manual-L-Head.pdf

I was already aware that the diaphragm and spring shoul be preloaded using a 3/8" bolt or drill shaft to hold the choke butterfly open while tightening the carb fixing bolts. That information is provided on the card that comes with the replacement.

I assume you mean flatness rather than levelness. I had already checked the base of the carb and the top of the tank with a steel rule. It is unlikely that would be an issue because the original gasket did not leak fuel. The leak only happened with the gasket that did not fully cover the carb base (as shown in the photos). When I replaced it with the gasket that matched the original there were no fuel leaks.

I will read the service manual to see if there is anything else that could explain poor starting.
 
The service manual is one of the worst I have ever encountered!
Rather than have separate sections for each of the many variants, it jumps back and forth between variants in different paragraphs leaving the reader confused as to which paragraphs are relevant for a particular model.

The manual only describes how to take things apart and reassemble them. It gives little fault finding guidance.
There is no fault finding flow chart.

I could find no mention of the how the intake tube is supposed to seal to the manifold fixing.
 
Last edited:
I began to wonder if the starting problem might be connected with the ignition system rather than the fuel system.
Perhaps the spark is not strong enough to allow easy starting even though the engine runs ok onece it gets going.
So today I checked the coil, HT lead and spark plug resistance using a multimeter. All appeared ok.
I noticed a build up of detritis around the kill switch contacts next to the carb.
I wondered it that could partially short the kill switch and prevent starting - especially when damp.
I cleaned the dirt away from the contacts with a brush but have yet to find out if it has made a difference.

Has anyone tried removing the filler cap and blowing into the fuel tank to force some petrol up the fuel pick up tube into the carb before starting?
 
Last edited:
Today I tried to start the mower once again.
It still takes over a dozen pulls on the cord to get the damn thing to start.
Nothing I have tried has made any difference.
I have received no suggestions or advice from this forum.
I think it's time to give up and buy a new cordless electric mower.
 
Well we do need the engine numbers to even lookup the engine. But if this is a L-Head (side valve) engine it is the valve clearance are too tight and even to near zero. And you may have other problems too. Personally my crystal ball was in a shredder the other day and the USPS has lost the replacement.
 
There is still a fuel leak between the bottom of the carb and the fuel tank - even with the new diaphragm.
I decided to take it apart yet again and re-check the flatness.
As far as I can tell, the base of the carb appears to be flat.
However I think the top of the fuel tank where the carb fits may be out by up to 0.5mm.

Is there a way to flatten the top of the tank without taking it to an engineering company to get it milled?

I tried making a secondary gasket using thin gasket material (approx 1mm thick).
I cut a circular hole for the diaphragm and fitted the gasket to the top of the tank with the diaphragm on top.
It still leaked. I think the gasket material was either too thin or not soft enough.
I tried a different gasket material. Same problem.
Finally I tried some 1.5mm cork. That appears to have cured the leak - for now at least.
I have not yet tried starting the engine.
If it cures the starting problem then I will get some 1mm nitrile sheet for a more permanent fix.

While the carb was apart I re-checked that the 'check ball' in the fuel pick up tube was able to move freely.
 
Last edited:
The cork gasket has fixed the fuel leak from between the carb and tank but the poor starting problem remains.
After running out of ideas on the fuel system, I spent some more time checking the ignition.

I removed the spark plug, connected the plug body to the engine casing and turned the engine over a few times.
I saw a single initial spark but then nothing. Eventually I realised that the spark is not easily visible unless the plug is positioned somewhere dark.
I am unsure how strong the spark should appear but to me it looked quite weak.
The plug condition looked ok but I scraped away a small amount of surface carbon deposit and checked that the gap matched the figure in the service manual (30 thou').

I had already checked the magneto coils, HT lead and spark plug resistances using a multimeter. They all appear normal.
I found an online video that suggested that corrosion where the laminated coil armature mounts to the engine block can result in a weak spark.
The laminated armature is made from soft iron and the engine block is alloy. Dissimilar metals in direct contact often result in corrosion.
The resistance of the primary is low (between 0.5 and 1 Ohm) so just a small amount of additional resistance would have a significant effect on the primary current.
I removed the armature and cleaned any surface rust from the mounting points using emery paper.

It made no visible difference to the spark intensity. The engine still took 8 pulls on the cord before it started. As before, once the engine is running it seems fine.

Am I expecting too much? Is poor starting normal for a Briggs & Stratton engine with a vacu-jet carb that does not include a primer bulb?
 
Back
Top