You are using an out of date browser. It may not display this or other websites correctly.
You should upgrade or use an alternative browser.
You should upgrade or use an alternative browser.
Export thread
Kohler Courage 20 / SV600 Walbro 3 carburetor leaking from float valve
#1
S
shrout1
S
shrout1
Hey!
I bought a used 2014 Troy-Bilt mower a few months ago and it has been leaking gas from the carb. The carburetor says "Walbro 3" on the side. As I mentioned in the title it is running a Kohler Courage 20 engine and I believe the model is an SV600. The SV470-SV620 service manual matches what I see.
The gas leak is coming out of the jet (insofar as I can tell) and ultimately out of the air inlet by the choke plate which makes me think that 2 things are going on:
1) The fuel shut off solenoid doesn't work (maybe)
2) The float valve isn't seating properly and gas continues to flow into the bowl.
I have a small rebuild kit that has all the gaskets needed for the carb, to include a new float valve needle. The float valve needle currently in the carburetor looks brand new - the guy I bought it from claims to have serviced the carb before selling it. The odd thing is that there doesn't appear to be any kind of a rubber gasket at the bottom of the float valve needle seat... The kit I bought has a small gasket that seems slightly too large for insertion into the seat though the rubber end of the float needle appears to be just the right size for it.
Additionally, if I insert the float valve needle directly into the seat as-is (with no gasket installed) the back of the needle is perfectly flush with the back of the seat; everything seems to play nice together. Still... the darn thing is leaking so I'm kind of at a loss. I'm tempted to spend the $150 to buy a new OEM carb for it but I think I might be close to getting it fixed... any advice would be most appreciated.
Can provide photos if that would be helpful")
I bought a used 2014 Troy-Bilt mower a few months ago and it has been leaking gas from the carb. The carburetor says "Walbro 3" on the side. As I mentioned in the title it is running a Kohler Courage 20 engine and I believe the model is an SV600. The SV470-SV620 service manual matches what I see.
The gas leak is coming out of the jet (insofar as I can tell) and ultimately out of the air inlet by the choke plate which makes me think that 2 things are going on:
1) The fuel shut off solenoid doesn't work (maybe)
2) The float valve isn't seating properly and gas continues to flow into the bowl.
I have a small rebuild kit that has all the gaskets needed for the carb, to include a new float valve needle. The float valve needle currently in the carburetor looks brand new - the guy I bought it from claims to have serviced the carb before selling it. The odd thing is that there doesn't appear to be any kind of a rubber gasket at the bottom of the float valve needle seat... The kit I bought has a small gasket that seems slightly too large for insertion into the seat though the rubber end of the float needle appears to be just the right size for it.
Additionally, if I insert the float valve needle directly into the seat as-is (with no gasket installed) the back of the needle is perfectly flush with the back of the seat; everything seems to play nice together. Still... the darn thing is leaking so I'm kind of at a loss. I'm tempted to spend the $150 to buy a new OEM carb for it but I think I might be close to getting it fixed... any advice would be most appreciated.
Can provide photos if that would be helpful
#2

Scrubcadet10
Scrubcadet10
Looks can be deceiving with the float needle. There is no Rubber seat in these carbs, as you will see the needle tip is rubber. (Viton)
Post the Model and Spec number of the engine (SV600-_ _ _ _ ) So we can look up the correct parts/check if you have the correct parts.
Also be sure the hole where the needle seats/fuel inlet is, is clean.
Post the Model and Spec number of the engine (SV600-_ _ _ _ ) So we can look up the correct parts/check if you have the correct parts.
Also be sure the hole where the needle seats/fuel inlet is, is clean.
#3
S
shrout1
The engine appears to be spec number SV600-0224. The needle valve seat *appears* to be clean... hard to get a good picture. I have a replacement needle that I can try but the one that was in there didn't look too bad...
Here are some pictures of the spec, the sides of the carb (dismantled) and the engine sans shroud:
Engine info:

Carb (dismantled):


Side view of the engine (shroud and carb removed):

S
shrout1
Ok! You are 100% correct and thank you for the info so farLooks can be deceiving with the float needle. There is no Rubber seat in these carbs, as you will see the needle tip is rubber. (Viton)
Post the Model and Spec number of the engine (SV600-_ _ _ _ ) So we can look up the correct parts/check if you have the correct parts.
Also be sure the hole where the needle seats/fuel inlet is, is clean.
The engine appears to be spec number SV600-0224. The needle valve seat *appears* to be clean... hard to get a good picture. I have a replacement needle that I can try but the one that was in there didn't look too bad...
Here are some pictures of the spec, the sides of the carb (dismantled) and the engine sans shroud:
Engine info:
Carb (dismantled):
Side view of the engine (shroud and carb removed):
#4
S
shrout1
S
shrout1
Ok some more pictures. Here is the bottom of the carb:

Here is a tighter version of just the float valve needle seat:

Here is the float valve needle - the current one:

Is carb cleaner enough to clean this up? The needle doesn't seem like it wants to get stuck when I take it in or out of the seat.
Here is a tighter version of just the float valve needle seat:
Here is the float valve needle - the current one:
Is carb cleaner enough to clean this up? The needle doesn't seem like it wants to get stuck when I take it in or out of the seat.
#5
B
bertsmobile1
B
bertsmobile1
With the float assembled but bowl not turn the carb upside down
The weight of the float should be enough to prevent 7-10 psi of air
With the carb upside down & vertical the float should sit horizontal
If it touched the carb then the needle is too small , too damaged, the float is damaged or the seat is too high .
The carb solenoid does not shut off the fuel supply to the carb.
It plugs the end of the main jet feed so fuel can not enter the engine .
The seat needs to be cleaned
you can cut some scotchbrite , poke it down the hole& twist
Steel wool can be used the same way
I use an end mill or a pencil wire brush between my fingers
Then have a good look at the hole in the seat, some times a very careful twist from a drill bit will restore the edge good enough to make a seal.
The needle in your image is stuffed .
#6
S
shrout1
I believe that the float assembly is behaving the way you mentioned; with the carb upside down it rests horizontal to the ground. Also, I think I have some steel wool lying around, I'll have to try to clean up the seat a little tomorrow. I may have to jaunt out to the hardware store to buy some wire brushes if that doesn't do the job.
You mention the needle in the image being "stuffed"; this is the first time I have ever worked on a carburetor and I am not familiar with the term. I'm very interested to know what that means! Thanks again!
S
shrout1
Awesome ty for the pointers!With the float assembled but bowl not turn the carb upside down
The weight of the float should be enough to prevent 7-10 psi of air
With the carb upside down & vertical the float should sit horizontal
If it touched the carb then the needle is too small , too damaged, the float is damaged or the seat is too high .
The carb solenoid does not shut off the fuel supply to the carb.
It plugs the end of the main jet feed so fuel can not enter the engine .
The seat needs to be cleaned
you can cut some scotchbrite , poke it down the hole& twist
Steel wool can be used the same way
I use an end mill or a pencil wire brush between my fingers
Then have a good look at the hole in the seat, some times a very careful twist from a drill bit will restore the edge good enough to make a seal.
The needle in your image is stuffed .
I believe that the float assembly is behaving the way you mentioned; with the carb upside down it rests horizontal to the ground. Also, I think I have some steel wool lying around, I'll have to try to clean up the seat a little tomorrow. I may have to jaunt out to the hardware store to buy some wire brushes if that doesn't do the job.
You mention the needle in the image being "stuffed"; this is the first time I have ever worked on a carburetor and I am not familiar with the term. I'm very interested to know what that means! Thanks again!
#7
Scrubcadet10
Scrubcadet10
if you look close at the rubber tip, it appears scuffed, any imperfections can cause it to leak. Bert is from Down Under so either stuffed is the term down there or it was a mis-type. He may not have had his coffee yet.
#8

ILENGINE
ILENGINE
Stuffed either the correct terminology or slang for it is junk and needs to be replaced. And from the pictures the needle is toast and the seat needs a serious cleaning and probably the rest of the carb also.
#9

StarTech
StarTech
The inlet needle does appears to be ringed along being dirty.
The OP needs to replace the needle and seat on the carburetor. A known problem area with these Walbro carbs. Now the question is it gravity or pump fed? IPL appears to indicate gravity fed but just need to be sure as there are two different kits for these carbs.
Note: Most online IPLs will not list these needle/seat kits but they are available.
#11
S
shrout1
Now I just feel like an idiot for not realizing that But that makes sense looking at the needle a little more closely
S
shrout1
stuffed
A polite way to say bend over & spread em , totally beyond use , etc
Now I just feel like an idiot for not realizing that But that makes sense looking at the needle a little more closely
#12
S
shrout1
This makes sense! The carb is gravity fed from a tank that sits just a little higher than the engine behind the steering wheel. I have seen some videos of people using bolts to extract the seat - I haven't seen an example for this particular carb but I think the process makes sense....
Do you happen to know a part number or where I could pick up a new seat / needle combo? I will try to clean it first but replacement might be the better option.
S
shrout1
The inlet needle does appears to be ringed along being dirty.
The OP needs to replace the needle and seat on the carburetor. A known problem area with these Walbro carbs. Now the question is it gravity or pump fed? IPL appears to indicate gravity fed but just need to be sure as there are two different kits for these carbs.
Note: Most online IPLs will not list these needle/seat kits but they are available.
This makes sense! The carb is gravity fed from a tank that sits just a little higher than the engine behind the steering wheel. I have seen some videos of people using bolts to extract the seat - I haven't seen an example for this particular carb but I think the process makes sense....
Do you happen to know a part number or where I could pick up a new seat / needle combo? I will try to clean it first but replacement might be the better option.
#13
S
shrout1
I'll be learning my Aussie slang in no time. Communities like these are amazing; I've kept beaters on the road and fixed things I had no right fixing thanks to boards like this. Excited to pepper you guys with all my stupidest questions
S
shrout1
Also, that is awesome that there is a member here from the other side of the planetif you look close at the rubber tip, it appears scuffed, any imperfections can cause it to leak. Bert is from Down Under so either stuffed is the term down there or it was a mis-type. He may not have had his coffee yet.
I'll be learning my Aussie slang in no time. Communities like these are amazing; I've kept beaters on the road and fixed things I had no right fixing thanks to boards like this. Excited to pepper you guys with all my stupidest questions
#14
StarTech

Instructions for replacement.


StarTech
This makes sense! The carb is gravity fed from a tank that sits just a little higher than the engine behind the steering wheel. I have seen some videos of people using bolts to extract the seat - I haven't seen an example for this particular carb but I think the process makes sense....
Do you happen to know a part number or where I could pick up a new seat / needle combo? I will try to clean it first but replacement might be the better option.
Instructions for replacement.
#16
StarTech
StarTech
You actually use the installed bowl screw and lever the seat with the large pliers [longer the handles the better]. That is why they provide you the bowl screw.
I know not the best instructions provided but that is how it is done.
I know not the best instructions provided but that is how it is done.
#17
S
shrout1
Can't tell you how helpful that is - I spent hours trying to find part numbers and figure this out before coming here.
This carb has a fuel shutoff solenoid that holds the bowl to the carb body - is that typically done with the screw? The design is actually quite obnoxious as you can only attach the bowl and solenoid once the carb body is on the mounting studs. The solenoid sticks down far enough that it interferes with the frame of the mower when you try to take the carb on/off. So... I get to put the bowl and solenoid on in place every time.
Edit: And regarding pliers - I have some 10" linesman pliers that I use for electrical around the house so... that should get the job done
S
shrout1
Hey thanks a million for linking thatYou actually use the installed bowl screw and lever the seat with the large pliers [longer the handles the better]. That is why they provide you the bowl screw.
I know not the best instructions provided but that is how it is done.
Can't tell you how helpful that is - I spent hours trying to find part numbers and figure this out before coming here.This carb has a fuel shutoff solenoid that holds the bowl to the carb body - is that typically done with the screw? The design is actually quite obnoxious as you can only attach the bowl and solenoid once the carb body is on the mounting studs. The solenoid sticks down far enough that it interferes with the frame of the mower when you try to take the carb on/off. So... I get to put the bowl and solenoid on in place every time.
Edit: And regarding pliers - I have some 10" linesman pliers that I use for electrical around the house so... that should get the job done
#18
ILENGINE
ILENGINE
I have done it like that a few times myself. Also I have used the two mounting nuts, jam them together on the left stud and then unscrew the left stud to be able to rotate the carb. the right stud is square headed to the back of the plastic carb mounting isolator. And is held on by the screw that connects the ground wire for the solenoid Don't like that one as much due to possibly tearing the gasket behind it when you rotate the isolatorHey thanks a million for linking that
This carb has a fuel shutoff solenoid that holds the bowl to the carb body - is that typically done with the screw? The design is actually quite obnoxious as you can only attach the bowl and solenoid once the carb body is on the mounting studs. The solenoid sticks down far enough that it interferes with the frame of the mower when you try to take the carb on/off. So... I get to put the bowl and solenoid on in place every time.
Edit: And regarding pliers - I have some 10" linesman pliers that I use for electrical around the house so... that should get the job done
#19
Scrubcadet10
Scrubcadet10
Yep, i don't care for that mounting design very much, guess it cost too much to drill and tap an extra hole for a studI have done it like that a few times myself. Also I have used the two mounting nuts, jam them together on the left stud and then unscrew the left stud to be able to rotate the carb. the right stud is square headed to the back of the plastic carb mounting isolator. And is held on by the screw that connects the ground wire for the solenoid Don't like that one as much due to possibly tearing the gasket behind it when you rotate the isolator
#20
S
shrout1
Any good suggestions for that? It's a silly little part but I really don't want to set the mower on fire either
S
shrout1
I was extremely surprised to discover it was done this way. Rotating the carb does make sense, but it probably isn't worth the risk. Oh, also my grounding wire totally broke at the screw in the carb so I need to get a new end for itYep, i don't care for that mounting design very much, guess it cost too much to drill and tap an extra hole for a stud
Any good suggestions for that? It's a silly little part but I really don't want to set the mower on fire either
#21
Scrubcadet10
Scrubcadet10
if i remember right, a 22-18 gauge crimp on ring terminal will work, i don't recall the size of the hole for the screw though, any good hardware store, (TruValue, Ace, Lowe's etc) will have what you need.

#22
StarTech
StarTech
The flange head screw is a M6x1.0x20 so the hole in the terminal needs to at least that.
#23
S
shrout1
S
shrout1
Awesome thank you both I might stop over at Ace tonight. Life's killin me with these gas prices though lol
This (from here):

Looks an awful lot like this (the broken end of my grounding wire):

The JST site says that it is "JST, R Uninsulated Ring Terminal, 4mm Stud Size, 0.25mm² to 1.65mm² Wire Size"
Here is a screenshot of the spec sheet:

Now to match that to something on Ace hardware...
I might stop over at Ace tonight. Life's killin me with these gas prices though lolThis (from here):
Looks an awful lot like this (the broken end of my grounding wire):
The JST site says that it is "JST, R Uninsulated Ring Terminal, 4mm Stud Size, 0.25mm² to 1.65mm² Wire Size"
Here is a screenshot of the spec sheet:
Now to match that to something on Ace hardware...
#24
S
shrout1
S
shrout1
Man the Ace around the corner doesn't seem to have what I need in stock 30 minutes to the next closest hardware store.
Looks like the 4mm ring terminal takes a number 8 stud (this is the side on the carb, not the frame) - Ace has it but not in stock Supposed to snow tomorrow or something crazy too lol
I lied I think they have them. Maybe the internet lied to me. Off to the hardware store!
30 minutes to the next closest hardware store.Looks like the 4mm ring terminal takes a number 8 stud (this is the side on the carb, not the frame) - Ace has it but not in stock
Supposed to snow tomorrow or something crazy too lolI lied I think they have them. Maybe the internet lied to me. Off to the hardware store!
#25
S
shrout1
S
shrout1
So... can I use brass polish and a Q Tip to try and clean this up? The seat is so stinkin small and it's very difficult to get anything down in there... I might try putting it together as is; used some carb cleaner and scotchbrite but it doesn't seem like it made much of a difference. I will use the new needle.
I ordered the full rebuild kit (thanks for the part number!) but I am hopeful that I can fix this without replacing the seat. I'll keep the kit as a spare if I can get this running as-is
I ordered the full rebuild kit (thanks for the part number!) but I am hopeful that I can fix this without replacing the seat. I'll keep the kit as a spare if I can get this running as-is
#26

VRR.DYNDNS>BIZ
VRR.DYNDNS>BIZ
If it leaks when sitting and key off, the fuel solenoid only prevents the fuel from getting to fuel passages. Thus the float if can be gravity fed, can leak by and overflow. The carb has an atmospheric vent for the bowl, so the fuel overcomes the float and either comes out the vent or if the top bowl gasket is no good, it will leak there. The fuel solenoids are known to cause no start or lack of fuel issues intermittently when sticky.Looks can be deceiving with the float needle. There is no Rubber seat in these carbs, as you will see the needle tip is rubber. (Viton)
Post the Model and Spec number of the engine (SV600-_ _ _ _ ) So we can look up the correct parts/check if you have the correct parts.
Also be sure the hole where the needle seats/fuel inlet is, is clean.
#27
T
TwinL
T
TwinL
Ok some more pictures. Here is the bottom of the carb:
View attachment 59707
Here is a tighter version of just the float valve needle seat:
View attachment 59708
Here is the float valve needle - the current one:
View attachment 59709
Is carb cleaner enough to clean this up? The needle doesn't seem like it wants to get stuck when I take it in or out of the seat.
#28
T
TwinL
T
TwinL
TOk some more pictures. Here is the bottom of the carb:
View attachment 59707
Here is a tighter version of just the float valve needle seat:
View attachment 59708
Here is the float valve needle - the current one:
View attachment 59709
Is carb cleaner enough to clean this up? The needle doesn't seem like it wants to get stuck when I take it in or out of the seat.
#29
S
shrout1
The fuel is leaking out of the side of the carb at the air inlet, so... does that seem like a bad seal at the float valve needle allowing fuel to seep into the bowl and slowly leak out of the carb? If the fuel solenoid were working then would it prevent fuel from coming out of the jet? I am going to try and reassemble it today and see if my work so far has made any difference. It's a fair amount of effort just to see but... I don't have any other means of testing at the moment. Perhaps I can try to get a pressure tester from an auto parts store near by.
S
shrout1
Hey thanks! I replaced the bowl gasket prior to getting on these forums - that seems like it is holding okIf it leaks when sitting and key off, the fuel solenoid only prevents the fuel from getting to fuel passages. Thus the float if can be gravity fed, can leak by and overflow. The carb has an atmospheric vent for the bowl, so the fuel overcomes the float and either comes out the vent or if the top bowl gasket is no good, it will leak there. The fuel solenoids are known to cause no start or lack of fuel issues intermittently when sticky.
The fuel is leaking out of the side of the carb at the air inlet, so... does that seem like a bad seal at the float valve needle allowing fuel to seep into the bowl and slowly leak out of the carb? If the fuel solenoid were working then would it prevent fuel from coming out of the jet? I am going to try and reassemble it today and see if my work so far has made any difference. It's a fair amount of effort just to see but... I don't have any other means of testing at the moment. Perhaps I can try to get a pressure tester from an auto parts store near by.
#30
StarTech
StarTech
No the fuel solenoid does not prevent this, it blocks the main nozzle so the engine straves to death for fuel. This help prevent the boom that happens when raw fuel hits the hot exhaust muffler during engine shut down.
All I can say is that the needle and seat has been a known with Walbro carburetors since 2009. This why Kohler came out the replacement kit.
It appears that you are trying to do anything to keep from installing the needle/seat kit. It have become a waste of my time to try to explain this to you.
All I can say is that the needle and seat has been a known with Walbro carburetors since 2009. This why Kohler came out the replacement kit.
It appears that you are trying to do anything to keep from installing the needle/seat kit. It have become a waste of my time to try to explain this to you.
#31
J
Joed756
J
Joed756
A shut-off valve as close to the carb as possible will also make this problem go away, but clean that carb first and keep the steel wool away from it.
#32
StarTech
StarTech
Not necessarily as it can to a point that cause flooding at off load engine speeds. Besides shut-off valve is only a band aid approach to the problem. They are find for problem of seepage overnight and transportation induced porblems. I have seen needle seats to etched and even brand new needle valves will still leak. Now if you have a six point countersink bit of the right and angle the seat can be cleaned but if it leaking around the outside sealing surface nothing will be a permanent fix except replacement.A shut-off valve as close to the carb as possible will also make this problem go away, but clean that carb first and keep the steel wool away from it.
#33
G
Gord Baker
G
Gord Baker
Get some carb cleaner and carefully wipe off the Viton tip of the needle.
It does not require a Viton 'seat'. Clean the bore where the needle goes.
Looks like Ethanol contamination to me. Set float as described above. When you turn the key Off/On there should be an audible 'click'. Hold your hand on the shut off solenoid and you should be able to feel it working.
It does not require a Viton 'seat'. Clean the bore where the needle goes.
Looks like Ethanol contamination to me. Set float as described above. When you turn the key Off/On there should be an audible 'click'. Hold your hand on the shut off solenoid and you should be able to feel it working.
#34
R
Rivets
R
Rivets
I’ve found that extra fine lapping compound and Q-tip works to clean up seats. I don’t know why brass compound would not work. If you try it make sure you clean the carb at least twice or you may end up with compound in the cylinder. I’ve also found that if you invert the carb, with float and needle install, and blow very hard with your mouth, you will blow you cheeks out before the float moves and opens the seat. Old fart job site trick.
#35
StarTech
StarTech
Yet this will not find low leakage rates which why I invert and use 5-10 Psi (usually close to pop off pressure the better) by applying using a pressure pump and checking after 30 minutes of standing pressure to see if any leakage is detectable. A positive seal will not leak any. Rivets only massive leakage can be found using your method Rivets. I have even submerge carburetor to check for leakage.
Using fine valve grounding compound only works to clean up a dirty seat but not a badly pitted or etched one. That require countersinking (must use the correct countersink bit) or repacement if it is the seat to seat contact area that is leaking but the seat is leaking around the contact area between the seat the carburetor then a new seat need to be installed.
Using fine valve grounding compound only works to clean up a dirty seat but not a badly pitted or etched one. That require countersinking (must use the correct countersink bit) or repacement if it is the seat to seat contact area that is leaking but the seat is leaking around the contact area between the seat the carburetor then a new seat need to be installed.
#36
R
Rivets
R
Rivets
Maybe you can’t get these methods to work for you, but they have worked for me when I’ve had to resort to them in the field or to salvage a NLA carb. Maybe I’m the luckiest old fart tech around. Yes, I have lapping compound and Q-tips in my travel tool box.
#37
StarTech
Now of course I work with the cubes and the larger carburetors.
StarTech
Or maybe you got heck set of lungs. I don't as Pneumonia took a lot that away. which why Covid would probably take me of this old mean world. It is like some people can smell gas in oil but I have never been able to do that either. I cant where carburetor with 8 psi of pressure is leaking down pass 7 psi without a gauge.Maybe you can’t get these methods to work for you, but they have worked for me when I’ve had to resort to them in the field or to salvage a NLA carb. Maybe I’m the luckiest old fart tech around. Yes, I have lapping compound and Q-tips in my travel tool box.
Now of course I work with the cubes and the larger carburetors.
#38
V
Vic bellan
V
Vic bellan
your seat on the carb needs serious cleaning, and with a new needle should stop the gas flow when required!
#39
S
shrout1
S
shrout1
You guys are all amazing! I don't think I can respond to everyone all at once Thank you for all the pointers. I bought some Permatex valve grinding compound and cleaned the seat; that q-tip baaaarely fit in there. I'm using the replacement needle as well.
So here are the results (so far anyway):

That's a bit fuzzy but you can actually see the shine off the brass in the valve seat now. I also used a dental pick to clean out the area around the opening and then hit everything with carb cleaner *a bunch* to try and make sure that none of the compound is still in there. It looked clean when I was done.
Here is the re-terminated end of the grounding wire attached to the carb body:

I mashed down on that ring terminal with my lineman's pliers and it crimped on there quite firmly. Looks a bit festive.
Also, here is the assembled float from the side; you can see that it is pretty much horizontal. It's a plastic piece and it seems like it's in decent shape so I don't think it's a part of the problem. We'll see

The float has the new needle attached to it, so hopefully that will help as well.
Then I mounted the whole thing back on the mower and secured it on the studs with the nuts that actually hold the back plate for the filter box. Reconnected fuel line as well.

The picture is actually cropped out, so it's a bit fuzzy. I put a little gas in it and left the garage about 15 minutes afterwards. I'll go check it again to see if it's sealed up! I hope so...
Fingers crossed! If that worked then I have to double check the throttle positions. I totally dorked around with the governor before I knew what I was doing (the throttle plate won't close at low throttle position because... governor duh...) I followed the advice in the service manual for resetting the governor but I may have to get that dialed in. I have an induction tachometer I can use to test the engine speed if things aren't working quite right. Just want to avoid an overspeed...
Anyway, more to come! Thanks again all
Thank you for all the pointers. I bought some Permatex valve grinding compound and cleaned the seat; that q-tip baaaarely fit in there. I'm using the replacement needle as well.So here are the results (so far anyway):
That's a bit fuzzy but you can actually see the shine off the brass in the valve seat now. I also used a dental pick to clean out the area around the opening and then hit everything with carb cleaner *a bunch* to try and make sure that none of the compound is still in there. It looked clean when I was done.
Here is the re-terminated end of the grounding wire attached to the carb body:
I mashed down on that ring terminal with my lineman's pliers and it crimped on there quite firmly. Looks a bit festive.
Also, here is the assembled float from the side; you can see that it is pretty much horizontal. It's a plastic piece and it seems like it's in decent shape so I don't think it's a part of the problem. We'll see
The float has the new needle attached to it, so hopefully that will help as well.
Then I mounted the whole thing back on the mower and secured it on the studs with the nuts that actually hold the back plate for the filter box. Reconnected fuel line as well.
The picture is actually cropped out, so it's a bit fuzzy. I put a little gas in it and left the garage about 15 minutes afterwards. I'll go check it again to see if it's sealed up! I hope so...
Fingers crossed! If that worked then I have to double check the throttle positions. I totally dorked around with the governor before I knew what I was doing (the throttle plate won't close at low throttle position because... governor duh...) I followed the advice in the service manual for resetting the governor but I may have to get that dialed in. I have an induction tachometer I can use to test the engine speed if things aren't working quite right. Just want to avoid an overspeed...
Anyway, more to come! Thanks again all
#40
S
shrout1
S
shrout1
Good news so far! No leaks from the carb last night despite gas being in the mower. I cycled the fuel solenoid a couple times this morning and heard it click every time the ignition was put into "accessory" mode (or whatever the term for that is on a mower). No fuel leaking yet! I am going to let it sit a little longer and then try to fire up the mower this afternoon. I have some starting fluid so hopefully it will fire up and then run on its own for a little while
#41
S
shrout1
S
shrout1
Ok! So it started and it runs but I have to keep it on full throttle plus about 50% choke. The choke plate looks like it's about 80% closed when it's running successfully (I've been monkeying with everything so this is probably my fault lol). I put fresh ethanol free gas in it and opened the fuel adjustment valve all the way up. If I take the choke off it starts surging and eventually cuts off.
I mentioned that I messed with the governor a little (my mistake) and I'm wondering if I turned it down too low. The dead man switch on the mower seat prevents me from looking down the carb barrel to see if the throttle plate is open all the way when it's running. Forward progress though! And it least it hasn't leaked yet.
I mentioned that I messed with the governor a little (my mistake) and I'm wondering if I turned it down too low. The dead man switch on the mower seat prevents me from looking down the carb barrel to see if the throttle plate is open all the way when it's running. Forward progress though! And it least it hasn't leaked yet.
#42
Scrubcadet10
Scrubcadet10
you should be to keep it running by setting the park brake. Blades disengaged.
#43
S
shrout1
I have only tried to fire it up a few times so far
S
shrout1
Awesome I will give that a tryyou should be to keep it running by setting the park brake. Blades disengaged.
I have only tried to fire it up a few times so far
#44
S
shrout1
S
shrout1
Ok! Back with more because it's Friday...
As mentioned previously, I've gotten the thing to start but it runs pretty rough and needs the choke closed to keep running. If it only runs at half choke then does that mean my fuel mixture is lean? Not enough gas too much air? I dialed the governor back to factory so that may have something to do with it... Here is some more info...
Here is the position of the choke where I can get the mower to stay running:

Here is the tachometer that I installed... not 100% certain that it's working correctly:

That wire coil does seem to loop back over itself once... I don't want to hit the exhaust manifold or the flywheel
And here is a video of me starting the mower - I was surprised that it actually started. Also, I thought the tach had read 1500 rpm when the starter was going when in reality it was 1200 rpm.
That was a bumpier ride than I was expecting. I'm not sure that I believe the 4-5k RPM reading from the tach. I followed the instructions that came with it and set it for a 4 stroke, 1 cylinder engine. If the RPM reading during ignition makes sense then the tach might be right... dunno.
Another note worth mentioning is that the dead man switch on the seat kills the engine even without the blades engaged. So there is no easy way to stand up; I probably need to jumper something together under the chair.
As mentioned previously, I've gotten the thing to start but it runs pretty rough and needs the choke closed to keep running. If it only runs at half choke then does that mean my fuel mixture is lean? Not enough gas too much air? I dialed the governor back to factory so that may have something to do with it... Here is some more info...
Here is the position of the choke where I can get the mower to stay running:
Here is the tachometer that I installed... not 100% certain that it's working correctly:
That wire coil does seem to loop back over itself once... I don't want to hit the exhaust manifold or the flywheel
And here is a video of me starting the mower - I was surprised that it actually started. Also, I thought the tach had read 1500 rpm when the starter was going when in reality it was 1200 rpm.
That was a bumpier ride than I was expecting. I'm not sure that I believe the 4-5k RPM reading from the tach. I followed the instructions that came with it and set it for a 4 stroke, 1 cylinder engine. If the RPM reading during ignition makes sense then the tach might be right... dunno.
Another note worth mentioning is that the dead man switch on the seat kills the engine even without the blades engaged. So there is no easy way to stand up; I probably need to jumper something together under the chair.
#45
B
bertsmobile1
B
bertsmobile1
Yes you are lean
Not enough fuel or air entering after carb
Those induction tachs should only have the pick up wound in one direction , not run back across themselves or tied in a knot
Not enough fuel or air entering after carb
Those induction tachs should only have the pick up wound in one direction , not run back across themselves or tied in a knot
#46
S
shrout1
S
shrout1
I saw a video with a fix for this particular carb that involved removing the limiter from the fuel adjustment knob and turning it up even further than normally allowed. Is there a reason that it would be running outside of spec when it fired up and ran just a couple months ago? It definitely seems lean to me but could the governor be involved? Not being able to look down the carb while it's running does make this a little frustrating. Perhaps I can fix that tomorrow.Yes you are lean
Not enough fuel or air entering after carb
Those induction tachs should only have the pick up wound in one direction , not run back across themselves or tied in a knot
#47
H
hlw49
H
hlw49
Hey!
I bought a used 2014 Troy-Bilt mower a few months ago and it has been leaking gas from the carb. The carburetor says "Walbro 3" on the side. As I mentioned in the title it is running a Kohler Courage 20 engine and I believe the model is an SV600. The SV470-SV620 service manual matches what I see.
The gas leak is coming out of the jet (insofar as I can tell) and ultimately out of the air inlet by the choke plate which makes me think that 2 things are going on:
1) The fuel shut off solenoid doesn't work (maybe)
2) The float valve isn't seating properly and gas continues to flow into the bowl.
I have a small rebuild kit that has all the gaskets needed for the carb, to include a new float valve needle. The float valve needle currently in the carburetor looks brand new - the guy I bought it from claims to have serviced the carb before selling it. The odd thing is that there doesn't appear to be any kind of a rubber gasket at the bottom of the float valve needle seat... The kit I bought has a small gasket that seems slightly too large for insertion into the seat though the rubber end of the float needle appears to be just the right size for it.
Additionally, if I insert the float valve needle directly into the seat as-is (with no gasket installed) the back of the needle is perfectly flush with the back of the seat; everything seems to play nice together. Still... the darn thing is leaking so I'm kind of at a loss. I'm tempted to spend the $150 to buy a new OEM carb for it but I think I might be close to getting it fixed... any advice would be most appreciated.
Can provide photos if that would be helpful
20-521-01-S is the part no. for the inlet needle and seat along with the instructions to install it. The original seat was brass and would pit over time with the alcohol in the fuel. The new seat is zinc and won't pit due to alcohol. Is $32.00 and change on Amazon.
#48
S
shrout1
S
shrout1
Hey thanks! I have solved that particular issue and now seem to have a fuel mixture problem. I really appreciate you pointing out that part number though! Thank you!20-521-01-S is the part no. for the inlet needle and seat along with the instructions to install it. The original seat was brass and would pit over time with the alcohol in the fuel. The new seat is zinc and won't pit due to alcohol. Is $32.00 and change on Amazon.
#49
S
shrout1
S
shrout1
Ok another update. I was able to turn the "low idle fuel adjusting needle and spring" a bit past where the limiter wanted to stop. Not all that hard to do. The mixture definitely got a little more rich. I also adjusted the governor to try and speed up the engine a little because it was keeping the throttle plate nearly all the way closed. It *reaaaaaally* revved up after I did that so I turned it off immediately and tweaked it back down a bit. Seems like I found a happy medium. I need to turn down the low idle speed adjuster a little as I think it's a bit fast when the throttle is all the way down. Here is a video of the latest run. I think the RPM values on that tach should probably be cut in half for it to make sense (I rewired the tach too):
Now, the engine seems to be leaking through a gasket and burning oil - here is that mess: (Edit: This is the valve cover gasket. Taryl Fixes All has a video on replacing it that I might get around to doing... maybe at the end of the season...)
So long as I check the oil levels, does this pose any fire risk? The grass is already starting to grow here in beautiful Alabama and I don't want to risk offlining this mower before I even get started for the season...
Here are some more photos.
I re-wired the tach and zip tied the loop in place. I still think the readings are off...

I bypassed the dead man switch by zip tying a piece of plastic in the contact by the left chair rail. When the driver sits up the spring pulls back on the contact bar, closing the circuit and shutting off the mower ignition. This allowed me to get up and mess around while it's still running. Don't put your fingers in the flywheel

Now, the engine seems to be leaking through a gasket and burning oil - here is that mess: (Edit: This is the valve cover gasket. Taryl Fixes All has a video on replacing it that I might get around to doing... maybe at the end of the season...)
So long as I check the oil levels, does this pose any fire risk? The grass is already starting to grow here in beautiful Alabama and I don't want to risk offlining this mower before I even get started for the season...
Here are some more photos.
I re-wired the tach and zip tied the loop in place. I still think the readings are off...
I bypassed the dead man switch by zip tying a piece of plastic in the contact by the left chair rail. When the driver sits up the spring pulls back on the contact bar, closing the circuit and shutting off the mower ignition. This allowed me to get up and mess around while it's still running. Don't put your fingers in the flywheel
#50
B
bertsmobile1
B
bertsmobile1
The problem with that gasket is people do it up WAY WAY WAY WAY WAY WAY WAY WAY WAY too tight
This chops up the cork and compresses it so far that it can not do it's job properly
The bolts get done up FINGER tight + 1/4 turn
Before you start use a big flat punch and flatten the region around the hole
Without fail every Courage single I have worked on had deformations around the holes from being done up too tight
Do them up by hand, not is any type of rattle gun / power driver
Start from the bottom then step up left - right and do the same for the bolts inside the V
The idea is you spread the gasket towards the end bolts .
I ride 100 year old bikes
Around 1930 the primary chains got oil tin baths sealed with large cork gaskets
It is no problem to make the joint oil tight .
#51
Scrubcadet10
i use stubby nut drivers so i don't over do it.
Scrubcadet10
WAY WAY WAY WAY. can't say it enough...The problem with that gasket is people do it up WAY WAY WAY WAY WAY WAY WAY WAY WAY too tight
i use stubby nut drivers so i don't over do it.
#52
StarTech

I use the following when applying RTV, Install screws finger tight for 12 hrs and then torque to spec.
StarTech
I use the following when applying RTV, Install screws finger tight for 12 hrs and then torque to spec.
#53
B
bertsmobile1
B
bertsmobile1
Interesting
The only gasket we seem to get here is the cork one
I usually go 2-5-4-1-7-3-6
But that is only after flattening the cover
Nearly every one I have come across the holes are dimpled in from being over tightened .
Possibly the original design was to be pressed from thicker steel
The only gasket we seem to get here is the cork one
I usually go 2-5-4-1-7-3-6
But that is only after flattening the cover
Nearly every one I have come across the holes are dimpled in from being over tightened .
Possibly the original design was to be pressed from thicker steel
#54
S
shrout1
Also tried adjusting the low speed idle screw but the thing doesn't seem to want to idle under 3k rpms... Not sure...
S
shrout1
Mine also appears to be overtightened. The rim of the valve cover actually looks bent to me... I have some sealant and a new cork gasket on the way.Interesting
The only gasket we seem to get here is the cork one
I usually go 2-5-4-1-7-3-6
But that is only after flattening the cover
Nearly every one I have come across the holes are dimpled in from being over tightened .
Possibly the original design was to be pressed from thicker steel
Also tried adjusting the low speed idle screw but the thing doesn't seem to want to idle under 3k rpms... Not sure...
#55
S
shrout1
S
shrout1
And some more pics / video because I want you all to hear and see what this is doing.
I got it fired up and running again, but this time I changed the setting on the tach. Sure enough, at half the measured RPMs from before this thing makes a little more sense:
It seems like it doesn't want to idle correctly. It won't go below about 2.7k rpms, even at low throttle. The thing is still running a little choppy too. It seems like I can smooth it out by turning the low idle fuel adjusting needle to a really rich position; not sure if that is working as intended. That was the fix from another video I saw. It also gets a little smoother as the engine warms up.
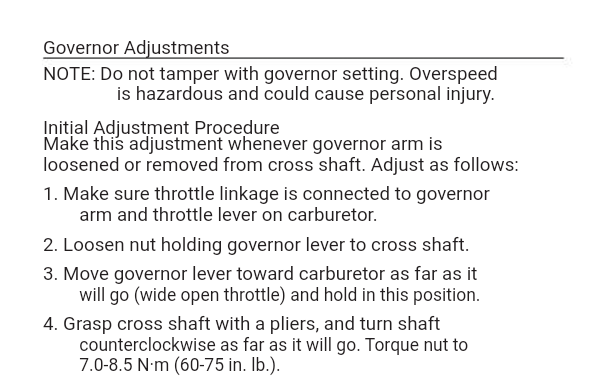
So... here is a blown out diagram of the carb from the service manual:

I have tried backing out the low idle speed adjusting screw and spring with the mower running and no matter how far I back the screw out, it doesn't seem to make a difference in the low-throttle idle speed. In contrast, if I tighten idle speed adjusting screw then I can get the engine to run faster at low throttle. This is in accordance with the idle speed adjustment instructions from the service manual:

So is the main jet messed up or what's the deal? This is the first carb I've ever worked on so I don't have a lot of perspective. It seems like this thing can only be adjusted for low throttle idle and I have that turned up so high that the mower is just running on "low idle" all the time. Does that seem at all likely?
I got it fired up and running again, but this time I changed the setting on the tach. Sure enough, at half the measured RPMs from before this thing makes a little more sense:
It seems like it doesn't want to idle correctly. It won't go below about 2.7k rpms, even at low throttle. The thing is still running a little choppy too. It seems like I can smooth it out by turning the low idle fuel adjusting needle to a really rich position; not sure if that is working as intended. That was the fix from another video I saw. It also gets a little smoother as the engine warms up.
So... here is a blown out diagram of the carb from the service manual:
I have tried backing out the low idle speed adjusting screw and spring with the mower running and no matter how far I back the screw out, it doesn't seem to make a difference in the low-throttle idle speed. In contrast, if I tighten idle speed adjusting screw then I can get the engine to run faster at low throttle. This is in accordance with the idle speed adjustment instructions from the service manual:
So is the main jet messed up or what's the deal? This is the first carb I've ever worked on so I don't have a lot of perspective. It seems like this thing can only be adjusted for low throttle idle and I have that turned up so high that the mower is just running on "low idle" all the time. Does that seem at all likely?
#56
S
shrout1
S
shrout1
Ok still working on this... Got some Berryman chem-dip and the carb just went in for a bath. Current problem: Valve cover.
This dumb mower has an extra bracket installed that is pinning the valve cover in place... Here it is from the front:

And here it is from the back:

I am tempted to think that I have to remove the muffler before I will be able to get the valve cover off. I don't think I own a set of torx (or whatever those particular screws are called) wrenches large enough to remove the connection. Additionally, I will have to get a replacement gasket... Annoying. I may have to use the old push mower this go round... Ugh. I'm not sure I even understand why this additional bracing was put in place... perhaps other mowers support the muffler from below...
This mower is a "2014 Troy-Bilt Bronco" and the frame design is a real pain in the rear. This thing reminds me of working on my old 1999 Maxima... nothing in the engine bay *really* made sense. We'll get this thing fixed eventually...
Also, any pointers on removing RTV cleanly from aluminum? It looks like someone else performed a very similar fix to myself some time ago and I am going to have to redo it...
This dumb mower has an extra bracket installed that is pinning the valve cover in place... Here it is from the front:
And here it is from the back:
I am tempted to think that I have to remove the muffler before I will be able to get the valve cover off. I don't think I own a set of torx (or whatever those particular screws are called) wrenches large enough to remove the connection. Additionally, I will have to get a replacement gasket... Annoying. I may have to use the old push mower this go round... Ugh. I'm not sure I even understand why this additional bracing was put in place... perhaps other mowers support the muffler from below...
This mower is a "2014 Troy-Bilt Bronco" and the frame design is a real pain in the rear. This thing reminds me of working on my old 1999 Maxima... nothing in the engine bay *really* made sense. We'll get this thing fixed eventually...
Also, any pointers on removing RTV cleanly from aluminum? It looks like someone else performed a very similar fix to myself some time ago and I am going to have to redo it...
#57
Scrubcadet10
Scrubcadet10
Rubbing alcohol works good at removing RTV.
I believe those screws are T50 torx bit
MTD 710-1314A
I believe those screws are T50 torx bit
MTD 710-1314A
#58
S
shrout1
Super close on the torx; they were T-45! I had some large allen wrenches that happened to have a T-45 in them... I hated having to loosen the muffler, but it will mow the lawn with a loud exhaust just as well as with a quiet one. A new gasket has been ordered but I'm hopeful that I'll be cutting the lawn on Monday before I could even install it.
I'm curious - the motor was manufactured in 2010 but the seller told me that the tractor is a 2014. Does that make any sense? I would think the tractor would be a 2010... it's possible that whoever makes Troy Bilt was just using up old engines. Either way, it should run well by the time I'm done so age isn't an issue.
I got the valve cover off and also chem-dipped the carburetor. The main and idle jets all allowed carb cleaner through when I blew them out. Hopefully 4-1/2 hours in the bath was enough. Also took about 2 hours to painstakingly remove the old RTV that someone had used on the valve cover in a previous attempt to fix it. I have a can of "The Right Stuff" and a new cork gasket so I'll be trying that trick tomorrow. Fingers crossed!
S
shrout1
Thanks!Rubbing alcohol works good at removing RTV.
I believe those screws are T50 torx bit
MTD 710-1314A
Super close on the torx; they were T-45! I had some large allen wrenches that happened to have a T-45 in them... I hated having to loosen the muffler, but it will mow the lawn with a loud exhaust just as well as with a quiet one. A new gasket has been ordered but I'm hopeful that I'll be cutting the lawn on Monday before I could even install it.
I'm curious - the motor was manufactured in 2010 but the seller told me that the tractor is a 2014. Does that make any sense? I would think the tractor would be a 2010... it's possible that whoever makes Troy Bilt was just using up old engines. Either way, it should run well by the time I'm done so age isn't an issue.
I got the valve cover off and also chem-dipped the carburetor. The main and idle jets all allowed carb cleaner through when I blew them out. Hopefully 4-1/2 hours in the bath was enough. Also took about 2 hours to painstakingly remove the old RTV that someone had used on the valve cover in a previous attempt to fix it. I have a can of "The Right Stuff" and a new cork gasket so I'll be trying that trick tomorrow. Fingers crossed!
#59
S
shrout1
S
shrout1
So, I reattached the carb, did "the right stuff" trick with the valve cover gasket and reassembled almost everything. I finger tightened the valve cover bolts with the socket and then did about one extra turn with the ratchet. It seemed snug but I didn't kill it. I also put a quart and a half of 10-W30 in it after draining it out to pull the valve cover yesterday. I'll fire it up after work tomorrow, too late tonight to do anything. I had to detach the muffler entirely to get everything to go back together... I *hope* the gasket doesn't leak, but if it does then I have a replacement in the mail already anyway.
I'll get a video of it running tomorrow, assuming it starts up and runs. It's on the battery charger for now, want to make sure it's ready to go. If the blade deck still works then I've got myself a nicely fixed up riding mower. Fingers crossed...
I'll get a video of it running tomorrow, assuming it starts up and runs. It's on the battery charger for now, want to make sure it's ready to go. If the blade deck still works then I've got myself a nicely fixed up riding mower. Fingers crossed...
#60
S
shrout1
S
shrout1
Ok so now it's running too fast I tweaked the governor back to the recommended factory setting but that doesn't seem like it matters...
Thing is running like gangbusters. I have a new governor spring hiding somewhere... could that be the problem? I turned the idle fuel jet as low as it can go, but even when I crank the throttle all the way down it doesn't seem to matter. It's a "unitized" cable system and choke works (choke is manipulated by the throttle cable as well) but the thing is just running like crazy from the get go. Now with the main jet unclogged I feel like it's just in overspeed all the time. I'm not sure how accurate my tach is, but you can hear how fast it's going and it seems like the throttle makes no difference at all.
I tweaked the governor back to the recommended factory setting but that doesn't seem like it matters...Thing is running like gangbusters. I have a new governor spring hiding somewhere... could that be the problem? I turned the idle fuel jet as low as it can go, but even when I crank the throttle all the way down it doesn't seem to matter. It's a "unitized" cable system and choke works (choke is manipulated by the throttle cable as well) but the thing is just running like crazy from the get go. Now with the main jet unclogged I feel like it's just in overspeed all the time. I'm not sure how accurate my tach is, but you can hear how fast it's going and it seems like the throttle makes no difference at all.
#61
Scrubcadet10
Scrubcadet10
Make sure the Idle screw (not the mixture screw) is screwed out some, that screw makes physical contact with the throttle shaft where the linkage hooks to to set your idle rpm.
If that checks out, I'd do this, dont worry about torquing the nut. just get it tight.
If that checks out, I'd do this, dont worry about torquing the nut. just get it tight.
#62
S
shrout1
I think the governor is shot. I need to monkey around with it a little more, but I really hate to run the engine in an overspeed condition for any period of time.
Man this thing is proving to be a real pain.
S
shrout1
Yeah sadly I have done all of that, including backing out the idle adjustment screw almost all the way.Make sure the Idle screw (not the mixture screw) is screwed out some, that screw makes physical contact with the throttle shaft where the linkage hooks to to set your idle rpm.
If that checks out, I'd do this, dont worry about torquing the nut. just get it tight.
I think the governor is shot. I need to monkey around with it a little more, but I really hate to run the engine in an overspeed condition for any period of time.
Man this thing is proving to be a real pain.
#63
S
shrout1
S
shrout1
So I tweaked the governor a whole bunch and had someone sitting on the mower who could turn it off quickly. The factory adjustment in the manual actually turns the governor *up* all the way, hence the crazy overspend. After turning it down the mower was actually idling a little lean - maybe because it couldnt pull off the main jet. I cranked the idle jet up a bunch and things smoothed out a bit. The mower seems to be running between 1900 rpms at the low end and 3000 at the top. It has headspace to make it up to 4900 (ask me how I know this) but it seems like it's running well enough for now.... So I will try mowing with it next weekend... we'll see if the blade deck gives me any trouble. Thanks again for all your help!
#64
S
shrout1
S
shrout1
It runs! It's still a little lean on the bottom of the throttle but it cuts the lawn so it's going to stay that way.
There are still a couple things wrong with it; it moves at about 2 mph... slower than a walk. I believe the accelerator bracket that connects the pedal to the transmission has been bent by years of a lead foot. This thread identified the issue and I can see that my bracket is bent when I look under the tractor (https://www.lawnmowerforum.com/threads/troubleshooting-slow-troy-bilt-bronco-2011-fixed.60636/).
Also, the steering is all kinds of messed up as the bushing for the "tie rod" (not 100% sure what the connecting rod to the wheels is called) to the steering gear is cracked and broken. The wheel has to be turned pretty far to one side before it starts to engage the tie rod.
I have all the replacement parts on the way from MTD, so hopefully I can get it back to 100% in the next couple weeks.
Also, this thing turns out to be a 2010 Troy Bilt Bronco, no surprise; the engine is a 2010 Kohler Courage so I figured the mower might be the same vintage.
This is actually the MTD Transmatic 780 mower. MTD rebadges them. I think my parents bought an earlier generation of this exact mower that I used to mow the lawn many moons ago. And now I know how to fix one... Will follow up when I get it running 100%!
#65
S
shrout1
S
shrout1
Just a follow up to finish discussing my fixes. I've fixed just about everything so far... there were a few more problems...
Man I want to go buy an electric
- Accelerator bracket replacement
- I replaced the old accelerator bracket with a new one, but this was while replacing all the internal belts

- In order to replace this I had to drop the blade deck and take off all the springs connected to the shaft this bracket is connected to.
- There is a strange circular retaining clip in front of this bracket that has to be forced off (see item #31 in the diagram below)
- The kotter pin (part #23) has to be removed and then the strange wrench like brace has to be separated from the bracket.
- Once part 71 is removed (the mounting bracket for the shaft) then the accelerator bracket can slide off.

- The new bracket did not have tapped screw holes for the pedal to mount in to - I had to tap it with a 5/16 18 thread count tap.
- See the "Illustrated Parts Manual" for the transmatic 780 to get these same diagrams.
- I had to replace the transmission pulley that sits underneath the driver's seat as it had become stripped:

- The flange nut on the top was seized in place, making it impossible to remove the pulley without impact tools.
- I was able to drop the transmission off the tractor, manipulate its orientation and have just enough room to use a 23mm service wrench holding the underside of the transmission hub against the frame and a 7/8" impact socket with an extension and a U joint to remove the flange nut.
- I had to order a replacement pulley and hub as both were stripped beyond usability - you can see a side by side comparison here:

- Also I had to get a small pulley puller from Autozone in order to get the hub off the splined transmission shaft.
- My tractor was in disassembled state for quite a while as I collected all the parts and tools I needed:

- Belts required replacement
- The deck belt had slipped off multiple times and was either sized incorrectly or stretched out too far.
- The internal belts looked serviceable but it seemed like the right time to swap them
- I could not find a correctly sized transmission belt, but the original showed no signs of wear (probably because it doesn't slip across the pulleys like the other belts) so I left it in place. It is working so far.
- Idler pulleys & bracket needed replacement
- The old idler pulleys had been damaged by the belt slipping off. It seemed that they were not in proper alignment on top of the blade deck:

- I ordered a new bracket for the idler pulley that is connected directly to the PTO cable (the nearest pulley in this image), replacement idler pulleys and replacement "brakes" for the idlers. I also got new belt retainer brackets (those black guards that stick up and over the pulleys)
- The new bracket did not come with tapped screw holes for the brake so I, again, had to tap new holes into it. It needed a 1/4 20 thread count tap for those screws.
- Ironically the new bracket seemed identical to the old one in terms of its shape so I don't think the bracket was playing a part. I replaced it to be certain

- I should have taken a picture of the entire deck reassembled but I was tired and wanted to mow the lawn Here is the newly assembled bracket and idler with the new brake and belt guard. Notice that the new belt guard does not stick out over the top of the pulley. That will be super nice for replacing the belt as the older design required removal of the entire assembly. Now it can be done with just the pulley out.

- After all this it decided that it wouldn't start anymore
- Turns out the PTO lever isn't returning home all the way so it has to be pushed further back towards "PTO off" in order to start the mower. I can live with that for now.
- I just took it out for a spin
- The new blade deck idler pulley aligns better with the main crankshaft pulley - I think the belt geometry is better than before
- The new belt guards also seem to be keeping the belt in place.
- The new transmission pulley combined with the new accelerator bracket have greatly improved the speed of the mower. Still not as fast as I'd like, but a lot better.
Man I want to go buy an electric
#66
StarTech
StarTech
And just I have nearly 10K in tools in order to run a decent shop. And I just spent $200 to do a $100 job but I wouldn't need to buy the same tools again on the next job.So my $500 mower has turned into about a $1300 mower after factoring in new tools, parts etc. Not quite the "deal" I was looking for but it works and it was a little less expensive than a new one. I've also learned *a lot* about small engine repair, carburetors etc. Hopefully this thing continues to run for a few more years.
#67
Scrubcadet10

Scrubcadet10
And plus, you know the work was done right!Just a follow up to finish discussing my fixes. I've fixed just about everything so far... there were a few more problems...
So my $500 mower has turned into about a $1300 mower after factoring in new tools, parts etc. Not quite the "deal" I was looking for but it works and it was a little less expensive than a new one. I've also learned *a lot* about small engine repair, carburetors etc. Hopefully this thing continues to run for a few more years.
- Accelerator bracket replacement
- I replaced the old accelerator bracket with a new one, but this was while replacing all the internal belts
- View attachment 60983
- In order to replace this I had to drop the blade deck and take off all the springs connected to the shaft this bracket is connected to.
- There is a strange circular retaining clip in front of this bracket that has to be forced off (see item #31 in the diagram below)
- The kotter pin (part #23) has to be removed and then the strange wrench like brace has to be separated from the bracket.
- Once part 71 is removed (the mounting bracket for the shaft) then the accelerator bracket can slide off.
- View attachment 60984
- The new bracket did not have tapped screw holes for the pedal to mount in to - I had to tap it with a 5/16 18 thread count tap.
- See the "Illustrated Parts Manual" for the transmatic 780 to get these same diagrams.
- I had to replace the transmission pulley that sits underneath the driver's seat as it had become stripped:
- View attachment 60985
- The flange nut on the top was seized in place, making it impossible to remove the pulley without impact tools.
- I was able to drop the transmission off the tractor, manipulate its orientation and have just enough room to use a 23mm service wrench holding the underside of the transmission hub against the frame and a 7/8" impact socket with an extension and a U joint to remove the flange nut.
- I had to order a replacement pulley and hub as both were stripped beyond usability - you can see a side by side comparison here:
- View attachment 60986
- Also I had to get a small pulley puller from Autozone in order to get the hub off the splined transmission shaft.
- My tractor was in disassembled state for quite a while as I collected all the parts and tools I needed:
View attachment 60987- Belts required replacement
- The deck belt had slipped off multiple times and was either sized incorrectly or stretched out too far.
- The internal belts looked serviceable but it seemed like the right time to swap them
- I could not find a correctly sized transmission belt, but the original showed no signs of wear (probably because it doesn't slip across the pulleys like the other belts) so I left it in place. It is working so far.
- Idler pulleys & bracket needed replacement
- The old idler pulleys had been damaged by the belt slipping off. It seemed that they were not in proper alignment on top of the blade deck:
- View attachment 60988
- I ordered a new bracket for the idler pulley that is connected directly to the PTO cable (the nearest pulley in this image), replacement idler pulleys and replacement "brakes" for the idlers. I also got new belt retainer brackets (those black guards that stick up and over the pulleys)
- The new bracket did not come with tapped screw holes for the brake so I, again, had to tap new holes into it. It needed a 1/4 20 thread count tap for those screws.
- Ironically the new bracket seemed identical to the old one in terms of its shape so I don't think the bracket was playing a part. I replaced it to be certain
- View attachment 60989
- I should have taken a picture of the entire deck reassembled but I was tired and wanted to mow the lawn
- View attachment 60990
- After all this it decided that it wouldn't start anymore
- Turns out the PTO lever isn't returning home all the way so it has to be pushed further back towards "PTO off" in order to start the mower. I can live with that for now.
- I just took it out for a spin
- The new blade deck idler pulley aligns better with the main crankshaft pulley - I think the belt geometry is better than before
- The new belt guards also seem to be keeping the belt in place.
- The new transmission pulley combined with the new accelerator bracket have greatly improved the speed of the mower. Still not as fast as I'd like, but a lot better.
Man I want to go buy an electric
#68
S
shrout1
At least I have what I need now!
S
shrout1
I bought a '99 Maxima back in 2014 to learn to drive stick. I think I spent like $2k on tools while I owned it but a lot of them came in handy here. Shame is that I own everything needed to fix a Japanese import but nothing is standard lol. I had to go buy a 7/8" impact socket just for this thingAnd just I have nearly 10K in tools in order to run a decent shop. And I just spent $200 to do a $100 job but I wouldn't need to buy the same tools again on the next job.
At least I have what I need now!
#69
S
shrout1
We'll see how it holds up. Now I'm just waiting for the plastic cam gears in my Kohler Courage engine to break. It's just a matter of time
S
shrout1
Haha that might be up for debate!!!And plus, you know the work was done right!
We'll see how it holds up. Now I'm just waiting for the plastic cam gears in my Kohler Courage engine to break. It's just a matter of time
#70
S
shrout1
S
shrout1
So my last dilemma...
I bought this mower from a fellow on Facebook... He buys, "fixes" and resells used mowers. He told me that "this is still his mower and he'll work on it for free, I just have to give him a call and get the parts for him..." I wasn't sure that I wanted to give him a call due to the state of the mower and the amount of effort involved.
I have thought about leaving him a review on his seller's page but... I never did call him. So... do I A) Do nothing whatsoever or B) reach out to this guy and be like, "Man, don't buy another mower like that, you're gonna get burnt".
I don't want anything from him but... *assuming* he was too inexperienced to understand how much of a mess this thing was (benefit of the doubt) then is it worth while to just give him my lessons learned and move on? Or do I just leave it? If the guy meant well then I want to try and help him... if he didn't then... so much water under a bridge.
I'd love your thoughts
#71
S
slomo
S
slomo
Carb is still dirty. Need to:
1.KEEP and remove OEM carb from engine. Break it down removing all small parts. Boil clean the carb on your stove top with water and those automatic dishwasher balls. Use a candy thermometer to keep water/soap temp at 200F. Boil for 30 minutes. Rinse well in clean water to neutralize after. Blow out with compressed air. Reassemble carb. Flip carb over and blow test carb needle/seat (fuel inlet pipe). Should hold 7psi for 30 minutes.
2.Remove fuel tank. Clean out 100% with compressed air. Install new fuel line, filter and shut off valve if you have room.
3.Clean block and cooling fins YEARLY per your engine manual. Remove top metal engine shroud exposing cooling fins. Neglect this and you will get engine damage.
4.Adjust valves per your engine manual yearly.
5.Decarbon cylinder and valves every 5 years or suggested interval in your engine manual. Neglect this and you will get engine damage.
I see a small mud slide on top on your block. And some oil/grit forming by the plug area. Need to clean all that off.
Hope you are not running it long with the shroud off. These are air cooled.
Mower engines like this heat up to max temp in like 1-3 minutes. As in very fast.
Do you feel that detent about 3/4 of full throttle? IN that detent, that is your max rev throttle cable setting with NO choke. Your carb linkage is all fouled up.
#72
S
shrout1
I chem dipped the carb and it started running much more smoothly. The fuel tank was clean and the fuel lines are holding up just fine. I *could* stand to clean the outside of the engine a bit more, but it is running all right. I only had the shroud off to test the carb/governor, and never ran it for very long. The carb linkage seems to work as intended; like you said, once I hit that detent then the choke plate starts to move. Before that it is controlling the main throttle plate via the governor when the engine is running. Everything seems to be working decently well.
S
shrout1
Hey thanks!Carb is still dirty. Need to:
1.KEEP and remove OEM carb from engine. Break it down removing all small parts. Boil clean the carb on your stove top with water and those automatic dishwasher balls. Use a candy thermometer to keep water/soap temp at 200F. Boil for 30 minutes. Rinse well in clean water to neutralize after. Blow out with compressed air. Reassemble carb. Flip carb over and blow test carb needle/seat (fuel inlet pipe). Should hold 7psi for 30 minutes.
2.Remove fuel tank. Clean out 100% with compressed air. Install new fuel line, filter and shut off valve if you have room.
3.Clean block and cooling fins YEARLY per your engine manual. Remove top metal engine shroud exposing cooling fins. Neglect this and you will get engine damage.
4.Adjust valves per your engine manual yearly.
5.Decarbon cylinder and valves every 5 years or suggested interval in your engine manual. Neglect this and you will get engine damage.
I see a small mud slide on top on your block. And some oil/grit forming by the plug area. Need to clean all that off.
Hope you are not running it long with the shroud off. These are air cooled.
Mower engines like this heat up to max temp in like 1-3 minutes. As in very fast.
Do you feel that detent about 3/4 of full throttle? IN that detent, that is your max rev throttle cable setting with NO choke. Your carb linkage is all fouled up.
I chem dipped the carb and it started running much more smoothly. The fuel tank was clean and the fuel lines are holding up just fine. I *could* stand to clean the outside of the engine a bit more, but it is running all right. I only had the shroud off to test the carb/governor, and never ran it for very long. The carb linkage seems to work as intended; like you said, once I hit that detent then the choke plate starts to move. Before that it is controlling the main throttle plate via the governor when the engine is running. Everything seems to be working decently well.