I’m calling this my one thing after another Husqvarna post

Douglasdzaster

Active Member
Joined
Jul 9, 2021
Threads
5
Messages
56
  • / I’m calling this my one thing after another Husqvarna post
I keep running into different topics about the LGT2654 with a Kohler KT745.
Once again a lady let it sit outside for a couple of years without starting and I’m trying to help her out.
After today I need advice on a few things.
This mornin before I moved it to where I work on it I put a tiny Tach on the spark plug wire just to check rpms at low idle and full throttle. Then pulled it around to the front of my shop. Ran it about 10 minutes total. Went to remove my tach and the heat coming from the engine seemed a little much. I grabbed my ir gun and the oil area was 135 degrees. But the ohv covers where two different animals. Facing the front of the mower the one on the left was reading 195-200 degrees and the right cover 145-150 degrees. Both exhaust before going into the muffler where 200.
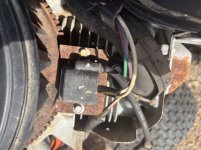
I decided to go ahead and pull the cowling off the top and see if it was full of debris or gunked up. I’m posting pictures of what I found. Nothing but rust and what looks like backed on oil from I think the valve cover on that side. I checked the bolts on the valve cover with the engine cool. I used my 1/4” torque wrench and the two on the bottom where loose so I got them to spec according to the manual I found on line.
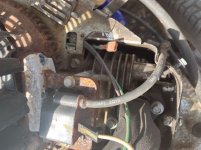
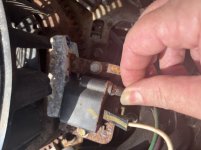
I tried to slide a business card between the air gap on the flywheel and coils and not a chance. I opened up the manual on line again and got my feeler gauges.
The manual gives two separate settings. .008”/203mm and .012”/305mm.
I don’t know which one to go by but not even the .008 would fit.
In the old days I’d get out the wire brush and maybe emery cloth and clean the whole thing up. Which if I did remove the rust I think the .008” would fit.
Is there a better way of cleaning up this mess and stopping the corrosion?
Also in the pic’s there’s one of the coil wire where the silicone is cracked at the coil. Should I go ahead and replace? After looking at the pictures y’all may tell me to replace both of them. There’s a green wire in the picture that wasn’t hooked up to anything. If anyone knows what it’s for I’d appreciate that.
I really appreciate all the help y’all have given me so far. I’m ge y’all’s advice so I don’t throw parts at it that it doesn’t need. And I don’t end up taking apart something big I didn’t have to.
Thanks again for share your knowledge.
I see the one I started about the oil filter is still an on going debate.
I worked for an equipment rental company for 22 years and every good small engine mechanic I had wasn’t afraid to voice his concerns. The biggest one for all of them was how people treated the equipment. Especially chainsaws. 😂
 

Attachments

  • 371DCCF3-5DA0-4418-9B1D-DE132FAC9D97.jpeg
    371DCCF3-5DA0-4418-9B1D-DE132FAC9D97.jpeg
    315.3 KB · Views: 17
  • E7E9FCDA-D1FF-497C-8DCB-F49F66DF5214.jpeg
    E7E9FCDA-D1FF-497C-8DCB-F49F66DF5214.jpeg
    316.2 KB · Views: 19
  • 526A5609-8188-44C8-A9C0-27840A3D8424.jpeg
    526A5609-8188-44C8-A9C0-27840A3D8424.jpeg
    250.9 KB · Views: 16

mechanic mark

Lawn Pro
Joined
Jul 15, 2013
Threads
175
Messages
7,437
  • / I’m calling this my one thing after another Husqvarna post
I would order new coil, green wire is possibly ground wire, check schematic in Service Manual above. Remove old coil & wire brush area on flywheel where contact is made. Air Gap on flywheel is 0.010, small business card works just fine. Make sure engine cooling fins etc, are clean as well as complete engine. Brake Parts Cleaner etc. may work on rust, dirt, & grease.
 

bertsmobile1

Lawn Royalty
Joined
Nov 29, 2014
Threads
64
Messages
24,745
  • / I’m calling this my one thing after another Husqvarna post
The gap simply changes the spark timing and on mower engines it is not all that critical.
Magnets should never be cleaned it is bad for them
the laminations can be cleaned but again apart from measuring the gap the rust makes absolutely no difference to the spark
Moving closer will advance the timing moving back will retard the spark.
It also changes the flux rate but contry to popular mis belief does not actually the voltage generated
 

Douglasdzaster

Active Member
Joined
Jul 9, 2021
Threads
5
Messages
56
  • / I’m calling this my one thing after another Husqvarna post
I would order new coil, green wire is possibly ground wire, check schematic in Service Manual above. Remove old coil & wire brush area on flywheel where contact is made. Air Gap on flywheel is 0.010, small business card works just fine. Make sure engine cooling fins etc, are clean as well as complete engine. Brake Parts Cleaner etc. may work on rust, dirt, & grease.
Thank you Thank you! Ive found that different manuals say different things. Must be the different year models. I normally don’t worry about rust on the flywheel because I figure the magnet doesn’t care. But this was really built up. I took a fine brush on my Dremel and cleaned a lot of it off. Then set the gap between the coils and the magnet at .008 but I’ll change it to 0.010.
Im going to suggest to her to let me replace both coils. The other ones wire don’t look much better.
I forgot to mention I used one of the spark testers that goes inline with the plug and has a glass you can see the spark.
I saw spark on both but it wasn’t blue it was yellowish. Does that mean anything? Then I got out something I hadn’t used. Called an ignition spark tester that I can adjust the gap. I set it for small engine plugged it into the spark plug wire then grounded the other end. I never got spark to jump the gap on either one. I used it one time 2 years ago on my old outboard and it worked then. The 40 hp started when I pulled it and I touched the engine and got lite up. My grandson was standing there supposed to tell me if he saw spark. He looked at me said you ok Gpa. I said yes. He said good because I really need to laugh right now.
Is brake cleaner safe on the aluminum? I’ve been looking at degreasers and they all seem to be corrosive.
 
Last edited:

Douglasdzaster

Active Member
Joined
Jul 9, 2021
Threads
5
Messages
56
  • / I’m calling this my one thing after another Husqvarna post
The gap simply changes the spark timing and on mower engines it is not all that critical.
Magnets should never be cleaned it is bad for them
the laminations can be cleaned but again apart from measuring the gap the rust makes absolutely no difference to the spark
Moving closer will advance the timing moving back will retard the spark.
It also changes the flux rate but contry to popular mis belief does not actually the voltage generated
Thanks for the information I appreciate it. I’ve already removed some of the rust from the magnets with a light brush and Dremel but I didn’t go to bare metal. It was really caked on and pitted looking. I’m going to suggest two new coils because the wires on these don’t look good where they enter the coils.
Does all that I mentioned about the temperatures mean anything?
Also the fins on the heads don’t have any debris in them but have corrosion. I’m trying to figure out what’s best to clean the engine with that won’t cause more aluminum corrosion. Once cleaned I’ll coat it with corrosion x aviation. All the degreasers I see are not safe on aluminum. I read a lot about Totally Awesome on line being safe. I called the company and was told do not use it on aluminum. I have a gallon of Purple power but it’s rough stuff.
 

Tiger Small Engine

Well-Known Member
Joined
Dec 7, 2022
Threads
1
Messages
745
  • / I’m calling this my one thing after another Husqvarna post
Thanks for the information I appreciate it. I’ve already removed some of the rust from the magnets with a light brush and Dremel but I didn’t go to bare metal. It was really caked on and pitted looking. I’m going to suggest two new coils because the wires on these don’t look good where they enter the coils.
Does all that I mentioned about the temperatures mean anything?
Also the fins on the heads don’t have any debris in them but have corrosion. I’m trying to figure out what’s best to clean the engine with that won’t cause more aluminum corrosion. Once cleaned I’ll coat it with corrosion x aviation. All the degreasers I see are not safe on aluminum. I read a lot about Totally Awesome on line being safe. I called the company and was told do not use it on aluminum. I have a gallon of Purple power but it’s rough stuff.
Rust and corrosion will not affect the performance or longevity of engine as long as it is free from dirt, debris, and grass.
Blue spark indicates a nice strong spark, yellow a weaker spark. .010” on air gap on ignition coils. If you feel the need to scrub engine, use a small steel brush, try various cleaners, and air compressor.
 

Douglasdzaster

Active Member
Joined
Jul 9, 2021
Threads
5
Messages
56
  • / I’m calling this my one thing after another Husqvarna post
Rust and corrosion will not affect the performance or longevity of engine as long as it is free from dirt, debris, and grass.
Blue spark indicates a nice strong spark, yellow a weaker spark. .010” on air gap on ignition coils. If you feel the need to scrub engine, use a small steel brush, try various cleaners, and air compressor.
Thanks so much. How do I achieve the blue spark?
I just did a test spot with some Chemical Guys Sticky citrus wheel cleaner that’s the best thing I found that really gets my after market wheels clean of brake dust and everything.
I sprayed some on a rag and rubbed it on a spot where the aluminum had corrosion. Then rinsed it off and it cleaned it right up. I know it’ll take the oil and stuff off the frame for sure. Got a valve cover leaking on the mower also.
Trying to figure out how to remove the fender where the gas cap is so I can get to the fuel tank and replace the fuel hose and vent hose. I noticed where the plastic clips into the metal but it’s super tight. I’m going to pull the wheel of and see what else is holding it on. I have a trim kit for such things just gotta figure it out.
 

Douglasdzaster

Active Member
Joined
Jul 9, 2021
Threads
5
Messages
56
  • / I’m calling this my one thing after another Husqvarna post
Yeah I get a little crazy about cleaning,detailing and shining everything. I’m going to wash out all the dirt and debris and call it good. I’m already spending way more time on this mower than expected.
I’ve got fishing that I have to get done.
 

Douglasdzaster

Active Member
Joined
Jul 9, 2021
Threads
5
Messages
56
  • / I’m calling this my one thing after another Husqvarna post
Hey guys another question. Before reassembling is there something I can spray the starter with for cleaning and to lubricant or protect?
 

Douglasdzaster

Active Member
Joined
Jul 9, 2021
Threads
5
Messages
56
  • / I’m calling this my one thing after another Husqvarna post
I thought I’d go ahead and test the coils ( for educational purposes)I’m going to replace anyway because of the cracks I found where the wires are weathered at the coils.
So here I go on YouTube again. A lot of videos the guy seems to put all sma engines in the same category measuring ohms they should only read 2-5.5k I believe is what it was. He tested one and it was over 9 so he said it’s about to stop working.
The manual doesn’t give a spec for the resistance in ohms instead it says you have to have a specific coil tester and it’s done by spark.
I set my multimeter to 20k ohms and used a clip for one wire and connected it to the bolt hole where I knew I had good contact then put the other wire into the spark plug wire and both coils measured a little over 11k. The removed the tester from the spark plugs wire to the kill tab and #2 had 9k and #1 said 10k.
Can someone tel me if I’m doing this correctly and if these readings are good. When I tested spark it before disassemble it had yellow/weak spark on both cylinders. So I used my other tester which is adjustable as to how far the spark can jump and when I set it for small engines neither one would make the jump.
I’m about to contact my neighbor I’m doing this for and let her know what I’ve spent on parts and what else I’ve found that she needs. I’d like to tell her how the coils tested along with its a good idea because of it being outside for so long.
EDIT: I looked up ignition tester for Kohler and found the adjustable spark tester I just told y’all about. I would’ve stuck them back on today to test but I finished doing the leakin valve cover last night and waiting the 24hr cure time. Which as hot as it is here it’s probably cured early.
 
Last edited:
Top