Snapper 38083 with Tecumseh TVXL 195

pappabear

Member
Joined
May 27, 2015
Threads
5
Messages
19
Howdy Folks,
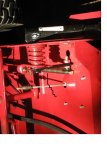
My second post on LMF. I have a project Snapper I'm going thru to add to my fleet. It's a Snapper model 38083 Series 3 RER with a Tecumseh TVXL195.
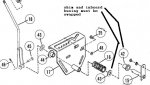
I tore down the shifter and removed the chaincase. The shift inboard bushing was melted and the shift lever broken off. The previous owner was shifting it with visegrips on the lever. So I am after a method to reassemble this mechanism. This thing was a biotch to get off. The shift handle has a thru-hole, with pin and cotter pin outboard. Inboard is a huge spring. I took the bracket off the machine and think the proper way is to partially assemble all the parts, put it in a vice with 2 sockets as bearing points and collapse the spring until the shift rod sticks out enough to install the outboard shim, shift handle, locking pin and cotter pin. Anybody had any experience with getting the monster spring collapsed for reassembly?

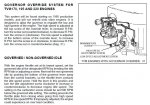
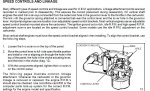
Second question regards setting the carburetor cable adjustments on the speed control bracket that mounts on top. This Tecumseh has idle and high speed set screws on the governor arm. Any guides available on for initial set up of the speed control bracket>
 

pappabear

Member
Joined
May 27, 2015
Threads
5
Messages
19
Re: Snapper 28088TE with Tecumseh TVXL 195

Thanks MM. I found Barrett's about a year ago. Great support site BTW. I downloaded several of the Tecumseh manuals a few months ago for this Snapper project.
I GAVE THE WRONG MODEL NUMBER IN MY ORIGINAL POST. THE ONE I'M WORKING ON IS SNAPPER MODEL 28088TE NOT THE 38083. my bad.
I corrected it in the Title. :confused2:

There were two sections pertinent to the TVXL195. I'll attach both.

The speed control bracket is identical to the drawing with one exception, the throttle cable leads in from the governor arm side and is clamped to the speed control bracket. I noticed some wear on the choke actuating tab but was able to get movement in the choke shutter.

I also tried this wire alignment method but wondered about the criticality of it to engine rpm adjustment since both high and low speed rpms are done at the base of the governor. I'll post an actual picture when I get the drive and shift repairs complete, then can set the mower horizontal to get to the start/adjust part of the job.

Any literature available on the OEM shift mechanism disassembly/reassembly? see jpg

If my vise will accomodate it, I'll assemble the bracket, put in a vise with 2 sockets bearing on the outside of bracket, compress the spring, install the outboard shim, align shift handle hole with shaft hole, then install the lock pin and cotter key.
 

Attachments

  • gov override.JPG
    gov override.JPG
    132 KB · Views: 12
  • speed control.JPG
    speed control.JPG
    192.3 KB · Views: 12
  • shift mechanism.JPG
    shift mechanism.JPG
    59.9 KB · Views: 11

pappabear

Member
Joined
May 27, 2015
Threads
5
Messages
19
Attacked the Snapper 28088TE this afternoon and got the shift mechanism figured out. I thought about using a vice with 2 sockets, but then I dropped my 2 arm puller on my foot and had a great idea.

See the front and side view jpgs. for my use of a 2 arm puller. It made the spring compression easy-peasy. Fortunately the shaft had a hole that fit the puller screw perfectly. I cranked it down until the shim and lock pin could be installed. then after decompressing the spring installed the cotter pin. Et Viola!

After assembly I bolted it back onto the main frame then installed a new linkage, boots, driven wheel and brake. Tomorrow I'll hang the deck back on it and start on the engine carb adjustments. Might be mowing some grass if all goes well.
 

Attachments

  • front view shift assy.jpg
    front view shift assy.jpg
    218.9 KB · Views: 13
  • side view w puller.jpg
    side view w puller.jpg
    242.6 KB · Views: 11
  • shifter installed.jpg
    shifter installed.jpg
    103 KB · Views: 10
  • new boots drive wheel and brakes.jpg
    new boots drive wheel and brakes.jpg
    137 KB · Views: 11

mechanic mark

Lawn Pro
Joined
Jul 15, 2013
Threads
175
Messages
7,487
Attacked the Snapper 28088TE this afternoon and got the shift mechanism figured out. I thought about using a vice with 2 sockets, but then I dropped my 2 arm puller on my foot and had a great idea.

See the front and side view jpgs. for my use of a 2 arm puller. It made the spring compression easy-peasy. Fortunately the shaft had a hole that fit the puller screw perfectly. I cranked it down until the shim and lock pin could be installed. then after decompressing the spring installed the cotter pin. Et Viola!

After assembly I bolted it back onto the main frame then installed a new linkage, boots, driven wheel and brake. Tomorrow I'll hang the deck back on it and start on the engine carb adjustments. Might be mowing some grass if all goes well.
Good deal. I emailed Snapper customer support with my model, serial, as well as all engine numbers asking them to send all information including wiring diagram which they did, a project my son & I are working on.
 

pappabear

Member
Joined
May 27, 2015
Threads
5
Messages
19
MM,
I'm glad to hear you work with your son and pass on your knowledge. I love these Snappers and marvel at the simple design and robustness they employ. The newer mowers are equipped with all the safety bells and whistles which just complicates the research, diagnosis & repair. No wonder folks want to restore yard sale finds. They do one thing and do it well- cut grass.
Live Long and Prosper Friend.
PB
 

rarebear

Active Member
Joined
Apr 27, 2015
Threads
9
Messages
71
I just took a TVXL220 10HP off my Snapper
It was running perfect, I just couldn't pass up a deal on 21 HP for $399 with shipping :)
I in the process of listing the engine in the FS forum
I'm looking for $60 if you need one..
I still have the box and packing for the 21 HP to ship it in..
New Muffler, Spark Pug, Rope and Oil this year..
 

pappabear

Member
Joined
May 27, 2015
Threads
5
Messages
19
Rarebear, where did you get a 21HP for under 4 bills?
I posted a new thread for repower as a different subject btw.

New Update on the project. I got the machine running and adjusted so it was working OK. I cut an acre of grass (first time on this machine) to test it out. All the other repairs (shifter, brakes, engine PM) tested OK. After about 2 hours the engine died from lack of fuel. The tank still had about a cup in it but the fuel filter was dry. After refilling the tank it would not start.

I towed it to the shop and did a spark test. There was no spark on the removed, grounded spark plug. I grabbed my inline spark tester and installed it in series with the plug (reisntalled into head). The light did not flash. So I pulled the ignition module and measured the primary and secondary windings DCR. They added up to like 270ohms if I recall correctly. I lopped off a wee bit of insulation and re-installed the insulation displacement spark plug terminal, sanded the ground contact points on the laminate strutcture, re-installed and re-gapped it to 0.012". Still no blinking light. I then hooked the test light to the spark plug wire and grounded it. When I spun the engine over I got a blinking light. So I figure the spark plug has opened. (never seen one do that but it is within the realm of possibility)

The Oregon brand plug measured about 2.7Kohm on the center electrode. I checked the Tecumseh literature and saw references to Champion RJ17(or19)LM. So I purchase the plug and measure it before installing it. It measures 70 Kohm center electrode resistance. After installing the Champion- Nothing. No open air spark at the plug gap (.030"), NO test light blinking when in series with the new plug! I got a blinking light when the test light is in series with the Ign coil and ground.

I went on to order a replacement IGN module thinking the winding(s) insulation has broken down and is leaking away all the voltage when it sees a spark plug as the load.
Anybody ever seen this happen before? Since I cannot measure a short duration voltage spike of >10KV I have to go with the direct replacement method.
Are there any test tricks used in the repair world other than having a peak detecting/recording high voltage meter or oscilloscope with huge input attenuator?
 

pappabear

Member
Joined
May 27, 2015
Threads
5
Messages
19
Re: Snapper 28088TE PROJECT UPDATE

PROJECT IS 99% COMPLETE.
I had to replace, the starter, and solenoid and ignition module to get the old Tecumseh back in operating order.
TOTAL PROJECT cost WAS ABOUT $195.

About the only think needed now is an 8-32 screw and wingnut to keep the battery inl
 
Top