You are using an out of date browser. It may not display this or other websites correctly.
You should upgrade or use an alternative browser.
You should upgrade or use an alternative browser.
Export thread
Push mower oil leak Briggs
#1
R
rwomack
R
rwomack
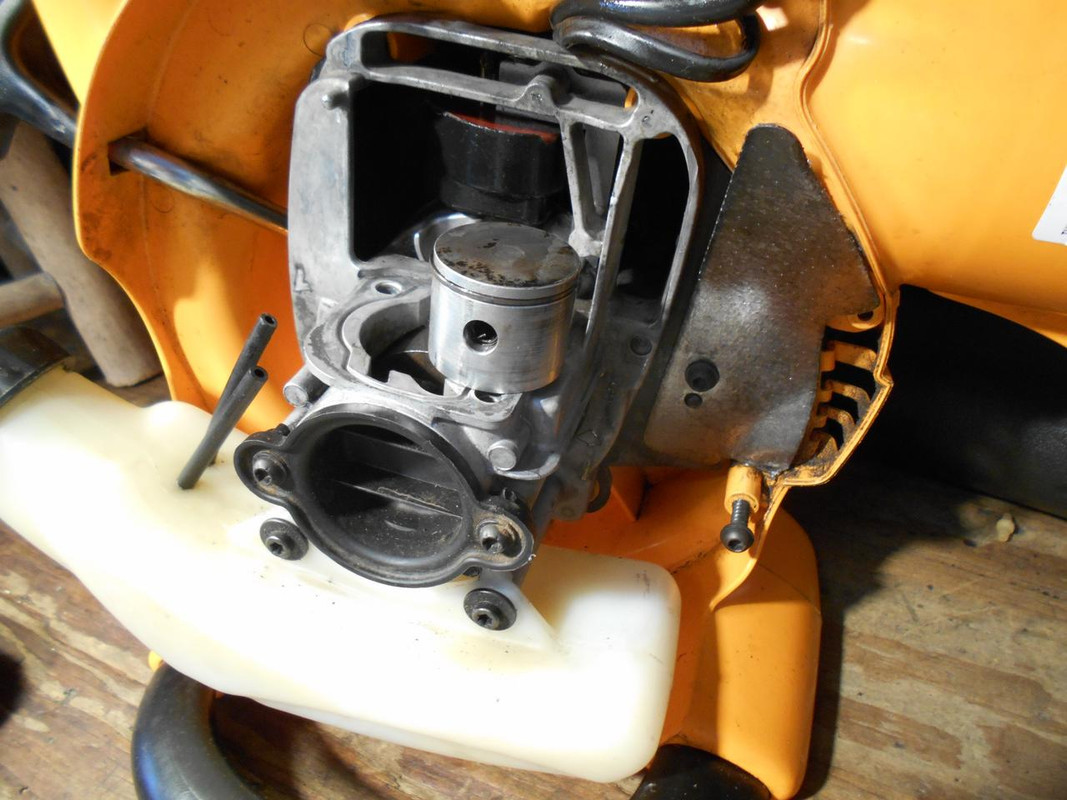
Don’t know the model or HP. Regardless, finding a lot of oil bottom side of the gas tank and all around the carb. Any ideas?
#2

Fish
Fish
You need to find the model numbers or put up a pic.
#3

7394
7394
Sure it's not gas ? mine did that @ about 10 yrs old, & it was the carb needed re-tightened, & I used blue Loc-Tite.
#4
R
Rivets
R
Rivets
Even without numbers a couple of things come to mind quickly. First check your oil level and also smell it. If it smells like gas and is over the full mark, you have a problem with your carb. If it is at the full mark and no smell, we can mark that off as a problem. Has this just shown up recently or slowly getting worse? May be just a slow accumulation of dirt. There are numbers on the shroud, so start wiping and report back when you find them.
#5
R
rwomack
Thank you! Looks like it’s a model 92502
R
rwomack
Even without numbers a couple of things come to mind quickly. First check your oil level and also smell it. If it smells like gas and is over the full mark, you have a problem with your carb. If it is at the full mark and no smell, we can mark that off as a problem. Has this just shown up recently or slowly getting worse? May be just a slow accumulation of dirt. There are numbers on the shroud, so start wiping and report back when you find them.
Thank you! Looks like it’s a model 92502
#6

Boudreaux In Eunice La.
Boudreaux In Eunice La.
You Have a 3.5 HP engine ..... Some of the best ones that they don't make anymore......... Yep that's gas and dirt on there....
Also that lil L shaped boot from the carb to the vent tube is cracked more than likely ........ I keep those in stock in my big shop and my small shop at my house ..........
The diaphragm kits for those are cheap also ...... If even one or two of those phillips screws are loose it will leak gas and cause that also......... Also it will run bad if it's leaking air ............
Those engines are cheap to rebuild and get another 10 years out of them ~!~!
Plus Tard Mon Ami ~!~!
#7
R
rwomack
Thank you and Merry Christmas. Ok, so I’ve dug a little deeper. I have oil coming out from underneath of the engine and onto the base of the mower. Crankshaft seal? Other?
R
rwomack
You Have a 3.5 HP engine ..... Some of the best ones that they don't make anymore......... Yep that's gas and dirt on there....
Also that lil L shaped boot from the carb to the vent tube is cracked more than likely ........ I keep those in stock in my big shop and my small shop at my house ..........
The diaphragm kits for those are cheap also ...... If even one or two of those phillips screws are loose it will leak gas and cause that also......... Also it will run bad if it's leaking air ............
Those engines are cheap to rebuild and get another 10 years out of them ~!~!
Plus Tard Mon Ami ~!~!
Thank you and Merry Christmas. Ok, so I’ve dug a little deeper. I have oil coming out from underneath of the engine and onto the base of the mower. Crankshaft seal? Other?
#8
R
Rivets
R
Rivets
Clean the area where the dipstick tube enters the block. Not uncommon for this seal and/or gasket to become brittle and leak.
#9
R
rwomack
Roger that. Here are some pics where most of the oil was found. Also, how in the heck do you remove the crank seal?


R
rwomack
Clean the area where the dipstick tube enters the block. Not uncommon for this seal and/or gasket to become brittle and leak.
Roger that. Here are some pics where most of the oil was found. Also, how in the heck do you remove the crank seal?
Attachments
#10
Boudreaux In Eunice La.
Boudreaux In Eunice La.
Rivets has good thought on that also .....
It could be your sump gasket AKA crankcover oil pan....... If it was the seal it wouldn't creep up and over the top of the deck.... Clean it well then check after a while of running and see where it's coming from ......
Like I said before I do those small engines all the time.... I have 3 to do in the future.... I have the overhaul kits here in stock......
They are easy to work on ....
Let us know Mon Ami ~!~!
#11
R
Rivets
R
Rivets
Looking at the pics, in my opinion only, it is not the seal or the sump gasket. Looks to me like the engine had been sitting or used in a dirty environment and had an accumulation of dirt and oil all over it, which would not be uncommon. Before I would pull the unit apart, I would clean everything up, reassemble and mount it on your unit. My system for finding oil leaks is after cleaning and drying I spray flour over all areas where I feel oil may be coming for. Start the unit and run it for 1/2 an hour, then let it sit. If there are any leaks you will be able to trace them to the source. May be a bit messy, but will solve your problem.
#12
Boudreaux In Eunice La.
Boudreaux In Eunice La.
I agree with Rivets, I don't see anything leaking in the pics.......
I would put it on a deck and mount a blade on it before I try and start it .........
I would put it on a deck and mount a blade on it before I try and start it .........
#13
R
rwomack
Well this was after I THOROUGHLY cleaned it. The arrows were where the oil was caked on. Should have mentioned that.
R
rwomack
I agree with Rivets, I don't see anything leaking in the pics.......
I would put it on a deck and mount a blade on it before I try and start it .........
Well this was after I THOROUGHLY cleaned it. The arrows were where the oil was caked on. Should have mentioned that.
#14
Boudreaux In Eunice La.
Ok that changes the equation in this problem you have ............. That would be the sump gasket that's leaking.... Let me see if I have a video on my channel where I take one apart ....
Be back in a bit ........ ~!~!
Boudreaux In Eunice La.
Well this was after I THOROUGHLY cleaned it. The arrows were where the oil was caked on. Should have mentioned that.
Ok that changes the equation in this problem you have ............. That would be the sump gasket that's leaking.... Let me see if I have a video on my channel where I take one apart ....
Be back in a bit ........ ~!~!
#15
Boudreaux In Eunice La.
Boudreaux In Eunice La.
Ok I found a video for you ....... This is not your engine though ..... You will be minus 1 sump bolt to take out ....
This video shows you what you have to do with the Governor also..... Like I said its easy to do .... You might have to shoe shine the shaft to let the cover off easier........
The seal is in the cover and it goes around the shaft ..... A screwdriver pops it out easily most of the time...... Look to see how far your seal is down into the cover for later reference ...... Pictures or a video made with your phone will be a lot of help ...... Then a good cleaning of the inside will be beneficial to you........ Make sure you align the timing marks on the cam and crank gear when you put it back together ...... Take picture of that before you pop it out or it falls out....
When you reassemble it make sure you PRE OIL everything.... Even the holes where the cam goes into and the shaft so the seal just slides easily......
If you need the part numbers let me know.....
https://youtu.be/tqQQ618XeiE
#16
R
rwomack
Thank you for the help once again. I’d like to do a rebuild but cannot locate a service manual for my model. Also, I can’t figure out how to remove crankshaft with that big plate and nut on the end of it! See pic above.
R
rwomack
Ok I found a video for you ....... This is not your engine though ..... You will be minus 1 sump bolt to take out ....
This video shows you what you have to do with the Governor also..... Like I said its easy to do .... You might have to shoe shine the shaft to let the cover off easier........
The seal is in the cover and it goes around the shaft ..... A screwdriver pops it out easily most of the time...... Look to see how far your seal is down into the cover for later reference ...... Pictures or a video made with your phone will be a lot of help ...... Then a good cleaning of the inside will be beneficial to you........ Make sure you align the timing marks on the cam and crank gear when you put it back together ...... Take picture of that before you pop it out or it falls out....
When you reassemble it make sure you PRE OIL everything.... Even the holes where the cam goes into and the shaft so the seal just slides easily......
If you need the part numbers let me know.....
https://youtu.be/tqQQ618XeiE
Thank you for the help once again. I’d like to do a rebuild but cannot locate a service manual for my model. Also, I can’t figure out how to remove crankshaft with that big plate and nut on the end of it! See pic above.
#17

tom3
tom3
One way I've removed the blade adapter is to soak it well with parts loosener, screw in the bolt almost all the way, hold the motor upside down holding it by the adapter plate, and smack the bolt head with a hammer a couple times. This will usually pop the adapter loose. And if the motor has been stored quite a while it might not actually be leaking that badly, with it cleaned up I'd put some fresh oil in it and run it some, might be good enough as is.
#18
Boudreaux In Eunice La.
Boudreaux In Eunice La.
Why do you want to remove the crank ??? You might need a 2 jawed puller to get the blade adapter off and then sand the crank like I said in the video ..... I show how to remove "that big plate" in the video.... Bolt for bolt minus 1 in your case....
#19
A
(Account Closed)
A
(Account Closed)
I'd replace the crank seal while the base and while doing so, as noted, polish the crank to get rod of the rust.
I personally would use a puller (try to keep the smacking to a minimum) and since your replacing the seal, a HEAT GUN used on the blade adapter should make removal way easier.. Just heat the adapter, squirt some liquid wrench in between the crank and adapter. Should come pretty easily.
The only thing that could be damaged would be the seal (with the heat) and your replacing that anyway..
#20
R
rwomack
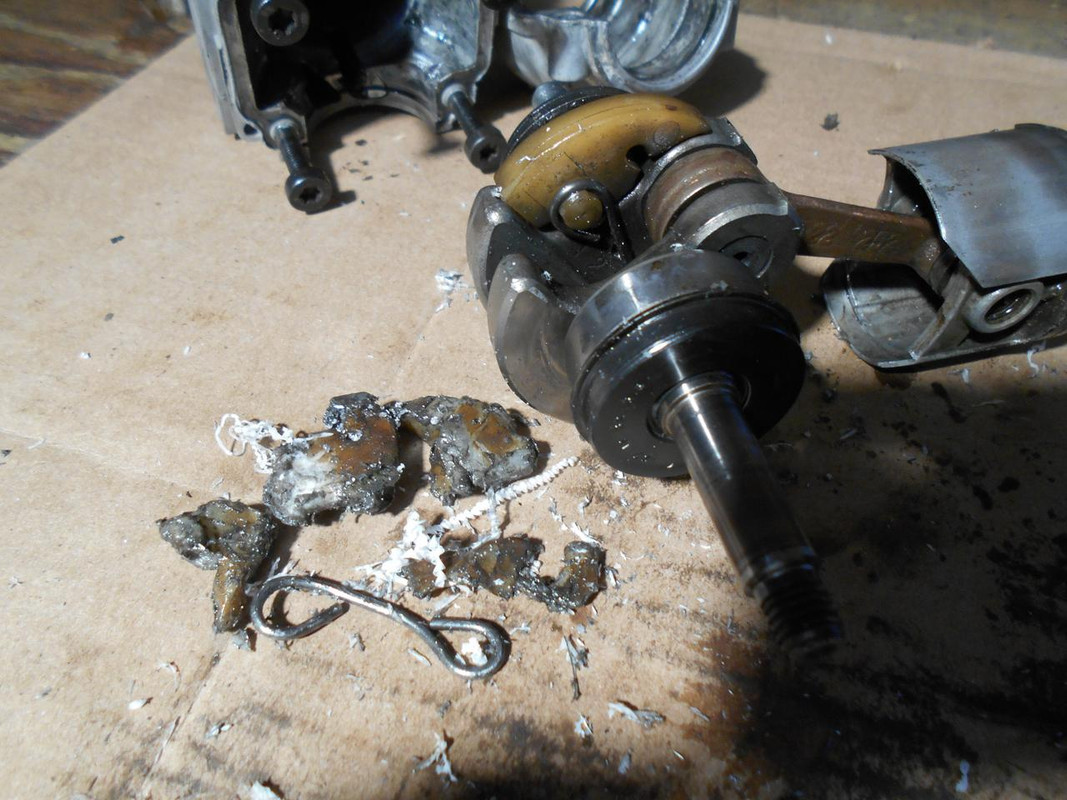
Ok so I’m at an empass. Look at the pic here. Seal out, sump loose, and now there is a key way keeping me from getting the sump off!!!

R
rwomack
I'd replace the crank seal while the base and while doing so, as noted, polish the crank to get rod of the rust.
I personally would use a puller (try to keep the smacking to a minimum) and since your replacing the seal, a HEAT GUN used on the blade adapter should make removal way easier.. Just heat the adapter, squirt some liquid wrench in between the crank and adapter. Should come pretty easily.
The only thing that could be damaged would be the seal (with the heat) and your replacing that anyway..
Ok so I’m at an empass. Look at the pic here. Seal out, sump loose, and now there is a key way keeping me from getting the sump off!!!
Attachments
#21

BlazNT
BlazNT
It is easily removable. I normally use a very tiny flat head screwdriver and a hammer. Tap in underneath of it and pops out
#22
R
rwomack
The key way? Seems to be frozen to shaft but I’ll try!
R
rwomack
It is easily removable. I normally use a very tiny flat head screwdriver and a hammer. Tap in underneath of it and pops out
The key way? Seems to be frozen to shaft but I’ll try!
#23
A
(Account Closed)
A
(Account Closed)
Simply push the cover back in a bit, take a small screwdriver, or pointy tool and tap the key way.
It'll push inwards and off the shaft. Unless you really nail it, it should be re-usable.
It goes without saying, don't nick up the shaft, it'll damage the aluminum cover coming off (and going on) along with the seal..
Were taking a steel crank shaft spinning inside an ALUMINUM cover..
I'd sand / wire brush that exposed crankshaft MORE till it shines super clean. You don't want any rust debris there and the cover will come off much easier..
Your almost there!
Oops, didn't see page two.. Yep, it'll pop out.. Wire brush clean to later re-install...
#24
R
rwomack
Got it! You’re the man! Now, do you HAVE to use a valve spring compressor to get valves out? I’d like to clean them and reseat them.
R
rwomack
It is easily removable. I normally use a very tiny flat head screwdriver and a hammer. Tap in underneath of it and pops out
Got it! You’re the man! Now, do you HAVE to use a valve spring compressor to get valves out? I’d like to clean them and reseat them.
#25
Boudreaux In Eunice La.
Boudreaux In Eunice La.
It's worth the 20 bux to buy the spring compressor from Briggs .... That's with shipping also ....
You can get the keepers off with a screwdriver, But putting everything back on is a PITA even experienced techs play hell ....
You can get the keepers off with a screwdriver, But putting everything back on is a PITA even experienced techs play hell ....
#26
BlazNT
BlazNT
I've never used a spring compressor but I am kind of on the stupid side sometimes. I'm sure it would be a lot easier.
#27
R
rwomack
Roger that!
R
rwomack
I've never used a spring compressor but I am kind of on the stupid side sometimes. I'm sure it would be a lot easier.
Roger that!
#28

Scrubcadet10
Scrubcadet10
https://www.amazon.com/dp/B002WNY2YS/ref=psdc_13789601_t1_B001OK9TRK
https://www.amazon.com/dp/B001OK9TRK/ref=psdc_13789601_t1_B002WNY2YS
I have the one in the second link, they have raised the price since i bought it though. I've used it many times on L head engines.
Makes a valve job a piece of cake once you get it right.
this may be of some help too, https://www.youtube.com/watch?v=0w2BRxAiUKw
#29
Boudreaux In Eunice La.
Yep the first link is a way better deal.... I have 2 laying around in my spare room when I moved 5 years ago and can't locate them .... So I ordered a new one from Briggs quite a while back.....
That price on Amazon in the 1st link is a couple bux cheaper than ordering from Briggs ......
Boudreaux In Eunice La.
https://www.amazon.com/dp/B002WNY2YS/ref=psdc_13789601_t1_B001OK9TRK
https://www.amazon.com/dp/B001OK9TRK/ref=psdc_13789601_t1_B002WNY2YS
I have the one in the second link, they have raised the price since i bought it though. I've used it many times on L head engines.
Makes a valve job a piece of cake once you get it right.
this may be of some help too, https://www.youtube.com/watch?v=0w2BRxAiUKw
Yep the first link is a way better deal.... I have 2 laying around in my spare room when I moved 5 years ago and can't locate them .... So I ordered a new one from Briggs quite a while back.....
That price on Amazon in the 1st link is a couple bux cheaper than ordering from Briggs ......
#30
R
rwomack
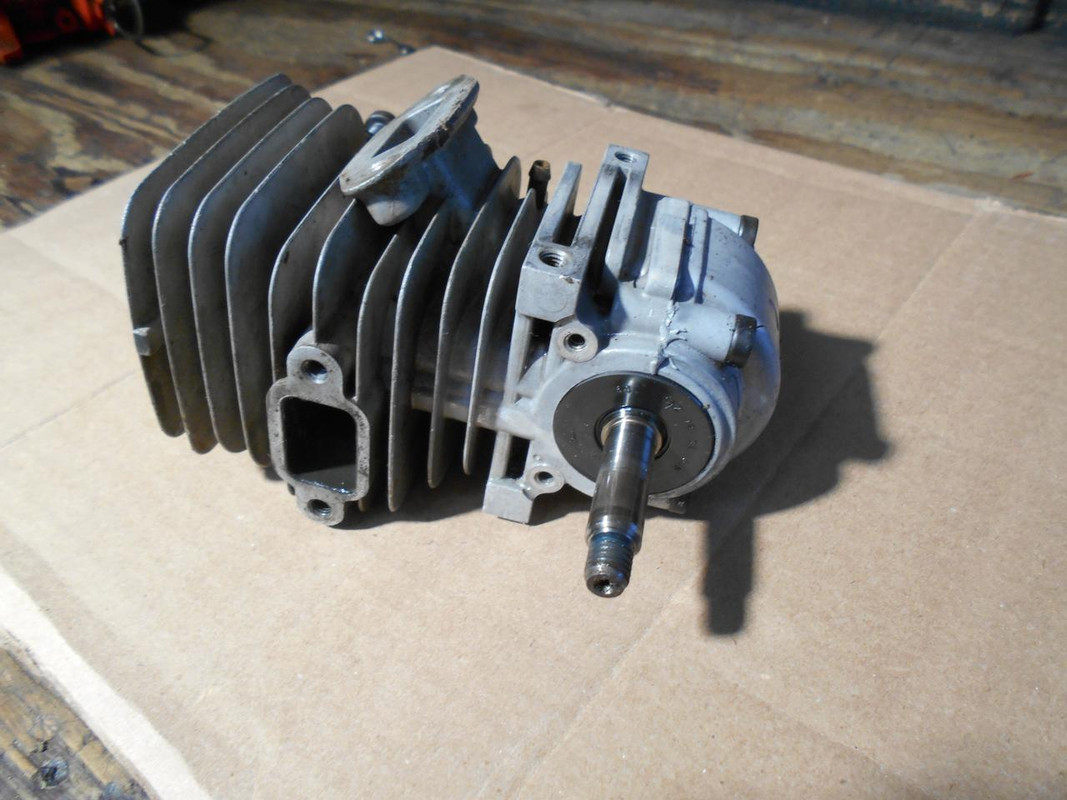
Love it. Ok. New pics. Head along with valves very gummy and oily (you can see where I scraped some away) Bore looks clean with no grooves. My flywheel is missing some fins. Concern? Best way to remove it?
How far should I go with this? ?


R
rwomack
Yep the first link is a way better deal.... I have 2 laying around in my spare room when I moved 5 years ago and can't locate them .... So I ordered a new one from Briggs quite a while back.....
That price on Amazon in the 1st link is a couple bux cheaper than ordering from Briggs ......
Love it. Ok. New pics. Head along with valves very gummy and oily (you can see where I scraped some away) Bore looks clean with no grooves. My flywheel is missing some fins. Concern? Best way to remove it?
How far should I go with this? ?
Attachments
#31
Scrubcadet10
Scrubcadet10
I use a multi purpose puller tool, to take off flywheels.
Sunex Tools Automotive 8-Way Reversible 2 or 3-Jaw Puller
Just don't hit the flywheel with a hammer, this can weaken it and cause it to possibly shatter while running. Or at least that's what I've heard.
Sunex Tools Automotive 8-Way Reversible 2 or 3-Jaw Puller
Just don't hit the flywheel with a hammer, this can weaken it and cause it to possibly shatter while running. Or at least that's what I've heard.
#32
A
(Account Closed)
A
(Account Closed)
Those couple of missing fin's won't hurt anything.
Unless your replacing the seal under the flywheel, there's no reason to remove it..
The insides look as I'd expect from an older used engine.
A wire brush (on a drill motor) works great for removing carbon. I would gently scrape the heavy carbon off first..
You can re-ring once the piston is pulled and lightly honed
As for the valves, I'd spin the engine over slowly and look at the valve seats (open). Un-less damaged, I put some fine sand paper in-between the valve and head and ALMOST close the valve fully. Now you can spin the valve, remove excess carbon, etc from both surfaces.
It's very rare I remove a valve.
#33
R
rwomack
Ok so I assume you can remove rod and piston and hone w/o removing crank? Flywheel must come off if crank is pulled. Also, once I do have piston and rod out, that’s when I would need to check the bore to determine ring size?
R
rwomack
Those couple of missing fin's won't hurt anything.
Unless your replacing the seal under the flywheel, there's no reason to remove it..
The insides look as I'd expect from an older used engine.
A wire brush (on a drill motor) works great for removing carbon. I would gently scrape the heavy carbon off first..
You can re-ring once the piston is pulled and lightly honed
As for the valves, I'd spin the engine over slowly and look at the valve seats (open). Un-less damaged, I put some fine sand paper in-between the valve and head and ALMOST close the valve fully. Now you can spin the valve, remove excess carbon, etc from both surfaces.
It's very rare I remove a valve.
Ok so I assume you can remove rod and piston and hone w/o removing crank? Flywheel must come off if crank is pulled. Also, once I do have piston and rod out, that’s when I would need to check the bore to determine ring size?
#34
A
(Account Closed)
A
(Account Closed)
If you pay close attention, yes you can hone with the crank still installed. Your just doing a light hone for the new rings.
If you want to pull the flywheel and crank, as posted above, a puller is best.
In a pinch, you can put pressure between the block and flywheel (lifting the block slightly) and smack the "flywheel end" of the crank (use a piece of aluminum in-between so you don't damage the crank end). It should pop off fairly easily..
Once the pistons out, carefully remove the old rings and measure "ring end gap" for the compression rings. It'll give you a good idea how worn they are.
As for replacements, I don't know what / if Briggs offers oversized rings.
Worst case scenario, STANDARD new rings will be considerably tighter than the old ones and very possibly within specs
I don't have the tool for measuring the bore however you can again, get an idea measuring between the bore and piston itself to see how worn it is.. These engines will run darn near forever if even slightly maintained
* An old Dodge slant six engine I acquired from a friend would blow 5 quarts of oil out the dip stick tube within 10 miles or so.
Pulled the motor, ring end gap was 1/4". Replaced the rings (STOCK SIZE), (didn't even do a valve job) and it didn't leak / blow a drop of oil for years (BIL bought it). Compression was blowing past the rings, into the crankcase, then out the dip stick tube.
#35
Scrubcadet10
Scrubcadet10
I would advise against honing with the crank in. Even though you're barely removing any material you need to clean your cylinder and inside of crankcase with soapy water to get out all the small honing residue. IF you do hone with the crank in, be careful not to stroke down too deep and hit the crank pin. You can possibly shatter the stones (if you use a 3 stone hone, not a ball hone) and cause more damage.
Or are you taking to a machine shop?
Or are you taking to a machine shop?
#36
Boudreaux In Eunice La.
Boudreaux In Eunice La.
Mack..... Briggs says not to hone a Kool Bore..... Just clean well .......... There is a special coating in the bore....
Regular sized rings are what you want...... Briggs also says if a honing is required then use aluminum stones.....
Briggs does make oversized rings, but you have to buy a piston to match then a bore job......
Regular sized rings are what you want...... Briggs also says if a honing is required then use aluminum stones.....
Briggs does make oversized rings, but you have to buy a piston to match then a bore job......
#37
R
rwomack
GREAT info guys. Sounds like I need to at least pull the rod off the crank, pull piston out, and check the cylinder wall and ring gap. I’ll send pics of it when I get it apart. Btw, I’m OCD") is there a torque table for everything going back?
is there a torque table for everything going back?
R
rwomack
Mack..... Briggs says not to hone a Kool Bore..... Just clean well .......... There is a special coating in the bore....
Regular sized rings are what you want...... Briggs also says if a honing is required then use aluminum stones.....
Briggs does make oversized rings, but you have to buy a piston to match then a bore job......
GREAT info guys. Sounds like I need to at least pull the rod off the crank, pull piston out, and check the cylinder wall and ring gap. I’ll send pics of it when I get it apart. Btw, I’m OCD
is there a torque table for everything going back?
#38
Boudreaux In Eunice La.
Boudreaux In Eunice La.
Yes there is a table ..... Google Briggs specs and a PDF site will pop up.... Click on that one ....
Like I said before I can look up the parts for you.........
Like I said before I can look up the parts for you.........
#39
A
(Account Closed)
Interesting...
Then, in this case, (per Briggs), just clean the cylinder (as the OP is likely NOT boring the engine-not worth it $ wise) and replace rings with stock rings.
No yanking the flywheel, crank, etc..
A
(Account Closed)
Mack..... Briggs says not to hone a Kool Bore..... Just clean well .......... There is a special coating in the bore....
Regular sized rings are what you want...... Briggs also says if a honing is required then use aluminum stones.....
Briggs does make oversized rings, but you have to buy a piston to match then a bore job......
Interesting...
Then, in this case, (per Briggs), just clean the cylinder (as the OP is likely NOT boring the engine-not worth it $ wise) and replace rings with stock rings.
No yanking the flywheel, crank, etc..
#40
R
rwomack
Ok. What do you recommend cleaning cylinder wall with?
R
rwomack
Interesting...
Then, in this case, (per Briggs), just clean the cylinder (as the OP is likely NOT boring the engine-not worth it $ wise) and replace rings with stock rings.
No yanking the flywheel, crank, etc..
Ok. What do you recommend cleaning cylinder wall with?
#41
R
rwomack
Btw, HILARIOUS story on the dodge!
R
rwomack
If you pay close attention, yes you can hone with the crank still installed. Your just doing a light hone for the new rings.
If you want to pull the flywheel and crank, as posted above, a puller is best.
In a pinch, you can put pressure between the block and flywheel (lifting the block slightly) and smack the "flywheel end" of the crank (use a piece of aluminum in-between so you don't damage the crank end). It should pop off fairly easily..
Once the pistons out, carefully remove the old rings and measure "ring end gap" for the compression rings. It'll give you a good idea how worn they are.
As for replacements, I don't know what / if Briggs offers oversized rings.
Worst case scenario, STANDARD new rings will be considerably tighter than the old ones and very possibly within specs
I don't have the tool for measuring the bore however you can again, get an idea measuring between the bore and piston itself to see how worn it is.. These engines will run darn near forever if even slightly maintained
* An old Dodge slant six engine I acquired from a friend would blow 5 quarts of oil out the dip stick tube within 10 miles or so.
Pulled the motor, ring end gap was 1/4". Replaced the rings (STOCK SIZE), (didn't even do a valve job) and it didn't leak / blow a drop of oil for years (BIL bought it). Compression was blowing past the rings, into the crankcase, then out the dip stick tube.
Btw, HILARIOUS story on the dodge!
#42
A
(Account Closed)
I would think lacquer thinner then soap and water (block facing down keeping water away from the crank).
Member Boudreaux likely may have what Briggs suggests.
*And yes, the Dodge, slant six engine is a true story. Had to degrease the entire engine compartment to find it.
Didn't take long to find where the oil was coming from.. Didn't burn ANY, just an "automatic oil change" set up!
A
(Account Closed)
Ok. What do you recommend cleaning cylinder wall with?
I would think lacquer thinner then soap and water (block facing down keeping water away from the crank).
Member Boudreaux likely may have what Briggs suggests.
*And yes, the Dodge, slant six engine is a true story. Had to degrease the entire engine compartment to find it.
Didn't take long to find where the oil was coming from.. Didn't burn ANY, just an "automatic oil change" set up!
#43
Scrubcadet10
Scrubcadet10
Maybe Briggs could incorporate a "automatic oil change" system with their newer "maintenance free" engines.
#44
Boudreaux In Eunice La.
After you clean the block all the way, gaskets an carbon then finally the valve lapping , I just Dawn ultra and water in a bucket with a scrub brush..... Rinse good and your done........
Boudreaux In Eunice La.
Ok. What do you recommend cleaning cylinder wall with?
After you clean the block all the way, gaskets an carbon then finally the valve lapping , I just Dawn ultra and water in a bucket with a scrub brush..... Rinse good and your done........
#45
R
Rivets
R
Rivets
I would add to Boo’s reply. After you dry everything take a white paper towel and dry every surface again. If you have ANY dirt on the towel wash again. Repeat until the paper towel comes out snow white. Don’t depend on just your eyes, back when we would completely rebuild an engine a week, it was not uncommon to wash three or four times. Just a little dirt can ruin a good rebuild.
#46
R
rwomack


R
rwomack
Ok guys. Here are some updated pics. Gonna get rings, reface the valves...took a dremel tool to intake and exhaust ports. Btw, I noticed the exhaust valve spring was longer? Didn’t expect that...
Attachments
#47
A
(Account Closed)
A
(Account Closed)
Nice clean up! Especially the lapping..
Did you happen to measure the old ring end gaps (compression) and compare to spec's?
Did you happen to measure the old ring end gaps (compression) and compare to spec's?
#48
R
Rivets
R
Rivets
Yes, some engine do have different size springs, not uncommon. SRT, I don’t think those valves have been lapped yet, just face cut. I would like to see the cylinder bore, as I see some deep scratches on the piston. Just cleaning the cylinder may not be enough, even with new rings. Looking at those rings, have you checked land or groove clearance on the piston. Piston may be too worn to just rering, might need to replace. Personally I would not try to clean the block with the crank in, just too many places for dirt to hide, which would ruin all your work. Then again I warranty my rebuilds and am extremely fussy about cleanliness. Just my opinion.
#49
A
(Account Closed)
A
(Account Closed)
The two pic's of the valves, before and after, the seat was definitly cleaner than the other.
You think that was just from cleaning? No lapping?
Ok, dumb question, as he's working out of the house (I assume), what is a "Face cut"?
You think that was just from cleaning? No lapping?
Ok, dumb question, as he's working out of the house (I assume), what is a "Face cut"?
#50
R
rwomack
R
rwomack
I will get ring measurements and groove once I get some feeler gauges. The valves and valve seats have not been ground yet. That was a pic when I had just pulled them. I noticed the scratches on the piston too but bore looks good. I’ll send a pic and see what you guys think.
#51
R
Rivets
R
Rivets
A face cut is the grinding or cutting of the valve face, depending on which system you are using. A seat cut is the grinding of the valve seat. Cutting is most often done with a Neway cutting system and grinding is done with a valve grinding (stone) system. The angle of the face is different than the angle of the seat. After they are both done, then lapping is done. In my opinion it makes no sense to lap valves if they are not cut first. Here is a manual that might help you with specs and procedures. https://docs.google.com/open?id=0B6NaqjIxWV1ycG8wd0s3Z2Q2X00
#53
B
bertsmobile1
B
bertsmobile1
A "cut face" is bright & shinny.
lapping the cut face in yields a dull section which is how you tell when to stop lapping.
lapping the cut face in yields a dull section which is how you tell when to stop lapping.
#55
A
(Account Closed)
A
(Account Closed)
Looks as I would expect, could be worse...
Did you happen to measure compression ring end gaps?
Did you happen to measure compression ring end gaps?
#56
R
Rivets
R
Rivets
The pics of the bore confirm what I was thinking when I saw the pics of the piston. Severe scoring and evidence of piston slap. Before buying any parts or spend more time I would have that cylinder measured for size and out-of-round. I know I am not there and pics don’t always tell a true story, but I am willing to bet that it is no longer within specs. Hopefully I am wrong, but please spend a little to have someone who know how to measure do so. You might be wasting a lot of time and money if you don’t. Just my opinion, read my signature.
#57
R
rwomack
R
rwomack
Ok. Thank you. The engine was running fine when I took it down. It just had a lot of hours on it. I’ll do some more digging.
#59
A
(Account Closed)
If my math is correct, ring end gap is just over .030" .
I'd say a bit worn....
What's spec's call for?
A
(Account Closed)
Ring gap is 1.219mm
Ring groove .152mm
If my math is correct, ring end gap is just over .030" .
I'd say a bit worn....
What's spec's call for?
#60
R
rwomack
That I don’t know. I have not been able to locate the specs.
R
rwomack
If my math is correct, ring end gap is just over .030" .
I'd say a bit worn....
What's spec's call for?
That I don’t know. I have not been able to locate the specs.
#61
Boudreaux In Eunice La.
30 thou is reject to me on the compression and wiper rings....... I think Brigg's specs are 30 to 35 thou.........
Boudreaux In Eunice La.
If my math is correct, ring end gap is just over .030" .
I'd say a bit worn....
What's spec's call for?
30 thou is reject to me on the compression and wiper rings....... I think Brigg's specs are 30 to 35 thou.........
#63
A
(Account Closed)
A
(Account Closed)
Found the chart in the manual posted previously. Just over .047"!
Limits are .030" for iron bore, .035 for aluminum bore
(page 9-8)
Limits are .030" for iron bore, .035 for aluminum bore
(page 9-8)
#64
R
rwomack
Aaah! Found the manual you all had posted. BIG help. At this point, the bore is within specs. I plan to clean up the bore, and replace the piston and rings. Thank you guys!
R
rwomack
Found the chart in the manual posted previously. Just over .047"!
Limits are .030" for iron bore, .035 for aluminum bore
(page 9-8)
Aaah! Found the manual you all had posted. BIG help. At this point, the bore is within specs. I plan to clean up the bore, and replace the piston and rings. Thank you guys!
#66
R
Rivets
R
Rivets
How did you measure the bore? You need either a special gage or telescoping gages and a mic or calipers. Then to do so properly you do six different measurements. First, is 1/2” down in the same direction as the wristpin. Second, is in the center of piston travel and the third is 1/2” from the bottom of the cylinder. Then you take the same three more measurements 90 degrees from the first three. With these six measurements you can accurately tell if the cylinder is in specs and not out of round.
#67
R
rwomack
R
rwomack
Roger that. I might have to get a local shop to measure. I don’t have the tools you mentioned.
#69
Boudreaux In Eunice La.
Boudreaux In Eunice La.
I use Lucas oil treatment, I use it cause I have it already.... I wouldn't go out and buy it because I have 30 and 40 WT oil all over the place....
I use straight 40 in my jeep. I always have oil on hand.. Jeep doesn't use oil but I got it in case....
Use 30 WT for oil to be used in the engine....
I use straight 40 in my jeep. I always have oil on hand.. Jeep doesn't use oil but I got it in case....
Use 30 WT for oil to be used in the engine....
#71
R
Rivets
R
Rivets
Any time I am working on the internal parts of an engine, repairs or rebuilds, I use this product. Never had to worry about not having moving parts protected. Always have a bottle around.[h=1]Permatex 81950 Ultra Slick Engine Assembly Lube[/h]
#72
B
bertsmobile1
B
bertsmobile1
These are really basic engines with wide tollerances by modern engine standards,
So a shot of SAE 30 mower oil on all parts as they get assembled is fine.
If you are going to take 3 weeks to get it back together then perhaps some assembly lube, but I have never used it an am yet to have a rebuild failure due to insuficant lube during assembly.
So a shot of SAE 30 mower oil on all parts as they get assembled is fine.
If you are going to take 3 weeks to get it back together then perhaps some assembly lube, but I have never used it an am yet to have a rebuild failure due to insuficant lube during assembly.
#73
A
(Account Closed)
+1 ^^^
As Tyrel would say, "this ain't a Space Shuttle, it a lawn mower"!
A
(Account Closed)
These are really basic engines with wide tollerances by modern engine standards,
So a shot of SAE 30 mower oil on all parts as they get assembled is fine.
If you are going to take 3 weeks to get it back together then perhaps some assembly lube, but I have never used it an am yet to have a rebuild failure due to insuficant lube during assembly.
+1 ^^^
As Tyrel would say, "this ain't a Space Shuttle, it a lawn mower"!
#74
R
rwomack
Ha! Ok guys. Thank you!
R
rwomack
+1 ^^^
As Tyrel would say, "this ain't a Space Shuttle, it a lawn mower"!
Ha! Ok guys. Thank you!
#75
Scrubcadet10
Scrubcadet10
Plus one on the permatex:thumbsup:Any time I am working on the internal parts of an engine, repairs or rebuilds, I use this product. Never had to worry about not having moving parts protected. Always have a bottle around.[h=1]Permatex 81950 Ultra Slick Engine Assembly Lube[/h]
#76
R
rwomack
Valve question. Both look decent and a line is on one, but no tangible grooves. Ok to lap and put back together after checking clearances?
R
rwomack
Plus one on the permatex:thumbsup:
Valve question. Both look decent and a line is on one, but no tangible grooves. Ok to lap and put back together after checking clearances?
#78
Boudreaux In Eunice La.
I think he means the gray stripe all around the valve............
Boudreaux In Eunice La.
Wrong way round.
lapping will change the clearnaces so do it first.
Line ?
I think he means the gray stripe all around the valve............
#79
R
rwomack
Roger that. Yes. Lap first. Gray line but no groove.
R
rwomack
I think he means the gray stripe all around the valve............
Roger that. Yes. Lap first. Gray line but no groove.
#80
R
rwomack
Ok so I was checking valve clearances. TDC seems arbitrary on this thing. There is a point where the engine is at TDC but crank “releases” a bit. When I check clearances they aren’t great. When I back up and feel some resistance, spot on. Is this normal?
R
rwomack
I think he means the gray stripe all around the valve............
Ok so I was checking valve clearances. TDC seems arbitrary on this thing. There is a point where the engine is at TDC but crank “releases” a bit. When I check clearances they aren’t great. When I back up and feel some resistance, spot on. Is this normal?
#81
R
Rivets
R
Rivets
Have no idea what you mean by releases, what releases? TDC cannot be arbitrary, it is an exact point. Have no idea what you mean by ( back up, feel resistance, spot on ). This is how I check valve clearances. Remove spark plugs, while rotating engine by hand watch valves until both valves are closed. Insert a small screwdriver into spark plug hole and while rotating flywheel back and forth you will feel piston moving up and down. Find TDC and then rotate flywheel forward until piston moves about 1/4” down. Now check your clearances. If clearances are off, adjust then rotate flywheel through 4 complete cycles. Now repeat the steps to find 1/4” past TDC and recheck clearances. If off repeat procedure until you have clearances within specs. Others have different procedures, but this is the procedure I use when I check and adjust valve clearances. Remember we are not stand there watching what you do, please paint us a better picture.
#82
A
(Account Closed)
A
(Account Closed)
Rivets;
He's got a "Flat head", non OHV engine (3.5HP Briggs). Your talking about adjusting an OHV engine.
Oranges to apples...
I forgot if the access to the valves and tappets are inside the side "breather" (I think they are-been awhile((45 years)).
If so, get the cam and tappets loose/away from the valve so the cam lobe is NOT pressing upward.
I'd measure the widest gap, should get you in the ball park. Likely still within spec's'...
#83
R
rwomack
Ok. Yea. I have the head off doing a rebuild. I’ll check cam lobes. ?
R
rwomack
Rivets;
He's got a "Flat head", non OHV engine (3.5HP Briggs). Your talking about adjusting an OHV engine.
Oranges to apples...
I forgot if the access to the valves and tappets are inside the side "breather" (I think they are-been awhile((45 years)).
If so, get the cam and tappets loose/away from the valve so the cam lobe is NOT pressing upward.
I'd measure the widest gap, should get you in the ball park. Likely still within spec's'...
Ok. Yea. I have the head off doing a rebuild. I’ll check cam lobes. ?
#84
R
Rivets
R
Rivets
The procedure is the same on a flat head or OHV. Both have tappets, cam lobes, compression release. The L-head is just more time consuming, because to do it right you should have the springs on when measuring and if the clearance is not correct, you are either grinding the stem or seat, not adjusting a nut. If you grind the seat you should relap the valve. Most want to cut corners by not installing springs or relapping after grinding seats. If you have the head off you should still rotate a 1/4” past TDC to make sure the compression release is off. Only oranges to apples if you feel you need to take shortcuts. Shortcuts in our shop normally come back to haunt you, so we use a procedure which we can warranty and not pray that the short cut will work.
#85
A
(Account Closed)
A
(Account Closed)
"Apples to oranges" was referring to an OHV engine vs an "L" style engine, NOT a short cut. As noted, there are no screws to adjust clearances.
Also as noted, springs should be installed. It's too easy to push a feeler gauge in-between with no real tension between the valve and the rest of the valve train.
Needless to say, the side cover should be installed, just snugged down, to keep the cam from flopping downward (screwing up actual clearances).
To my knowledge, (please advise), the old, 3.5 HP B&S engines didn't have compression releases, didn't need them.
#86
R
rwomack
Got it. That answers my question. Yes. I agree the tension with springs on makes total sense.
R
rwomack
"Apples to oranges" was referring to an OHV engine vs an "L" style engine, NOT a short cut. As noted, there are no screws to adjust clearances.
Also as noted, springs should be installed. It's too easy to push a feeler gauge in-between with no real tension between the valve and the rest of the valve train.
Needless to say, the side cover should be installed, just snugged down, to keep the cam from flopping downward (screwing up actual clearances).
To my knowledge, (please advise), the old, 3.5 HP B&S engines didn't have compression releases, didn't need them.
Got it. That answers my question. Yes. I agree the tension with springs on makes total sense.
#87
A
(Account Closed)
A
(Account Closed)
Do you know for certain (just curious), if the old B&S engines had compression releases built in?
I know my 7HP Briggs OHV Snapper valve adjustment is 1/4" past TDC compression stroke (adjusted a couple of years ago) however didn't know why the 1/4".. That makes sense, tks..
Lastly, for the larger engines (with compression releases), are most valves adjusted also at 1/4" beyond TDC?
I know my 7HP Briggs OHV Snapper valve adjustment is 1/4" past TDC compression stroke (adjusted a couple of years ago) however didn't know why the 1/4".. That makes sense, tks..
Lastly, for the larger engines (with compression releases), are most valves adjusted also at 1/4" beyond TDC?
#88
R
Rivets
R
Rivets
Unless you know for sure that there is NO compression release, (have sump cover off and visually check) set the clearance 1/4” past TDC. As I would tell my students, “Why take a chance” takes no extra time to always follow the same procedure no matter which engine you have. In a shop if everyone is using the same procedure, no one is guessing if it was done right and we can feel confident, as we warranty all repairs. What someone does in their garage is totally up to them, they play by their own rules.
#89
A
(Account Closed)
A
(Account Closed)
Thanks and good information.
I just had to adjust two exhaust valves on my Yamaha, 600cc, 4 cylinder, 4 valves /cylinder OHV engine. Both were .001" too tight. A bit more involved than a mower engine..
Per the manual, all adjustments are made at TDC for each cylinder. (which I did).
Per a forum I frequent, (very knowledgeable folks), as long as the lobes are 180 degrees from the bucket(shim and bucket design), you can measure... The cam lobe circumference would be the same until you hit the ramp lobe. This bike does not have a compression release...
I can see larger single mowers (or any large single/two cylinder engine) needing the release..
#90
R
rwomack
Ok so clearance is way too large. Exhaust .031 and intake .045! Will refacing the valves get me close enough to workable numbers?
R
rwomack
Thanks and good information.
I just had to adjust two exhaust valves on my Yamaha, 600cc, 4 cylinder, 4 valves /cylinder OHV engine. Both were .001" too tight. A bit more involved than a mower engine..
Per the manual, all adjustments are made at TDC for each cylinder. (which I did).
Per a forum I frequent, (very knowledgeable folks), as long as the lobes are 180 degrees from the bucket(shim and bucket design), you can measure... The cam lobe circumference would be the same until you hit the ramp lobe. This bike does not have a compression release...
I can see larger single mowers (or any large single/two cylinder engine) needing the release..
Ok so clearance is way too large. Exhaust .031 and intake .045! Will refacing the valves get me close enough to workable numbers?
#91
Boudreaux In Eunice La.
Are you sure of those numbers ?????? I have never seen numbers that big before for valves.....
Boudreaux In Eunice La.
Ok so clearance is way too large. Exhaust .031 and intake .045! Will refacing the valves get me close enough to workable numbers?
Are you sure of those numbers ?????? I have never seen numbers that big before for valves.....
#92
Scrubcadet10
Scrubcadet10
You aren't getting thousandths and MM mixed up are you?
most feeler gauges have both marked on them.
most feeler gauges have both marked on them.
#93
Boudreaux In Eunice La.
Yeah I think so toooo. If i'm right 45 MM is 18 tho..............
Boudreaux In Eunice La.
You aren't getting thousandths and MM mixed up are you?
most feeler gauges have both marked on them.
Yeah I think so toooo. If i'm right 45 MM is 18 tho..............
#94
Scrubcadet10
Scrubcadet10
Yep, .45 comes out to 17 thou, and .31mm comes too 12.thou.
#95
R
rwomack
Ok. I was going by top numbers on my gauges in inches. So you guys are talking mm then.
R
rwomack
Yep, .45 comes out to 17 thou, and .31mm comes too 12.thou.
Ok. I was going by top numbers on my gauges in inches. So you guys are talking mm then.
#96
B
bertsmobile1
B
bertsmobile1
Take a close look at your gauges.
Each leaf will either have 1 or two numbers on them
The smaller number will be the inch size & the larger one will be the mm size.
If the smallest one does not say 0005 or 001 then your feelers are metric.
Each leaf will either have 1 or two numbers on them
The smaller number will be the inch size & the larger one will be the mm size.
If the smallest one does not say 0005 or 001 then your feelers are metric.
#97
R
Rivets
R
Rivets
I went back to the beginning of this thread and looked at the pics of the valves and valve seats. I am curious as to why you would have a wide valve clearance. Normally as an engine gets older the clearances get small, not larger. I would be double checking those measurements as I don’t see a reason that those measurements should be so large. Second, to get the clearance back into specs you are going have to cut the valve seats and then grind the valve faces. If the valve margin becomes less that 3/32”, the valve will not have enough thickness to deal with the heat and fail very quickly. If you do get the clearance in specs, you then have to lap the valves. Here you must make sure that the lapped surface is in the middle of the valve face or the valve will not seat properly, causing a loss of compression. Have you checked valve guide clearance? If the clearance is too large, all your work on the valves and seat will be for naught. Finally, are you sure you really want to stick the time and money into that engine? You have a scored cylinder, bad rings, probably a worn piston due to piston slap, could be replacing valves and will need a gasket set. Plus if you do just the bare minimum it may not last a season. Personally, from the pictures you posted and the measurements you gave us, I would tell you to stop now and cut your loses. Read my signature.
#98
R
rwomack


R
rwomack
Thanks for taking the time to reply. The cylinder checked out within specs and cleaned up well with a soft hone. The rings were worn. I’m willing to keep going based on all feedback so far. I don’t have that much into it.
Here are pics of the feeler gauges I used to come up with the valve clearances.
Here are pics of the feeler gauges I used to come up with the valve clearances.
Attachments
#99
R
rwomack
R
rwomack
In regards to checking the valve guides, do you mean the hole you drop the valves through before installing the valve springs and keepers?
#100
A
(Account Closed)
Yes, valve slop back and forth in the block.
**IMO, You knew what you had when you started, your freshening up the engine, not a high performance re-build.
Keep going and she'll run much better than before, even with the imperfections you found. As noted, it's your labor,
parts are cheap and "it's a lawn mower, not the Space Shuttle"..
A great "backyardian: project!
A
(Account Closed)
In regards to checking the valve guides, do you mean the hole you drop the valves through before installing the valve springs and keepers?
Yes, valve slop back and forth in the block.
**IMO, You knew what you had when you started, your freshening up the engine, not a high performance re-build.
Keep going and she'll run much better than before, even with the imperfections you found. As noted, it's your labor,
parts are cheap and "it's a lawn mower, not the Space Shuttle"..
A great "backyardian: project!
#101
R
Rivets
R
Rivets
I agree it’s not the space shuttle, but why would you only fix something halfway and hope it works. If the OP wanted to do it that way, why is he spending time asking how to do things and looking for technical guidance. Is that the way you rebuild you cycle engines? If it is then I guess you policy is “ never time to do it right, always time to do it over. I’ll bet the OP has not even looked at the manual I posted for him. He doesn’t know how to read a feeler gage, but says that the cylinder is within specs and just needs a little cleaning. He doesn’t have tools to grind valves and seats, but is going to get valve clearance back to specs. I doubt it. As I can see now he is just looking to the techs on this site to babysit hum through a rebuild, but still do it his way. Why waste the time of the techs like Bert, Bou, Scrub and myself who are trying to lead him in the right direction, then is listening to someone who thinks because it is just a small engine, why do things the right way. For that reason I will get out of this thread, as I’m not one who likes to see people throw money away. He started with trying to find an oil leak and now is doing a rebuild, but only half way. Good Bye and Good Luck.
#102
A
(Account Closed)
A
(Account Closed)
There's no reason to get upset.
I agree, he hasn't read the manual... Should he-ABSOLUTLY, everything is there.
It's a project, he's learning. If you feel your wasting your time, don't post.
"Just because it's a small engine why do things the right way" ??? I do things the right way.
You gonna put $200 into boring, professional measuring, new piston, rings, valve seats, etc for a $40 engine?
To do it correctly, you would have to... It isn't worth it $ wise because the engine isn't worth much, except to the owner..
I know I'm the new guy here, I guarantee ALL my customers work. Some things (as you know) are not worth the $ fixing and I'll tell the customer that.. The above machine, just a side gasket replacement, piece of cake..
If it burns gas, I work on it...
IE

Echo CS 355t chain saw with blow crankcase stuffer:
Re-assembled WITHOUT A NEW CRANKSHAFT (The incorrect way-NO stuffers)
Fixed, running great and back into service. Saved from the "Parts heap" (as the customer didn't want to spend $100 on a new crank-which would be "the correct way to repair"). Customers happy, saved a $350 machine which gets "dogged" big time daily.
The above commercial machine, Commercial Tree company test video:
https://www.flickr.com/photos/147134237@N06/45591828684/
I agree, he hasn't read the manual... Should he-ABSOLUTLY, everything is there.
It's a project, he's learning. If you feel your wasting your time, don't post.
"Just because it's a small engine why do things the right way" ??? I do things the right way.
You gonna put $200 into boring, professional measuring, new piston, rings, valve seats, etc for a $40 engine?
To do it correctly, you would have to... It isn't worth it $ wise because the engine isn't worth much, except to the owner..
I know I'm the new guy here, I guarantee ALL my customers work. Some things (as you know) are not worth the $ fixing and I'll tell the customer that.. The above machine, just a side gasket replacement, piece of cake..
If it burns gas, I work on it...
IE
Echo CS 355t chain saw with blow crankcase stuffer:
Re-assembled WITHOUT A NEW CRANKSHAFT (The incorrect way-NO stuffers)
Fixed, running great and back into service. Saved from the "Parts heap" (as the customer didn't want to spend $100 on a new crank-which would be "the correct way to repair"). Customers happy, saved a $350 machine which gets "dogged" big time daily.
The above commercial machine, Commercial Tree company test video:
https://www.flickr.com/photos/147134237@N06/45591828684/
#103
Scrubcadet10
Scrubcadet10
https://youtu.be/0w2BRxAiUKw?t=381
this may be of some type of help....
edit, that's if the clearances are tight.....
this may be of some type of help....
edit, that's if the clearances are tight.....
#104
Scrubcadet10
Scrubcadet10
I wonder, is it possible for the tappets to get wore down where they meet the valve and cause the excess clearance?
#105
R
rwomack
Wow. I didn’t expect that former post. I’m a former professional motocross racer and worked on all of my bikes. I’m in sales now but thought I’d do my dad a favor by trying to salvage an engine that isn’t made anymore.
I’m a DIYr and believe in doing things right or not at all, the very reason I sought help here. You all have been great and I have learned so much just by trying this. I HAVE read the manual. Even with it, questions arise.
The cylinder was checked by a local small engine shop and it is well within clearances. My hang up now is that there appears to be no replaceable valve guides, and the exhaust valve is loose. You can see the hole (guide) is wallowed.
If y’all think my journey should end here, I’m listening. If there is a solution, I’m open. Thank you all for your input.
R
rwomack
I wonder, is it possible for the tappets to get wore down where they meet the valve and cause the excess clearance?
Wow. I didn’t expect that former post. I’m a former professional motocross racer and worked on all of my bikes. I’m in sales now but thought I’d do my dad a favor by trying to salvage an engine that isn’t made anymore.
I’m a DIYr and believe in doing things right or not at all, the very reason I sought help here. You all have been great and I have learned so much just by trying this. I HAVE read the manual. Even with it, questions arise.
The cylinder was checked by a local small engine shop and it is well within clearances. My hang up now is that there appears to be no replaceable valve guides, and the exhaust valve is loose. You can see the hole (guide) is wallowed.
If y’all think my journey should end here, I’m listening. If there is a solution, I’m open. Thank you all for your input.
#106
Scrubcadet10
Scrubcadet10
Well, from what I can tell by your model 92502________
There should be a replaceable guide bushing,
https://www.jackssmallengines.com/j...092502-0116-99/cylinder-sumps-piston-mufflers
#871 I believe..
There should be a replaceable guide bushing,
https://www.jackssmallengines.com/j...092502-0116-99/cylinder-sumps-piston-mufflers
#871 I believe..
#107
B
bertsmobile1
B
bertsmobile1
Any cylinder head shop can fit sleeves into the guides.
Now days replacing guides in alloy motorcycle heads is a thing of the past as the inserts have gotten better as has the skills of those who fit them.
Remember new guides = new valves as well.
Now days replacing guides in alloy motorcycle heads is a thing of the past as the inserts have gotten better as has the skills of those who fit them.
Remember new guides = new valves as well.