hsk850 2 cycle snowblower engine help needed with replacement piston and rod assembly

Joneebgood

Forum Newbie
Joined
Mar 20, 2015
Threads
2
Messages
8
  • / hsk850 2 cycle snowblower engine help needed with replacement piston and rod assembly
HI!
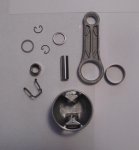
I have a Tecumseh HSK850 8312B on a Toro snowthrower and am replacing the piston assembly. P/N 310291A is a newer replacement sub for the number on my original parts list. The rod, piston and bearings all were shipped loose and need to be assembled and this is not covered by my original Tecumseh Technician痴 Handbook probably as it痴 for the older style parts? I could use a little guidance getting the piston pin bearings in place as well as how best to install the 31 needle bearings, etc. It looks like the pressed in steel rod liner is actually separate and needs to be pressed in also. The Tech Manual stresses that the steel bearing liner has a flange that goes towards the flywheel end of crankshaft but I don't see how that applies to these replacement parts? The piston instructions refer to the cast in side of the pin retainer to face the PTO end but the substitute parts use a C-clip in both sides so that doesn't apply either.

Is there a technical bulletin covering this new assembly that anyone has seen? I will attach a photo of the many pieces I have to work with.

Thank you for any assistance you can offer. JIM
 

Attachments

  • IMG4845.jpg
    IMG4845.jpg
    84.9 KB · Views: 13

Rivets

Lawn Royalty
Joined
Mar 11, 2012
Threads
60
Messages
15,501
  • / hsk850 2 cycle snowblower engine help needed with replacement piston and rod assembly
I am confused and will need a little more info to help you. You have taken on a tough job and need the patience of Job to get it done, since this is probably your first attempt at this. I have not done one for at least 10 years so bear with me and if we understand each other, hopefully you'll end up with a finished assembly. Your picture does not include the 31 needle bearings you are talking about. Do you have them? Can you take a close-up pic of both sides of the rod, so I can tell you the direction of installation? What is the large ring to the right of the rod, I'm think bearing race, can you take a pic tipped slightly to better identify? Have you disassembled the old assembly? Have you identified where each of the parts shown go? These will not be the last questions I will asked. If you feel that you may not be able to continue or that I will not be able to help you, please say so. Not being there to physically handle the parts is going to make it much more difficult to explain properly. Also, there will be a time lapse in questions and answers which will get frustrating, it's your decision on how to proceed. I assume this is the manual you are talking about which I believe is all there is to help.

http://www.mymowerparts.com/pdf/Tec...L-2-CYCLE-TVS-TVXL-HXL-HSK-840-850-694988.pdf
 

Joneebgood

Forum Newbie
Joined
Mar 20, 2015
Threads
2
Messages
8
  • / hsk850 2 cycle snowblower engine help needed with replacement piston and rod assembly
Yes, that's the manual I have but when I went to order the piston and rod assembly it is no longer available and there is a replacement number that is not an assembly but all the parts loose as in my photo. Yes I have the new 31 pins but there must be a trick to getting them in place without losing them?

In my photo there is a clip which fits nicely into the piston in the pin area. The pin bushing is wider than the end of the rod but those two steel washers seem to be almost correct to make up the difference so I am pretty confident how the piston and pin connect to the rod although it looks like a tight fit. None of these parts are evident in the parts I removed from the 1998 era engine. My dilemma is, which way does the piston face in regards to the side of the rod with the numbers cast into it?

One side of the rod is machined exactly flat but the side with the cast numbers definitely has a campher so that must be the side I install the steel bearing race sleeve from. The steel sleeve is cut square on one end but has a bit of a campher on the other so I am pretty sure that campher goes against the campher on the rod and I can probably drive the parts together using my workbench vise and some steel shims on each side.

The piston pin bearing does not easily fit into the rod so that must be pressed in with the vice as well?

Note the dot on one side of the top of the piston and the arrow pointing toward the other side. I want to get the piston oriented correctly on the rod but this new piston is the same on both sides of the pin area so there is no definite "cast in piston pin retainer" evident as there is a C clip supplied for both ends. Seems like there should have been a few instructions packed with these parts?

I will attach photos of both sides of the rod plus one of the old rod before I removed it from the crankshaft.

Also, the 31 pins seem to be held together with some kind of tape or silicone seal type material on one side? Does that need to be washed off or does it stay to hold them in place? I figured I would dab some grease there to hold things while I slipped the rod and piston assembly over them and onto the crank.

Thank you so much for taking the time to help with this.
 

Attachments

  • IMG4846.jpg
    IMG4846.jpg
    83.9 KB · Views: 8
  • IMG4849.jpg
    IMG4849.jpg
    58.5 KB · Views: 7
  • IMG4832.jpg
    IMG4832.jpg
    148.3 KB · Views: 5

bertsmobile1

Lawn Royalty
Joined
Nov 29, 2014
Threads
65
Messages
24,995
  • / hsk850 2 cycle snowblower engine help needed with replacement piston and rod assembly
Not familar with this engine either but some general information.
The piston has a pin in the ring slots to stop the rings rotating and catching on the inlet or exhaust port.
This pin must run along a solid section of the bore, and not near the ports.
The rollers go the crankshaft and you should be able to stick them on by running a bead of grease around the inner race and pushing them into it.
That type of bering is called a crowded race and when all of the rollers are in place there should be just enough space to squash in another roller.
This space is needed so the rollers can turn and not rub against each other.
Fit the rollers, slide the outer race over them then warm up the con rod to expand it a little then slip it over the outer race, you may need to be a bit firm with it so try and find some thing that is a good fit behind.
I use two bearing separators if I have to apply force.
 

Rivets

Lawn Royalty
Joined
Mar 11, 2012
Threads
60
Messages
15,501
  • / hsk850 2 cycle snowblower engine help needed with replacement piston and rod assembly
I wish I was standing in your garage with the parts in front of me, would make this so much easier. I have installed these assemblies in the past, but they were assembled and marked, just had to install crankpin needle bearings and install. To me the rod looks the same on both sides, which would mean direction is no longer a problem. Arrow on the piston head will point toward flywheel on final installation. This is the order I follow in putting this together.

Talk nice to your better half and ask for her largest baking sheets, line the bottom with either wax paper or paper toweling. This will be your work surface on with you will put all parts and keep them from ending up on the floor. Will also make it easier to keep track of those needles.

Install piston pin bearings into the rod. Before installation give them a good coat of grease to make sure they stay in place.

Assemble piston pin, rod and piston, match how the original one looks to the best of your ability. Don't need to put the locking clips in yet.

Install crankpin race into the rod. Use the old rod as a way to figure out direction.

Coat the race with a layer of grease to hold the needle bearings. Because I can not see the tape which hold the bearings together, I am going to recommend removing it and installing the bearings one at a time. Patience of Job needed to do this.

Now you install the rod on the crank, again a little extra grease is used to make sure needles don't fall out. Watch the direction of chamfer you were talking about.

After installation of rod, check to see if piston arrow is pointing toward flywheel. If it is install locking clips.

A couple more suggestions before starting. I would have a second set of eyes and hands around to help. I like to use an assembly lube when installing needle bearings, but it has it's good and bad sides. It is very sticky and will hold things in place, but will also pick up extra needles or unwanted parts if not being extra careful. Over light your work area and be seated while doing this. I cannot overstate the need for PATIENCE AND CALM while doing this.

If you have any other questions, please feel free to ask and we will try to help.

Retired teacher mode: Make sure you have a plan and sequence laid out before starting this. Test and double check each part of your plan, making sure you understand in your mind what and why you are doing each step. Make sure your second set of eyes understands and agrees with each step. Try to make sure you are not going to be bothered while going through your steps. I cut my clean up towels into 6" squares and have a pile close at hand. I can grab one, wipe off and dispose, no large rag in the way.

I hope this helps, but understand if it confuses things, again wish I was standing there!
 

Joneebgood

Forum Newbie
Joined
Mar 20, 2015
Threads
2
Messages
8
  • / hsk850 2 cycle snowblower engine help needed with replacement piston and rod assembly
I got the engine back together okay. Pressing the rod bearing and crankshaft bearing sleeve into the rod took a lot more pressure than I expected it to but I got them into place. It looked like heavy grease holding the 31 pins together in a strip but I broke the strip apart. Even lacquer thinner didn't want to cut whatever was on them. I really didn't see how they were going to roll with all that wax like stuff on them. I glued them to the crank with real heavy grease and the rod slipped over nicely. The arrow on the piston actually didn't point to either end of the crankshaft so I pointed it toward the exhaust port. Oh well, it spins over nicely and started at once. But............ I must have messed up the governor as the tension on the governor shaft and rod forces the carb full open so the engine races out of control unless I manually force it back to idle. I was sure I had the two forks on the lever positioned up against the slide ring but I must have forgotten to recheck after I lifted up the crank to put some Loctite under the roller bearings. Oh well. I know where all the bolts go now so it should be quicker when I take it apart again.

Thank you both for your help and guidance. I rebuilt a lot of Chevy V8s as a kid but that was almost 50 years ago. This is the first small engine I have worked on.

JIM
 

Rivets

Lawn Royalty
Joined
Mar 11, 2012
Threads
60
Messages
15,501
  • / hsk850 2 cycle snowblower engine help needed with replacement piston and rod assembly
Thank you for letting us know how it went. Most of the time we never know if the problem was solved or not..
 

Joneebgood

Forum Newbie
Joined
Mar 20, 2015
Threads
2
Messages
8
  • / hsk850 2 cycle snowblower engine help needed with replacement piston and rod assembly
Re: hsk850 2 cycle snowblower engine --help needed with Governor

I finally had time to take the engine apart again to check the governor, governor sleeve and the three balls in the crankshaft. Everything seems to be assembled properly, yet, the first time I started it, it wanted to run wide open. I had to force the governor arm towards idle to get it to slow down where I felt safe running it. The good new is that it now has lots of compression and starts instantly.

I will attach two photos so you can see the sleeve and the governor balls. The governor arm is in the correct position. How is this governor supposed to work. The default position with the arm against the sleeve and the sleeve against the crankshaft is wide open throttle. I assume that, as soon as it starts, centrifugal force is supposed to throw the three balls out and force the sleeve to force the arm at the carburetor to close the throttle a little? there isn't much movement in the sleeve before it hits the crankshaft ball bearing at the crankcase. Maybe 1/4" of movement if the balls are fully extended.

If I spin the crank by hand and hold pressure against the governor arm to close the throttle the three balls move right out as I assume they are supposed to. they do not seem to be sticking in the bore. Should they have a spring behind them?

I don't think we have ever needed to adjust the carb or governor arm and I didn't disturb it when I replaced the rings and bearings so what could I have done differently?

thank you for your help,
JIMIMG4872.jpgIMG4875.jpg
 
Top