You are using an out of date browser. It may not display this or other websites correctly.
You should upgrade or use an alternative browser.
You should upgrade or use an alternative browser.
Export thread
Briggs Coil Replacement, Restoration (Model 92502)
#1
T
TylerFrankel
T
TylerFrankel
Hello All!
I recently was fortunate enough to acquire 4 free briggs and Stratton mower engines. They are all unmounted, but all of them have blade mounts on them. Their model numbers are (2x 92502), (93502), (92982) I'm going to refurbish these in my free time to have for various uses or to sell, and I need some help. I decided to start with what seemed like the oldest and dirtiest of them, a cream color 92502.
This one was so dirty I decided before I even tried to start it I would clean it up, so I decided to tear it down. I'm pretty new to this, so I dove right in figuring since they were free I could throw caution to the wind, and since I had a duplicate model I could see how to rebuild it based on the other one. Long story short, I managed to easily remove the air filter, carb/gas tank, air shroud/starter coil, the throttle assembly, auto-choke, and block head. Then I ran into trouble with the coil. It, oddly enough, is attached directly to the points without being removable, but I didn't know this and blindly broke the brittle wire off since most just pull off a little metal plate (facepalm). This coil was attached with a wire directly, and I don't know how to replace it. I assume since the coil was wired directly, the removable part is within the points/condenser (if anyone knows why this is please let me know). Unfortunately I didn't check for spark before disassembling, but I removed what seem to be two ground wires, one that was on the coil and one that ran from under the flywheel from the points to a metal bracket on the throttle control thing that lines up with the head. SO I figure I have to replace the coil or find a way to solder a tiny wire together that is broken off so close to the base that there isn't enough insulation to expose to make a connection.... but I can't get the damn flywheel off because it's so tight. I don't have an air hammer or flywheel puller, so I suppose I'll have to get those. I also tried to remove the sump from the bottom and succeeded (in spilling oil I thought I had drained completely) but it can't come off because the blade mount is rusted solid on there, and again, I don't have a proper puller.
Anyway..... I figure the sump and flywheel can be left alone and I can just clean up what I've done and reassemble everything IF I can find a way to repair the coil without accessing the points. Anyone else ever experience this type of issue with the coil, or have tips on how to correct it? Some pics for reference are attached. Thanks!


(Above: Green circle is ground (I think); Red circle is stub of wire that broke off from main wire coming from points).
Edit:
Tomorrow I will upload pictures of the engine where the coil wires are and where the other ground wire went
I suspect the other one may have had to do with the safety mechanism in some way since it was near the throttle assy.
with this in mind I was wondering if anyone has an idea of how I would go about starting one of these with no throttle cable or start/stop lever attached
Also, how dangerous is it to start without a blade? I've heard kickback is a concern, but assuming the alternative is leaving a blade attached and trying to start that I'd prefer risking bruising my knuckles for a week.
I recently was fortunate enough to acquire 4 free briggs and Stratton mower engines. They are all unmounted, but all of them have blade mounts on them. Their model numbers are (2x 92502), (93502), (92982) I'm going to refurbish these in my free time to have for various uses or to sell, and I need some help. I decided to start with what seemed like the oldest and dirtiest of them, a cream color 92502.
This one was so dirty I decided before I even tried to start it I would clean it up, so I decided to tear it down. I'm pretty new to this, so I dove right in figuring since they were free I could throw caution to the wind, and since I had a duplicate model I could see how to rebuild it based on the other one. Long story short, I managed to easily remove the air filter, carb/gas tank, air shroud/starter coil, the throttle assembly, auto-choke, and block head. Then I ran into trouble with the coil. It, oddly enough, is attached directly to the points without being removable, but I didn't know this and blindly broke the brittle wire off since most just pull off a little metal plate (facepalm). This coil was attached with a wire directly, and I don't know how to replace it. I assume since the coil was wired directly, the removable part is within the points/condenser (if anyone knows why this is please let me know). Unfortunately I didn't check for spark before disassembling, but I removed what seem to be two ground wires, one that was on the coil and one that ran from under the flywheel from the points to a metal bracket on the throttle control thing that lines up with the head. SO I figure I have to replace the coil or find a way to solder a tiny wire together that is broken off so close to the base that there isn't enough insulation to expose to make a connection.... but I can't get the damn flywheel off because it's so tight. I don't have an air hammer or flywheel puller, so I suppose I'll have to get those. I also tried to remove the sump from the bottom and succeeded (in spilling oil I thought I had drained completely) but it can't come off because the blade mount is rusted solid on there, and again, I don't have a proper puller.
Anyway..... I figure the sump and flywheel can be left alone and I can just clean up what I've done and reassemble everything IF I can find a way to repair the coil without accessing the points. Anyone else ever experience this type of issue with the coil, or have tips on how to correct it? Some pics for reference are attached. Thanks!
(Above: Green circle is ground (I think); Red circle is stub of wire that broke off from main wire coming from points).
Edit:
Tomorrow I will upload pictures of the engine where the coil wires are and where the other ground wire went
I suspect the other one may have had to do with the safety mechanism in some way since it was near the throttle assy.
with this in mind I was wondering if anyone has an idea of how I would go about starting one of these with no throttle cable or start/stop lever attached
Also, how dangerous is it to start without a blade? I've heard kickback is a concern, but assuming the alternative is leaving a blade attached and trying to start that I'd prefer risking bruising my knuckles for a week.
#2

Boudreaux In Eunice La.
Boudreaux In Eunice La.
Hey Mon Ami you came to the right forum for advice ..........
1st ....... Yes bolt the engine to a mower frame and install a blade.... Under size doesn't matter.... That is your extra weight so you don't get a kick back......
2nd ...... The wire with the connector spade that has the hole in it goes under the coil mounting bolt......
3rd ...... The wire you broke off can be soldered back together.... Use heat shrink tubing to insulate it......
4th ...... You can use a newer coil from a 3 to 4 1/2 HP Briggs engine and that will eliminate the points..........
Some pictures will be nice to post , but I know the engines well that you have...........
I will be on here till 2 AM tonight, but I won't be back on here till around noon tomorrow and then back on around 4 PM. tomorrow......
Plus Tard Mon Ami ~!~!
#3

ILENGINE
ILENGINE
I wouldn't worry so much about the wires. From the rust on the surface of the lamination on the coil, I am betting that they are swelled,and if they are will need to be replaced anyway due to the disruption of magnetic flow, will cause loss of fire. if you get a new coil from Briggs you won't get the one for the points anyway, it will be solid state with points requires.
#4
T
TylerFrankel
Thanks to both of you for the quick replies. This is very helpful information. What you're saying here is that I can simply use the electronic ignition coils and bypass the old points and condenser, which is probably what I want to do in order to prevent the need for removing the flywheel, especially since the wires seem worn badly. However I have a few questions.
1. With the wire that comes from the base of the flywheel out of the condenser and travels to the area near the throttle assy, I am assuming this has to do with the kill switch, or is that the wire I showed in the picture? In other words, if I replace this, will I need to cut the wire from the points and solder it to the prong on the new coil to act as a kill switch, or what? Basically how will the kill switch be affected by this, and if I ignore it can the kill switch just be overridden if it's disconnected.
2. My flywheel has two magnets since its a point and condenser system, but I thought the new flywheels for electronic ignition have one? If so, can i simply block off a magnet with tape or scrape it out to prevent double ignition? Or will the electronic ignition's transistors account for this?
3. Would this work as a coil? (Its third party but I want to test the system before spending 40-50 dollars)
https://www.ebay.com/itm/Electronic-Ignition-Coil-For-Briggs-Stratton-695711-802574-796964-126700-121700/152638330265?hash=item2389f41599:rk:5 f:1&checksum=15263833026590f1abf6651842848ac7e6197139e5a5&enc=AQADAAADABkojIFHYtWT%2BANpG6F7t2H2ziylClm81yGy1RFb5mReYyRWQNe9Ks4r4z%2Bj15CMaa8Mz5LulrGpO%2FXcv%2BUq1kqi2pFWCgNIfFiv0f1CIbCWzYE153vRJRrAKLNWAkL0hKl9BGmw2T9rPH4ZBiaLXq97ovgIAStFx%2FhrfeH%2BbaGtnMAUb9RmArFCqNbwaTgx6aOhiHel0drxv%2Bqvg0LL1lGeVlHEr5FzZVEHc%2BK2Zz1Z749t379WW4iAEwccwqZOE5HafQF2GA5NgbwTX0D0MBMk6usEg0sbjofNkZjj8DAHmkKtQaWXZKiIQuUhmOnXNvCmUBLqT6KqDXTz0zhjGCqT0gF8eJsHYc%2BxH6lOyGONmFTjompSm9X%2FVKI4%2FGxpsDVtXB7J3gSAUuq1MlU8W%2FopctiATKlw2WCxuwCuWQCZ05ZL9XmcyybAektKQuNr6cvFrALR6crqu5HjjXeMUWDKpQegecoSzf2268Ui0wEjpQvGKgOJTf%2FpDJIcKtbXgz6TyGbLQf4061kaJrNb7aRIhjQqrOBMvzuJZ2fpYfqlLPstybKNcoamGNFqOubVF8IER7jEuPOkznqTFso%2Fm94lkoHu8l3xKqVOjG%2F6RLJ2uyZKsCFjc2iiWKcCczO014SeiHA8NRYeMgV0g0Jd4XC5x11sHVRAWGlk3GL4PA%2Fafv1Nd9tkKmR%2Fn3UsbixgM8Ps2Pt6H21RyjuoH6JP%2BMKg53tNQ53KtjiEiONqfrAF%2BkfYsRo9WAIaLRLaASwGzN8rxGioZ87Oja28Vafq4L1YfRbygHA%2Bw44Zfc%2F2A4TFQi1aQx3mwpMofTezXIqA9nsMtZ%2BMCmBk%2BAuHh47903Rt7yMwgZ0O%2FVhCM24gjftjqUEZO%2B7iqZo4ASkprm%2FdnRtZXuNXDioJwZHr9gRhkFOG7bQpxSuWUMURL8pO5B1vTNsYRzXcjNuSxINqn8wK0WbZZlFhrwzdSDrZtSPEl2ohSUqxHXHgjEDEjq7RFEriA8n4o2qsOcTlgTrYlMcJmA%3D%3D&frcectupt=truez
4. Can you briefly tell me what the two wires that I suspect are for ground do? Assuming you don't need the pictures, basically it's like this: 2 wires come out of the condensor area, 1 goes to the coil and 1 goes to the piece near the throttle assembly (metal piece that goes over head block). Then there's a wire that came out of the coil and went to a screw on the coil. I figured they were grounding, but I don't know what the two wires that aren't from the condenser to the coil are for, and how much I need to worry about it?
Thanks so much for everything!
Edit:
I looked up how the governor works and it seems like throttle can be controlled at the lever without linkage, however I'm still curious about how the kill switch works.... Interesting how the spring tension affects how much the vane moves and therefore how fast or slow the engine runs.
T
TylerFrankel
Hey Mon Ami you came to the right forum for advice ..........
1st ....... Yes bolt the engine to a mower frame and install a blade.... Under size doesn't matter.... That is your extra weight so you don't get a kick back......
2nd ...... The wire with the connector spade that has the hole in it goes under the coil mounting bolt......
3rd ...... The wire you broke off can be soldered back together.... Use heat shrink tubing to insulate it......
4th ...... You can use a newer coil from a 3 to 4 1/2 HP Briggs engine and that will eliminate the points..........
Some pictures will be nice to post , but I know the engines well that you have...........
I will be on here till 2 AM tonight, but I won't be back on here till around noon tomorrow and then back on around 4 PM. tomorrow......
Plus Tard Mon Ami ~!~!
Thanks to both of you for the quick replies. This is very helpful information. What you're saying here is that I can simply use the electronic ignition coils and bypass the old points and condenser, which is probably what I want to do in order to prevent the need for removing the flywheel, especially since the wires seem worn badly. However I have a few questions.
1. With the wire that comes from the base of the flywheel out of the condenser and travels to the area near the throttle assy, I am assuming this has to do with the kill switch, or is that the wire I showed in the picture? In other words, if I replace this, will I need to cut the wire from the points and solder it to the prong on the new coil to act as a kill switch, or what? Basically how will the kill switch be affected by this, and if I ignore it can the kill switch just be overridden if it's disconnected.
2. My flywheel has two magnets since its a point and condenser system, but I thought the new flywheels for electronic ignition have one? If so, can i simply block off a magnet with tape or scrape it out to prevent double ignition? Or will the electronic ignition's transistors account for this?
3. Would this work as a coil? (Its third party but I want to test the system before spending 40-50 dollars)
https://www.ebay.com/itm/Electronic-Ignition-Coil-For-Briggs-Stratton-695711-802574-796964-126700-121700/152638330265?hash=item2389f41599:rk:5
f:1&checksum=15263833026590f1abf6651842848ac7e6197139e5a5&enc=AQADAAADABkojIFHYtWT%2BANpG6F7t2H2ziylClm81yGy1RFb5mReYyRWQNe9Ks4r4z%2Bj15CMaa8Mz5LulrGpO%2FXcv%2BUq1kqi2pFWCgNIfFiv0f1CIbCWzYE153vRJRrAKLNWAkL0hKl9BGmw2T9rPH4ZBiaLXq97ovgIAStFx%2FhrfeH%2BbaGtnMAUb9RmArFCqNbwaTgx6aOhiHel0drxv%2Bqvg0LL1lGeVlHEr5FzZVEHc%2BK2Zz1Z749t379WW4iAEwccwqZOE5HafQF2GA5NgbwTX0D0MBMk6usEg0sbjofNkZjj8DAHmkKtQaWXZKiIQuUhmOnXNvCmUBLqT6KqDXTz0zhjGCqT0gF8eJsHYc%2BxH6lOyGONmFTjompSm9X%2FVKI4%2FGxpsDVtXB7J3gSAUuq1MlU8W%2FopctiATKlw2WCxuwCuWQCZ05ZL9XmcyybAektKQuNr6cvFrALR6crqu5HjjXeMUWDKpQegecoSzf2268Ui0wEjpQvGKgOJTf%2FpDJIcKtbXgz6TyGbLQf4061kaJrNb7aRIhjQqrOBMvzuJZ2fpYfqlLPstybKNcoamGNFqOubVF8IER7jEuPOkznqTFso%2Fm94lkoHu8l3xKqVOjG%2F6RLJ2uyZKsCFjc2iiWKcCczO014SeiHA8NRYeMgV0g0Jd4XC5x11sHVRAWGlk3GL4PA%2Fafv1Nd9tkKmR%2Fn3UsbixgM8Ps2Pt6H21RyjuoH6JP%2BMKg53tNQ53KtjiEiONqfrAF%2BkfYsRo9WAIaLRLaASwGzN8rxGioZ87Oja28Vafq4L1YfRbygHA%2Bw44Zfc%2F2A4TFQi1aQx3mwpMofTezXIqA9nsMtZ%2BMCmBk%2BAuHh47903Rt7yMwgZ0O%2FVhCM24gjftjqUEZO%2B7iqZo4ASkprm%2FdnRtZXuNXDioJwZHr9gRhkFOG7bQpxSuWUMURL8pO5B1vTNsYRzXcjNuSxINqn8wK0WbZZlFhrwzdSDrZtSPEl2ohSUqxHXHgjEDEjq7RFEriA8n4o2qsOcTlgTrYlMcJmA%3D%3D&frcectupt=truez4. Can you briefly tell me what the two wires that I suspect are for ground do? Assuming you don't need the pictures, basically it's like this: 2 wires come out of the condensor area, 1 goes to the coil and 1 goes to the piece near the throttle assembly (metal piece that goes over head block). Then there's a wire that came out of the coil and went to a screw on the coil. I figured they were grounding, but I don't know what the two wires that aren't from the condenser to the coil are for, and how much I need to worry about it?
Thanks so much for everything!
Edit:
I looked up how the governor works and it seems like throttle can be controlled at the lever without linkage, however I'm still curious about how the kill switch works.... Interesting how the spring tension affects how much the vane moves and therefore how fast or slow the engine runs.
#5
A
(Account Closed)
The old wires from under the flywheel are not needed at all. Cut em, yank em, don't matter, your not using them.
The new coil (as you can see in the link you posted) has a male electrical tab on it. That's to KILL the engine when grounded. So simply wire that tab to your kill switch, etc...
If one of your other engines has what appears no points (B&S), HP range posted above, I'd put that coil on there before investing more into the engine.
A
(Account Closed)
Thanks to both of you for the quick replies. This is very helpful information. What you're saying here is that I can simply use the electronic ignition coils and bypass the old points and condenser, which is probably what I want to do in order to prevent the need for removing the flywheel, especially since the wires seem worn badly. However I have a few questions.
1. With the wire that comes from the base of the flywheel out of the condenser and travels to the area near the throttle assy, I am assuming this has to do with the kill switch, or is that the wire I showed in the picture? In other words, if I replace this, will I need to cut the wire from the points and solder it to the prong on the new coil to act as a kill switch, or what? Basically how will the kill switch be affected by this, and if I ignore it can the kill switch just be overridden if it's disconnected.
2. My flywheel has two magnets since its a point and condenser system, but I thought the new flywheels for electronic ignition have one? If so, can i simply block off a magnet with tape or scrape it out to prevent double ignition? Or will the electronic ignition's transistors account for this?
3. Would this work as a coil? (Its third party but I want to test the system before spending 40-50 dollars)
https://www.ebay.com/itm/Electronic-Ignition-Coil-For-Briggs-Stratton-695711-802574-796964-126700-121700/152638330265?hash=item2389f41599:rk:5
4. Can you briefly tell me what the two wires that I suspect are for ground do? Assuming you don't need the pictures, basically it's like this: 2 wires come out of the condensor area, 1 goes to the coil and 1 goes to the piece near the throttle assembly (metal piece that goes over head block). Then there's a wire that came out of the coil and went to a screw on the coil. I figured they were grounding, but I don't know what the two wires that aren't from the condenser to the coil are for, and how much I need to worry about it?
Thanks so much for everything!
The old wires from under the flywheel are not needed at all. Cut em, yank em, don't matter, your not using them.
The new coil (as you can see in the link you posted) has a male electrical tab on it. That's to KILL the engine when grounded. So simply wire that tab to your kill switch, etc...
If one of your other engines has what appears no points (B&S), HP range posted above, I'd put that coil on there before investing more into the engine.
#6
T
TylerFrankel
Awesome! So I imagine that this means the kill switch won't matter as long as I don't connect anything to it and it will operate normally (not like a mower engine where the handle has to be held down). Since this isn't going to be used yet I won't worry about a kill check until I use it for something. As far as the others go, there's one that looks newer as it is called "classic" and I'll check it for a electronic ignition. I also have a magnetron mower engine I could borrow from.
So what about the flywheel having 2 magnets? Will that matter?
Thanks so much!
T
TylerFrankel
The old wires from under the flywheel are not needed at all. Cut em, yank em, don't matter, your not using them.
The new coil (as you can see in the link you posted) has a male electrical tab on it. That's to KILL the engine when grounded. So simply wire that tab to your kill switch, etc...
If one of your other engines has what appears no points (B&S), HP range posted above, I'd put that coil on there before investing more into the engine.
Awesome! So I imagine that this means the kill switch won't matter as long as I don't connect anything to it and it will operate normally (not like a mower engine where the handle has to be held down). Since this isn't going to be used yet I won't worry about a kill check until I use it for something. As far as the others go, there's one that looks newer as it is called "classic" and I'll check it for a electronic ignition. I also have a magnetron mower engine I could borrow from.
So what about the flywheel having 2 magnets? Will that matter?
Thanks so much!
#7
ILENGINE
Have you checked both magnets to see if they are really magnets, or possibly a non magnetic counterweight to offset the magnet on the opposite side of the flywheel
ILENGINE
Awesome! So I imagine that this means the kill switch won't matter as long as I don't connect anything to it and it will operate normally (not like a mower engine where the handle has to be held down). Since this isn't going to be used yet I won't worry about a kill check until I use it for something. As far as the others go, there's one that looks newer as it is called "classic" and I'll check it for a electronic ignition. I also have a magnetron mower engine I could borrow from.
So what about the flywheel having 2 magnets? Will that matter?
Thanks so much!
Have you checked both magnets to see if they are really magnets, or possibly a non magnetic counterweight to offset the magnet on the opposite side of the flywheel
#8
A
(Account Closed)
Re the kill switch, I removed the entire brake / lever / kill switch assembly off my 7 HP Briggs and wired THAT wire direct to an on/off switch (bolted to a bracket I made in the same place as the original brake.
No levers to hold, no re-starting, run's till you toggle the switch to off and ground out that wire. (If you have kids using it, might not be a good idea).

A
(Account Closed)
Awesome! So I imagine that this means the kill switch won't matter as long as I don't connect anything to it and it will operate normally YES..(not like a mower engine where the handle has to be held down). Since this isn't going to be used yet I won't worry about a kill check until I use it for something. As far as the others go, there's one that looks newer as it is called "classic" and I'll check it for a electronic ignition. I also have a magnetron mower engine I could borrow from.
So what about the flywheel having 2 magnets? LOOK AT MY FLYWHEEL BELOW CLOSLEY, IT HAS TWO MAGNETS, AND IT IS ELECTRONIC IGNITION (ABOUT 13 YEARS OLD) Will that matter? SHOULDN'T
Thanks so much!
Re the kill switch, I removed the entire brake / lever / kill switch assembly off my 7 HP Briggs and wired THAT wire direct to an on/off switch (bolted to a bracket I made in the same place as the original brake.
No levers to hold, no re-starting, run's till you toggle the switch to off and ground out that wire. (If you have kids using it, might not be a good idea).
#9
T
TylerFrankel
Thank you. I will try to use a different coil and leave it unswitched for now. I will buy one later to ensure I can turn it off without unplugging spark plug or something. I also will try to leave the magnets alone. It looked like a real magnet but I will make sure later today when I have opportunity, and proceed to try anyway. Good idea with the switch mounted to the engine btw.
T
TylerFrankel
Re the kill switch, I removed the entire brake / lever / kill switch assembly off my 7 HP Briggs and wired THAT wire direct to an on/off switch (bolted to a bracket I made in the same place as the original brake.
No levers to hold, no re-starting, run's till you toggle the switch to off and ground out that wire. (If you have kids using it, might not be a good idea).
Thank you. I will try to use a different coil and leave it unswitched for now. I will buy one later to ensure I can turn it off without unplugging spark plug or something. I also will try to leave the magnets alone. It looked like a real magnet but I will make sure later today when I have opportunity, and proceed to try anyway. Good idea with the switch mounted to the engine btw.
#10
Boudreaux In Eunice La.
Boudreaux In Eunice La.
Ok ........... I'm back......... Scott and IL Engine gave you good advice........
Yes the magnets on your flywheel will work with the newer style Mag coils.......... I do it all the time.....
As for as the two wires on the old coil, one is a kill and the other goes to the points and condenser for spark....... If you put the mag coil on there those point wires can be clipped... Like Scott said, no need to pull the flywheel.........
Plus Tard Mon Ami ~!~!
#11
T
TylerFrankel
Thanks everyone! I looked at it today more when I got home and found out it's a 1976 model! One of the other 4 I got had the modern electronic ignition, so I pulled it and after ensuring that it fit I began reassembling what I disassembled. I checked the valves to make sure they weren't loose in closed position to make sure I wouldn't have problems later, and they seemed tight. Then, I tried to clear out the oil and water from the sump as best I could being that I could only pull the thing off 1/2 an inch. Then, I re-bolted the base on with 3 screws. I then put the bolts back on the bottom of the head and head gasket (5 big screws). Then I replaced the muffler and carb/gas tank (1 screw). Next I put the coil and pneumatic governor back (2 small screws). Then the top went back on (3 medium screws), and the throttle (3 big screws that go into head too, 1 small 1 on tank. After I did all this, I realised the engine won't turn anymore, and I was left with 3 small screws same size as the one that screws onto the gas tank. I probably just missed something somewhere or put screws in the wrong spots, but everything went in flush so I'm baffled, but I'll tear it back down tomorrow. If anyone knows where they could go let me know please. I don't think I put the bottom on wrong because as far as I know the parts inside line up as the screws that hold it in do, and it turned after that before I completely reassembled it. Anyway.... I couldn't check for spark but tomorrow I'll be home before dark so I can work for longer and re-disassemble and assemble to let the engine spin again and figure out where the screws go,then check for spark again. After that, I plan to drill some holes into wood to make a stand and try to fire it with some gas and see what happens. Provided that fails, I'll rebuild the carb and check again. After that.... I'll be out of ideas.
I'll make sure to give it throttle when I'm trying to start of course, and I don't imagine the coil will not produce a spark because of a kill switch if nothing touches the tab right?
On an unrelated note, I have a briggs from 85 with a magnetron and manual start system 2 thats mounted on a deck and it works but I can't for the life of me figure out how everything works. It has a manual throttle control, it appears the kill switch connects to the deck, and theres wires running everywhere that none of the other engines I have possess. The motor adjusts the butterfly and speed under load, but there is no vane/pneumatic system. it also has a brake, whereas these engines don't. I wonder if the previous owner removed some of these parts...? and if they won't work because they don't have a kill system?
Again I really appreciate everyones ideas!
T
TylerFrankel
Ok ........... I'm back......... Scott and IL Engine gave you good advice........
Yes the magnets on your flywheel will work with the newer style Mag coils.......... I do it all the time.....
As for as the two wires on the old coil, one is a kill and the other goes to the points and condenser for spark....... If you put the mag coil on there those point wires can be clipped... Like Scott said, no need to pull the flywheel.........
Plus Tard Mon Ami ~!~!
Thanks everyone! I looked at it today more when I got home and found out it's a 1976 model! One of the other 4 I got had the modern electronic ignition, so I pulled it and after ensuring that it fit I began reassembling what I disassembled. I checked the valves to make sure they weren't loose in closed position to make sure I wouldn't have problems later, and they seemed tight. Then, I tried to clear out the oil and water from the sump as best I could being that I could only pull the thing off 1/2 an inch. Then, I re-bolted the base on with 3 screws. I then put the bolts back on the bottom of the head and head gasket (5 big screws). Then I replaced the muffler and carb/gas tank (1 screw). Next I put the coil and pneumatic governor back (2 small screws). Then the top went back on (3 medium screws), and the throttle (3 big screws that go into head too, 1 small 1 on tank. After I did all this, I realised the engine won't turn anymore, and I was left with 3 small screws same size as the one that screws onto the gas tank. I probably just missed something somewhere or put screws in the wrong spots, but everything went in flush so I'm baffled, but I'll tear it back down tomorrow. If anyone knows where they could go let me know please. I don't think I put the bottom on wrong because as far as I know the parts inside line up as the screws that hold it in do, and it turned after that before I completely reassembled it. Anyway.... I couldn't check for spark but tomorrow I'll be home before dark so I can work for longer and re-disassemble and assemble to let the engine spin again and figure out where the screws go,then check for spark again. After that, I plan to drill some holes into wood to make a stand and try to fire it with some gas and see what happens. Provided that fails, I'll rebuild the carb and check again. After that.... I'll be out of ideas.
I'll make sure to give it throttle when I'm trying to start of course, and I don't imagine the coil will not produce a spark because of a kill switch if nothing touches the tab right?
On an unrelated note, I have a briggs from 85 with a magnetron and manual start system 2 thats mounted on a deck and it works but I can't for the life of me figure out how everything works. It has a manual throttle control, it appears the kill switch connects to the deck, and theres wires running everywhere that none of the other engines I have possess. The motor adjusts the butterfly and speed under load, but there is no vane/pneumatic system. it also has a brake, whereas these engines don't. I wonder if the previous owner removed some of these parts...? and if they won't work because they don't have a kill system?
Again I really appreciate everyones ideas!
#12
Boudreaux In Eunice La.
Boudreaux In Eunice La.
Tyler if you put only 3 bolts on the sump you are missing 3 bolts....... Your engine has 6 bolts...... I don't know why your engine is binding up ...... I wasn't there and I don't know how you put everything back together ......
Here's a short video I made a while back about a governor replacement..... This engine has 7 sump bolts...... Just 1 extra in the back of the engine..... Otherwise your engine is the same one as this one is just a lil smaller in size and you don't have the mechanical governor on yours.....
Enjoy ............
https://youtu.be/tqQQ618XeiE
#13
T
TylerFrankel
Ohhhhh I'm silly. Awesome video! I watched it and the governor you're talking about might explain the mysterious invisible governor on my other mower, but since the one I'm working on now is pneumatic then I shouldn't have disrupted anything by partially removing the base right? Only thing I can think of is the oil slinger so I'll try to peak in there and make sure it's on the green cam gear still, and then it should be fine I suppose when I put the base on. In the video the slinger has to be lined up with the governor, but I think mine doesn't (it just dangles there I guess) since my governor is pneumatic. Is this true? If not and I messed, I'll have to find a way to remove the darn blade mount to resettle everything. Anyway, tomorrow I'll re-disassemble the engine and figure out where the other 3 bolts go. I probably just put some long bolts where short bolts should go, maybe wedged one into the flywheel blades. I also bet an easy way to make sure the slinger hasn't gotten loose is to shake it around and see if I hear clanking lol...
T
TylerFrankel
Tyler if you put only 3 bolts on the sump you are missing 3 bolts....... Your engine has 6 bolts...... I don't know why your engine is binding up ...... I wasn't there and I don't know how you put everything back together ......
Here's a short video I made a while back about a governor replacement..... This engine has 7 sump bolts...... Just 1 extra in the back of the engine..... Otherwise your engine is the same one as this one is just a lil smaller in size and you don't have the mechanical governor on yours.....
Enjoy ............
https://youtu.be/tqQQ618XeiE
Ohhhhh I'm silly. Awesome video! I watched it and the governor you're talking about might explain the mysterious invisible governor on my other mower, but since the one I'm working on now is pneumatic then I shouldn't have disrupted anything by partially removing the base right? Only thing I can think of is the oil slinger so I'll try to peak in there and make sure it's on the green cam gear still, and then it should be fine I suppose when I put the base on. In the video the slinger has to be lined up with the governor, but I think mine doesn't (it just dangles there I guess) since my governor is pneumatic. Is this true? If not and I messed, I'll have to find a way to remove the darn blade mount to resettle everything. Anyway, tomorrow I'll re-disassemble the engine and figure out where the other 3 bolts go. I probably just put some long bolts where short bolts should go, maybe wedged one into the flywheel blades. I also bet an easy way to make sure the slinger hasn't gotten loose is to shake it around and see if I hear clanking lol...
#14
A
(Account Closed)
A
(Account Closed)
I gather you adjusted the air gap for the coil about .010" (or with a business card) between the MAGNETS (on the flywheel) and the coil?
If not, that (if adjusted way too tight), would bind up...
Re the extra kill switch wires on the Magnetron. Some mowers had an additional kill switch wire often ran to the chute itself. If the chute was removed and not replaced with say a plastic mulcher "part/plug", being it NOW has an OPEN deck, that wire would kill the ignition-for safety reasons.
Some Briggs, depending on the style had the kill switch wire ONLY attached to the brake mechanism, older machines (with no brake) would be attached to the throttle assembly at the engine. As a side note, that little plastic "square" that the kill switch wire would go to, MANY engines have the square opening for it even thou it's NOT used. Briggs just left that square opening in later years. Depending on your engines throttle, you may be able to attach the kill wire to that "square" if installed and the actual throttle turns far enough to touch (kill it)..
Super old engines didn't have a wire at all. They had a tab attached to a head bolt that you pushed down and simply shorted the spark plug to ground killing the engine.
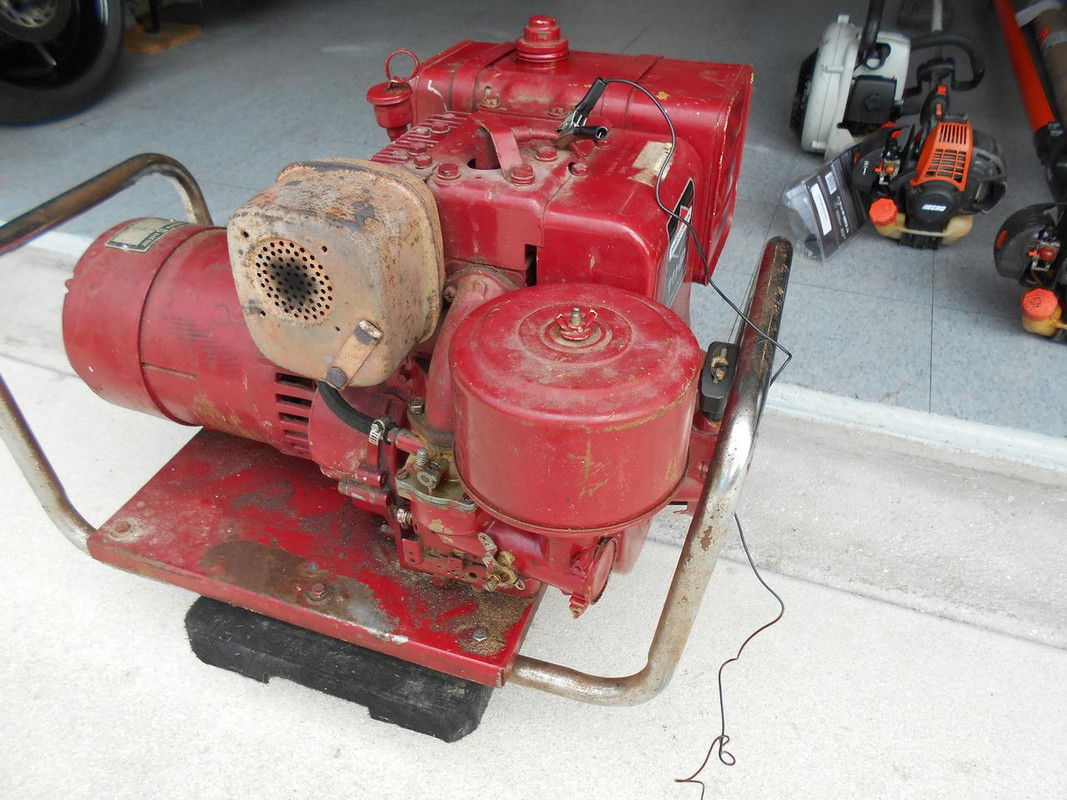
I just got this customers engine running (11 HP Briggs). If you look closely where the spark plug is, you'll see the tab (still painted red along with the spark plug cover-which has a small hole in it to allow grounding):
Just finished adjusting the RPM'S (3,600 as it's a generator). The black wire hanging loose is my tach.
If not, that (if adjusted way too tight), would bind up...
Re the extra kill switch wires on the Magnetron. Some mowers had an additional kill switch wire often ran to the chute itself. If the chute was removed and not replaced with say a plastic mulcher "part/plug", being it NOW has an OPEN deck, that wire would kill the ignition-for safety reasons.
Some Briggs, depending on the style had the kill switch wire ONLY attached to the brake mechanism, older machines (with no brake) would be attached to the throttle assembly at the engine. As a side note, that little plastic "square" that the kill switch wire would go to, MANY engines have the square opening for it even thou it's NOT used. Briggs just left that square opening in later years. Depending on your engines throttle, you may be able to attach the kill wire to that "square" if installed and the actual throttle turns far enough to touch (kill it)..
Super old engines didn't have a wire at all. They had a tab attached to a head bolt that you pushed down and simply shorted the spark plug to ground killing the engine.
I just got this customers engine running (11 HP Briggs). If you look closely where the spark plug is, you'll see the tab (still painted red along with the spark plug cover-which has a small hole in it to allow grounding):
Just finished adjusting the RPM'S (3,600 as it's a generator). The black wire hanging loose is my tach.
#15
T
TylerFrankel
Awesome. So that kinda helps me understand my functioning mower, I guess there are 2 kill switches; 1 from the handle that goes to a brake and 1 that engages when the throttle is closed all the way (it can be stopped both ways). This one I'm working on looked like it had the kill wire bare near the throttle, so I imagine this is how it would be grounded/killed... I'll take note of that when I want to set it up. For now I'll ground it manually. Interesting. Thanks.
The coil is spaced properly, I realized I put the screws meant to be in the sump in the cover, which are too long and probably preventing the flywheel when turning. Will update when I get home.
Thanks
T
TylerFrankel
I gather you adjusted the air gap for the coil about .010" (or with a business card) between the MAGNETS (on the flywheel) and the coil?
If not, that (if adjusted way too tight), would bind up...
Re the extra kill switch wires on the Magnetron. Some mowers had an additional kill switch wire often ran to the chute itself. If the chute was removed and not replaced with say a plastic mulcher "part/plug", being it NOW has an OPEN deck, that wire would kill the ignition-for safety reasons.
Some Briggs, depending on the style had the kill switch wire ONLY attached to the brake mechanism, older machines (with no brake) would be attached to the throttle assembly at the engine. As a side note, that little plastic "square" that the kill switch wire would go to, MANY engines have the square opening for it even thou it's NOT used. Briggs just left that square opening in later years. Depending on your engines throttle, you may be able to attach the kill wire to that "square" if installed and the actual throttle turns far enough to touch (kill it)..
Super old engines didn't have a wire at all. They had a tab attached to a head bolt that you pushed down and simply shorted the spark plug to ground killing the engine.
I just got this customers engine running (11 HP Briggs). If you look closely where the spark plug is, you'll see the tab (still painted red along with the spark plug cover-which has a small hole in it to allow grounding):
Just finished adjusting the RPM'S (3,600 as it's a generator). The black wire hanging loose is my tach.
Awesome. So that kinda helps me understand my functioning mower, I guess there are 2 kill switches; 1 from the handle that goes to a brake and 1 that engages when the throttle is closed all the way (it can be stopped both ways). This one I'm working on looked like it had the kill wire bare near the throttle, so I imagine this is how it would be grounded/killed... I'll take note of that when I want to set it up. For now I'll ground it manually. Interesting. Thanks.
The coil is spaced properly, I realized I put the screws meant to be in the sump in the cover, which are too long and probably preventing the flywheel when turning. Will update when I get home.
Thanks
#16
T
TylerFrankel
Update:
Big progress. I fixed the issue with the screws and actually put them back right, then tested for spark. It sparks well enough, not quite as bright as the mower but I can see it go. Then I put it on some wood and pulled it over a few times after adding 15oz oil. (not quite enough but enough to test if it starts). It doesn't have a blade, and I noticed when I was pulling it over that it seemed to have good compression. A couple times it yanked back hard, which I imaging is kickback. I'm pretty sure this means the engine is firing and the carb is providing fuel properly. Then, I went to pull it once and got a good kickback and a puff of smoke out the carb. Probably backfiring because of kickback, but anyway this means we have fire! and I shocked my toe on the spark plug to check. :tongue: Now I suppose the order at hand is putting a blade on and finding something to mount it to so I don't lose my hand trying to start it. I think I'll do this with a blade from another mower and some wood and bolts to mount. I'll wear safety glasses too of course. If it starts well, I'll finish the first engine off by dumping the oil again and checking the oil sprayer to make sure its in tact, then replace the gasket and oil. And, maybe find a way to take off the stupid blade mount, although I suppose I could use it to attach other things.
T
TylerFrankel
Awesome. So that kinda helps me understand my functioning mower, I guess there are 2 kill switches; 1 from the handle that goes to a brake and 1 that engages when the throttle is closed all the way (it can be stopped both ways). This one I'm working on looked like it had the kill wire bare near the throttle, so I imagine this is how it would be grounded/killed... I'll take note of that when I want to set it up. For now I'll ground it manually. Interesting. Thanks.
The coil is spaced properly, I realized I put the screws meant to be in the sump in the cover, which are too long and probably preventing the flywheel when turning. Will update when I get home.
Thanks
Update:
Big progress. I fixed the issue with the screws and actually put them back right, then tested for spark. It sparks well enough, not quite as bright as the mower but I can see it go. Then I put it on some wood and pulled it over a few times after adding 15oz oil. (not quite enough but enough to test if it starts). It doesn't have a blade, and I noticed when I was pulling it over that it seemed to have good compression. A couple times it yanked back hard, which I imaging is kickback. I'm pretty sure this means the engine is firing and the carb is providing fuel properly. Then, I went to pull it once and got a good kickback and a puff of smoke out the carb. Probably backfiring because of kickback, but anyway this means we have fire! and I shocked my toe on the spark plug to check. :tongue: Now I suppose the order at hand is putting a blade on and finding something to mount it to so I don't lose my hand trying to start it. I think I'll do this with a blade from another mower and some wood and bolts to mount. I'll wear safety glasses too of course. If it starts well, I'll finish the first engine off by dumping the oil again and checking the oil sprayer to make sure its in tact, then replace the gasket and oil. And, maybe find a way to take off the stupid blade mount, although I suppose I could use it to attach other things.
#17
Boudreaux In Eunice La.
Boudreaux In Eunice La.
You need to get you a good 3 jawed puller...... The kind that can be converted to a 2 jaw puller........ That will get your blade boss off easy.....
It has to come off to take the sump off all the way.......
Tired of typing got to go......
It has to come off to take the sump off all the way.......
Tired of typing got to go......
#18
D
dana a
D
dana a
IT WOULD BE BEST TO MOUNT THE ENGINE TO ANOTHER MOWER DECK. Starting it with a blade on it mounted to wood could be very dangerous. For testing purposes, an easy way to kill the engine is to close the choke. Instead of rigging up a throttle cable use your finger to work the throttle.
#19
A
(Account Closed)
Plus 100 ^^^
A
(Account Closed)
IT WOULD BE BEST TO MOUNT THE ENGINE TO ANOTHER MOWER DECK. Starting it with a blade on it mounted to wood could be very dangerous. For testing purposes, an easy way to kill the engine is to close the choke. Instead of rigging up a throttle cable use your finger to work the throttle.
Plus 100 ^^^
#20

tom3
tom3
Couple quick points.
The blade acts as a second flywheel, sure would help eliminate the kickback you're seeing. And converting points to electronic ignition with the solid state coil does increase the spark advance a couple degrees, makes for a bit more power but could also be causing the kickback without the blade on the motor. Those old motors are probably the usual plain aluminum bores, need to use the correct oil for any life from that. Today's oils have eliminated much of the barrier lubrication needed for this design.
Working on these simple motors is interesting and even fun sometimes.
#21
T
TylerFrankel
Well hello everyone! Thanks for all the replies. I got it to work today! I decided with much hesitation to take apart my new main lawnmower to use its deck. The other decks I have were literally rusted so hard that penetrating oil, hammers, impact drills, and 170LBS of man couldn't make their bolts budge. Hopefully I remember how to put it back together. Anyway, got the motor mounted and put the blade on, and after a good bit of pulling she revved right up and ran steadily until I pulled the spark plug cord off. It sounds strong enough to me, but I'm still going to drain the oil and re-add for safety, and replace the air filter, clean it up a bit, etc. Thanks everyone! I may be back to update on this engine, but I also have 3 others to repair. This is an awesome project and I can tell the spark was advanced, it seems to be a few degrees before TDC. Still worked out! Really appreciate everyones knowledge and advice.
T
TylerFrankel
Couple quick points.
The blade acts as a second flywheel, sure would help eliminate the kickback you're seeing. And converting points to electronic ignition with the solid state coil does increase the spark advance a couple degrees, makes for a bit more power but could also be causing the kickback without the blade on the motor. Those old motors are probably the usual plain aluminum bores, need to use the correct oil for any life from that. Today's oils have eliminated much of the barrier lubrication needed for this design.
Working on these simple motors is interesting and even fun sometimes.
Well hello everyone! Thanks for all the replies. I got it to work today! I decided with much hesitation to take apart my new main lawnmower to use its deck. The other decks I have were literally rusted so hard that penetrating oil, hammers, impact drills, and 170LBS of man couldn't make their bolts budge. Hopefully I remember how to put it back together. Anyway, got the motor mounted and put the blade on, and after a good bit of pulling she revved right up and ran steadily until I pulled the spark plug cord off. It sounds strong enough to me, but I'm still going to drain the oil and re-add for safety, and replace the air filter, clean it up a bit, etc. Thanks everyone! I may be back to update on this engine, but I also have 3 others to repair. This is an awesome project and I can tell the spark was advanced, it seems to be a few degrees before TDC. Still worked out! Really appreciate everyones knowledge and advice.
#22
T
TylerFrankel
Quick Question:
How terribly important is it to measure how hard I torque bolts onto blade, engine head, sump, etc.? I don't have any way to measure, I've always just tightened everything until I can't tighten it more without standing up and leveraging (enough so that it takes a good bit of force to loosen but not too tight). I try to make it uniform tightening throughout and haven't had any trouble so far....
T
TylerFrankel
Well hello everyone! Thanks for all the replies. I got it to work today! I decided with much hesitation to take apart my new main lawnmower to use its deck. The other decks I have were literally rusted so hard that penetrating oil, hammers, impact drills, and 170LBS of man couldn't make their bolts budge. Hopefully I remember how to put it back together. Anyway, got the motor mounted and put the blade on, and after a good bit of pulling she revved right up and ran steadily until I pulled the spark plug cord off. It sounds strong enough to me, but I'm still going to drain the oil and re-add for safety, and replace the air filter, clean it up a bit, etc. Thanks everyone! I may be back to update on this engine, but I also have 3 others to repair. This is an awesome project and I can tell the spark was advanced, it seems to be a few degrees before TDC. Still worked out! Really appreciate everyones knowledge and advice.
Quick Question:
How terribly important is it to measure how hard I torque bolts onto blade, engine head, sump, etc.? I don't have any way to measure, I've always just tightened everything until I can't tighten it more without standing up and leveraging (enough so that it takes a good bit of force to loosen but not too tight). I try to make it uniform tightening throughout and haven't had any trouble so far....
#23
tom3
tom3
A short handle 3/8" ratchet on most engine bolts will get them about right, a 1/2" on the blade bolt, pretty snug on that. Most parts with a gasket don't need to be super tight, but evenly tightened is pretty important.
#24
T
TylerFrankel
Good advice. Thanks man!
Today I started work on #2 since #1 is in working order. Its going to need a bit more work, as a suspicious level of oil made its way into the piston head, the points and condenser and/or coil aren't producing ANY spark, and the starter clutch is rusted to hell and back. Will be an interesting project. Post more soon! Thanks everyone!
T
TylerFrankel
A short handle 3/8" ratchet on most engine bolts will get them about right, a 1/2" on the blade bolt, pretty snug on that. Most parts with a gasket don't need to be super tight, but evenly tightened is pretty important.
Good advice. Thanks man!
Today I started work on #2 since #1 is in working order. Its going to need a bit more work, as a suspicious level of oil made its way into the piston head, the points and condenser and/or coil aren't producing ANY spark, and the starter clutch is rusted to hell and back. Will be an interesting project. Post more soon! Thanks everyone!