You are using an out of date browser. It may not display this or other websites correctly.
You should upgrade or use an alternative browser.
You should upgrade or use an alternative browser.
Model 28 Vertical - No Compression
- Thread starter Humbug
- Start date
More options
Export threadThey all appear to be identical but I'll have a closer look at them and see if there are any small differences between them, could they be different thicknesses?. If they are all the same is there any preference about which type to use?If they're all the same you got some spares , you don't need more than one, Sometimes they'll put several different types to fit a various assortment of engines
I always use Permatex Gasket sealer on one side , Don't put anything on it until you are ready to put the 2 halves together, Use sealer or whatever you like only on one side in case you need to take it apart again , the gasket will hold and you should be able to re use it not having to scrape it off the clean side - never ran across any gaskets for a small gas engine crankcase with varied thickness . Just make sure it covers all the contact surfaces and does not cover any ports for lubrication or vents etc.
bertsmobile1
Lawn Royalty
- Joined
- Nov 29, 2014
- Threads
- 64
- Messages
- 24,705
The different colours are different thicknesses
You do a dry assembly ( all gaskets fitted ) then measure the end float of the crankshaft then remove enough of them to get the specified end float .
I am at the other computer so do not have the specs but from memory it is around 0.002"
You do a dry assembly ( all gaskets fitted ) then measure the end float of the crankshaft then remove enough of them to get the specified end float .
I am at the other computer so do not have the specs but from memory it is around 0.002"
That makes sense. I’ll go and dig out my dial indicator. A quick search seems to suggest that anywhere between 2 and 30 thou is acceptable but I’ll have a look for the specs on my engine to be sure.The different colours are different thicknesses
You do a dry assembly ( all gaskets fitted ) then measure the end float of the crankshaft then remove enough of them to get the specified end float .
I am at the other computer so do not have the specs but from memory it is around 0.002"

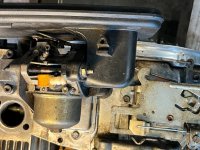
Thanks to the great help from you guys I’m almost done rebuilding this engine. I just have one last question though. It’s been a couple weeks since I took this apart and I can’t remember where one of the springs hooks onto. 
The spring that has me baffled is the super-thin wire spring that’s wrapped around the regulator link rod. At the regulator lever end I have it hooked in but I can’t remember where it hooks to at the carburettor end.
In the picture it’s in the top right corner. Anyone know this engine or have a diagram please?
Attachments
Perfect, many thanksUsually a tiny hole right on the same lever the larger rod fits onto .
 . I couldn’t see it so I pulled off the air filter housing base and it was much easier to see. I’m much obliged to you sir.
I had the engine back in one piece and fitted back in the mower but I just couldn’t get the thing to fire  .
.
I’m kicking myself for not checking it before I re-fitted the engine but I can only get about 20PSI of compression out of her. I replaced the head gasket and cleaned the valves (I didn’t grind or polish the seats), I didn’t touch the rings as they seemed to be fine. Is it likely to be the valves that is causing the loss of compression? I can’t think what else it could be.
This morning I pulled the engine out again and checked to see if I had got the rings offset from each other. They looked reasonable when I pulled the piston out but I ensured that they were 120 deg to each other when replacing it. The valves and pushers all seemed ok. I’m really baffled now. I’d be really grateful for any suggestions please.
.I’m kicking myself for not checking it before I re-fitted the engine but I can only get about 20PSI of compression out of her. I replaced the head gasket and cleaned the valves (I didn’t grind or polish the seats), I didn’t touch the rings as they seemed to be fine. Is it likely to be the valves that is causing the loss of compression? I can’t think what else it could be.
This morning I pulled the engine out again and checked to see if I had got the rings offset from each other. They looked reasonable when I pulled the piston out but I ensured that they were 120 deg to each other when replacing it. The valves and pushers all seemed ok. I’m really baffled now. I’d be really grateful for any suggestions please.
bertsmobile1
Lawn Royalty
- Joined
- Nov 29, 2014
- Threads
- 64
- Messages
- 24,705
This is why we do leak down tests
Lock the engine at TDC Firing stroke so both vales are closed
Remove spark plug and wrap some cloth around a long air duster
Remove dip stick
Insert into the spark plug hole & blow air into the cylinder ( low pressure )
Listen at the dip stick tube , cab & muffler .
You should get a SMALL amount coming from the dip stick and none from the muffler or carb
Spray around the gasket with soapy water and check for air bubbles