Ebay/Craigslist I may have found a deal

BustedKnuckles

Well-Known Member
Joined
Sep 26, 2012
Threads
16
Messages
119
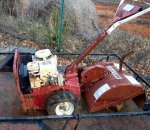
Wow... another good find and electric start to boot. Man, you must be living right! Oh, that picture reminds me... I need to add an inline fuel filter to mine. Let us know when you got it running....

Will do brother, just waiting on the parts to arrive so I can get started. Lots of family stuff coming up so it will be next week sometime most likely.
 

BustedKnuckles

Well-Known Member
Joined
Sep 26, 2012
Threads
16
Messages
119
I found this old Troy Bilt ad last night in a 1974 Popular Mechanics magazine I have. I usually thumb through these at night right before bed. I love the ads and there's still some good shop suggestions to be found in them.
 

Attachments

  • tbad.jpg
    tbad.jpg
    191.7 KB · Views: 12
Joined
Jun 8, 2012
Threads
321
Messages
6,749
I found this old Troy Bilt ad last night in a 1974 Popular Mechanics magazine I have. I usually thumb through these at night right before bed. I love the ads and there's still some good shop suggestions to be found in them.
Neat ad!! :thumbsup:
 

BustedKnuckles

Well-Known Member
Joined
Sep 26, 2012
Threads
16
Messages
119
We have parts! The axle seals, tine seals and carb kit came in yesterday so hopefully I can start making some progress this weekend. I think I'll knock out the tine seals first since they're dripping oil already. I've already got the the tine bolts loose so hopefully there won't be any nasty surprises when I get the holders off; I'll post photos as I go.

My total investment so far is $123 and change (the spare motor was insanely cheap :licking:) and I'm really looking forward to getting this machine back up and running.
 

BustedKnuckles

Well-Known Member
Joined
Sep 26, 2012
Threads
16
Messages
119
Ok, so I've thinking about these tine seals while chasing kids and cooking dinner. The manual says to check side to side play in the tine shaft; mine has about a 1/4" movement and is way too much. So, before I start, I have to buy some .010" gasket material since the side cover gasket also shims the side play.

Hopefully I won't find a worn out gear.
 

BustedKnuckles

Well-Known Member
Joined
Sep 26, 2012
Threads
16
Messages
119
Ok, play is more like 1/8" and there are some allen head screws in there somewhere.
 

Attachments

  • tine1.jpg
    tine1.jpg
    162.5 KB · Views: 9
  • tine2.jpg
    tine2.jpg
    171.3 KB · Views: 9
  • tine3.jpg
    tine3.jpg
    164.7 KB · Views: 8

BustedKnuckles

Well-Known Member
Joined
Sep 26, 2012
Threads
16
Messages
119
More pics. In between watching The Polar Express and other things, I dug out the allen screws and got the cover off. It looks like there was only one .010" gasket so that's what I'll go back with tomorrow. The seal on the other side will have to be removed with the tine shaft still in place.
 

Attachments

  • tine4.jpg
    tine4.jpg
    140.4 KB · Views: 10
  • tine5.jpg
    tine5.jpg
    167.8 KB · Views: 9
  • tine6.jpg
    tine6.jpg
    172.7 KB · Views: 8

HarryHarley

Well-Known Member
Joined
Mar 22, 2012
Threads
0
Messages
113
Nice pictures... Make sure to use super fine sandpaper on the rusty shaft before you put the new seals on. Then clean out that milky oil. Looks like some water got in there. I bet you took care of all that anyway. Just couldn't help myself!
Keep the pic's coming...
 

BustedKnuckles

Well-Known Member
Joined
Sep 26, 2012
Threads
16
Messages
119
Nice pictures... Make sure to use super fine sandpaper on the rusty shaft before you put the new seals on. Then clean out that milky oil. Looks like some water got in there. I bet you took care of all that anyway. Just couldn't help myself!
Keep the pic's coming...

You've got a good eye. I pulled the drain plug and about 6 ounces or more of water poured out before anything that remotely resembled oil started to drain. It was thick, gooey and nasty.

I got everything disassembled and need to clean up the tine shaft before reassembly. O'Reilly's had the 1/64 gasket material (3rd stop) so I would have to wait for a gasket to show up.
 

Attachments

  • tine13.jpg
    tine13.jpg
    104.9 KB · Views: 9
  • tine10.jpg
    tine10.jpg
    166.7 KB · Views: 7
  • tine8.jpg
    tine8.jpg
    110.2 KB · Views: 9
  • tine7.jpg
    tine7.jpg
    136.6 KB · Views: 8

BustedKnuckles

Well-Known Member
Joined
Sep 26, 2012
Threads
16
Messages
119
Tine seal replacement complete.

I wrapped up this job tonight and overall, it was very easy. I recommend taking your time and lots of photos when tackling something unknown (for me) like this.

Surprises? None really. The tine shaft is worn where the seals ride and the right side retaining bolt was loose creating wear on the key way and tine holder itself. I reversed the shaft so the pressure would be on the "good" part of the shaft key way. Tine shafts can be bought on ebay for around $60 so if it fails I know what to do.

The next step is to pick up the spare engine from my parents house tomorrow and (my favorite part) start working on getting the engine running. The transmission is drained and I'll fill it soon.

On a side note, I picked up a Snapper RT5 5hp rear tine tiller today to be a later project. I bought it from the original owner for $50 and it's been sitting for roughly 10 years. Should be interesting.
 

Attachments

  • tine18.jpg
    tine18.jpg
    128.7 KB · Views: 9
  • tine19.jpg
    tine19.jpg
    131.2 KB · Views: 9
  • tine20.jpg
    tine20.jpg
    170.2 KB · Views: 10
  • 100_0992.JPG
    100_0992.JPG
    258.1 KB · Views: 10
Top