FH580V carburetor removal

satman858

Active Member
Joined
Jun 22, 2013
Threads
12
Messages
68
I what to remove my carburetor to bring to a local lawnmower dealer to have my carburetor professional soaked and cleaned. I am concerned about me being able to remove this carburetor because of the uninstall instructions I read on page 3-25 of the service manual linked to the attachment below. The appears to me from reading that page that there are certain parts that have to be marked back to their original marking before you are able to remove the carburetor, and may be a little to much for me to handle, since I have never removed a carburetor before. The photo of my carburetor can be found on page 3-22 as it is the picture on the top of that page. Below you will find a attachment to the service manual. The Kawasaki engine on my Gravely lawnmower is the FH580V.

Any helpful information would be deeply appreciated. Thanks!
 

Attachments

  • Gravely - Kawasaki - FH580V service manual.pdf
    3.4 MB · Views: 39

EngineMan

Lawn Addict
Joined
Jun 12, 2012
Threads
9
Messages
2,275
Just make a note of all the parts or take some photos that way you shouldn't go wrong, if you do come here am sure there be someone to help you..!
 

Carscw

Lawn Pro
Joined
Aug 11, 2011
Threads
66
Messages
6,375
Use finger nail polish to Colorcode what parts go together. And take pics of every step.
 

satman858

Active Member
Joined
Jun 22, 2013
Threads
12
Messages
68
I am not sure what parts need to be removed to get the carburetor out.

This is what the service manual says about the uninstall process.

Carburetor Disassembly/Assembly-FH541V,
FH580V

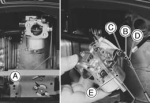
紐efer to the illustration for disassembly and assembly. 謬here are several passage plugs (Ball plugs) in the carburetor
body. Do not remove them. 稗efore disassembly, mark the out side of choke valve and
throttle valves for assembling them. 紐eplace the pilot screw with a new one if necessary in
accordance with the following procedure.

○Carefully mark the position of the pilot screw limiter on
the carburetor body so that it can be installed and set to
its original position later.
○Remove the limiter. Be careful not to turn the pilot screw
at this point.
○Turn the pilot screw clockwise and count the number of
turns until screw is gently seated in the pilot passage.
Record the number of turns needed to close the screw.
○Turn out the pilot screw to replace it with a new one.
○Install the new pilot screw until the screw is gently
seated. Then open the screw the same number of turns
as recorded prior to removal.
○Align the limiter with the mark on the carburetor body to
install, taking care not to turn the pilot screw. 肘nstall the choke valve and throttle valve on the shaft as
the outside mark of them facing outside. 疋rive the float pin into the carburetor body. The big diameter
side of the float pin must face the choke value side. 柊ssemble carburetor parts with recommended tightening
torque (see Exploded View).

1. Limiter
2. Pilot Screw
3. Spring
4. Spacer
5. Low Idle Speed Screw
6. Spring
7. Screws
8. Throttle Valve
9. Throttle Shaft
10. Dust Seal
11. Choke Valve
12. Choke Shaft
13. Dust Seal
14. Solenoid Valve (Electric Starter Model)
15. Gasket
16. Float Bowl
17. Gasket
18. Float Pin
19. Float
20. Main Jet
21. Main Nozzle
22. Float Valve
23. Gasket
24. Screw (Other than Solenoid Valve Type)


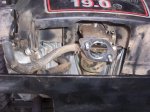
Here is an attached picture of what I am seeing.
 

Attachments

  • Gravely Kawaski carburetor.jpg
    Gravely Kawaski carburetor.jpg
    140.3 KB · Views: 16

Carscw

Lawn Pro
Joined
Aug 11, 2011
Threads
66
Messages
6,375
Take the fuel line off. Disconnect the green wire skid the carb off the studs and bring to the shop.
 

bertsmobile1

Lawn Royalty
Joined
Nov 29, 2014
Threads
64
Messages
24,705
Take the fuel line off. Disconnect the green wire skid the carb off the studs and bring to the shop.
Yep and they will clean it check it tell you you need some more parts then reassemble to factory standard settings so you should be able to pop it back on & the mower will fire up right off although it might need a few tweeks to be 100%
 

satman858

Active Member
Joined
Jun 22, 2013
Threads
12
Messages
68
I think there is more to it, then just removing the hose line.


I found this below on page 3-21 of the service manual:


Carburetor Removal:

Remove:
Air Cleaner and Related Parts (see Air Cleaner Body)
Turn the fuel shut off valve to the OFF position.
Drain the carburetor.
Disconnect the fuel tube at the fuel inlet joint [A] of the carburetor.
For Electric Starter model, disconnect the solenoid valve
lead terminal and remove the ground terminal.
Unhook the throttle link spring at the throttle shaft lever
top end [C] with a long nose plier.
Unhook the throttle [D] and choke link rods [E] at the top
ends of their arms while pulling off the carburetor.
 

Attachments

  • A11.png
    A11.png
    72.4 KB · Views: 17

Carscw

Lawn Pro
Joined
Aug 11, 2011
Threads
66
Messages
6,375
Bring the mower to a shop. You are in over your head.
 

satman858

Active Member
Joined
Jun 22, 2013
Threads
12
Messages
68
Bring the mower to a shop. You are in over your head.


Bringing the mower to the shop is option that will cost me grand or more before they even look at the mower. I would need to buy and install a trailer hitch for my car, along with having to also buy a trailer to transport the 900lb ZTR mower to the shop.
 
Last edited:

EngineMan

Lawn Addict
Joined
Jun 12, 2012
Threads
9
Messages
2,275
I think there is more to it, then just removing the hose line.


I found this below on page 3-21 of the service manual:


Carburetor Removal:

Remove:
Air Cleaner and Related Parts (see Air Cleaner Body)
Turn the fuel shut off valve to the OFF position.
Drain the carburetor.
Disconnect the fuel tube at the fuel inlet joint [A] of the carburetor.
For Electric Starter model, disconnect the solenoid valve
lead terminal and remove the ground terminal.
Unhook the throttle link spring at the throttle shaft lever
top end [C] with a long nose plier.
Unhook the throttle [D] and choke link rods [E] at the top
ends of their arms while pulling off the carburetor.


Just follow the directions, it can't be more simple then that, or find someone who can take it off for you.
 
Top