I am new to this forum and new to small engine repairs. I am trying to replace the above mentioned clutch disk and I am having trouble removing the nut from the underside of the deck.
I can get the nut loose but the "spindle" (for lack of a better term) above the deck, spins freely as I would suspect it to. It appears as though this "spindle" has two opposing flat sides that would allow a wrench (albeit very small) to grab hold and then allow me to loosen the nut from this "spindle".
Snapper website along with others show this part in their diagrams but do call it out in the parts listings... this is the reason I call it what I do.
Do I need a special wrench and or is there something (obviously) I am missing here. I am a novice and I am trying to "refurbish" my old Snapper walk-behind, which includes painting the deck (reason for removing the clutch disk).
Thank you in advance and I apologize for the lengthy post. I really do appreciate everyone's time (time is a precious)!
Sorry for not including them in my first thread - please see attached pictures for details.
Thank you sir for your time,
SteelersFan
Hope this works - first time uploading pictures.
#4
wingless
Welcome to the forum.
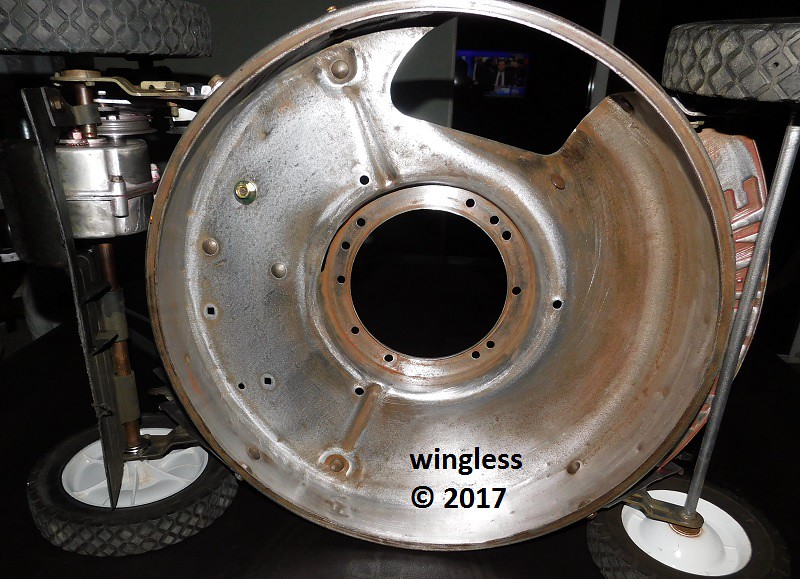
Yes, the driven disk spindle rotates freely, as-expected for proper operation.
On my driven disk, the spindle shaft end has a slot, for a flat-blade screwdriver, for removal and replacement.
Once removed, the driven disk is an assembly, with the large disc, a captive internal bearing race and the captive shaft. The hub / spacer may be removed from the shaft. A replacement part is provided w/ two different hub / spacer parts to make the replacement universal for all applications.
When I had mine apart last time I removed the hub and hand-packed the internal bearing race w/ wheel bearing grease. The rotational feel changed from some sticky spots to better than new.
#5
wingless
If the driven disk shaft does not have a slot, then use a cutting wheel on a Dremel tool to create a slot, even though it will partially cut into the flange nut retaining the shaft to the deck. Just replace that partially damaged fastener w/ a new flange nut.
The slot will permit stopping the shaft rotation during removal / replacement using a flat blade screwdriver.
Thank you for your Forum Welcome!
Also for your response to my problem. I appreciate the picture, information and advice for going forward with my project... much appreciated!
You have been very helpful - thank you for your time and advice!
SteelersFan
#7
wingless
Glad to help.
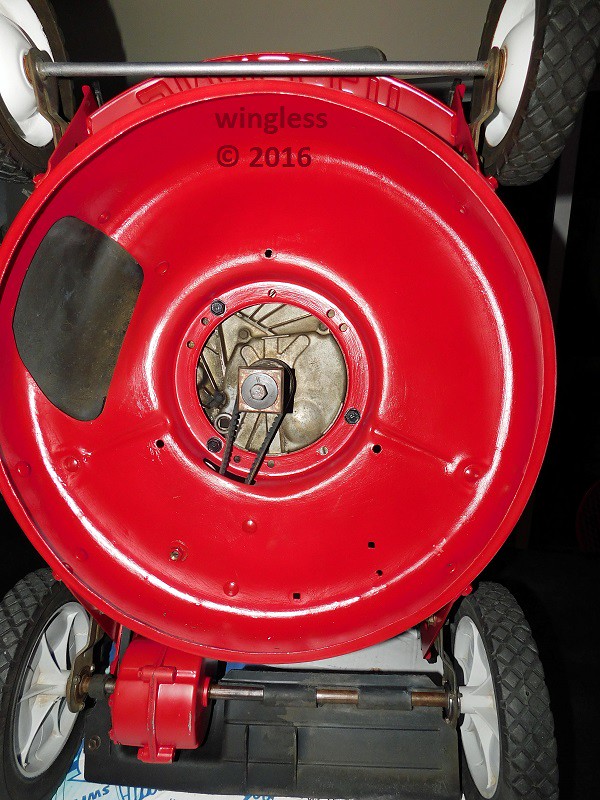
Here is my deck after stripping, coating w/ epoxy, painting and then assembly.
Nice job... looks great! I will be happy if mine looks half as good as yours when I am done.
I don't mean to impose on your time but I have a couple questions to ask, if you don't mind.
1. You stated you used an epoxy before painting the deck - what epoxy would that be?
2. Where can you find drawings for my mower that would include a part number for the clutch disk? Snapper - Jack's Small Engine - eReplacement have diagrams for the RP21509B and do show the clutch disk but don't list it in the parts section.
Note: I just finished getting the clutch disk off (ruined the bolt/nut in the process). The bolt/nut was basically welded together from all the years of rust. The bolt did have the slot you mentioned but it too was not usable from all the rust/wear.
Long story short... I can not get the bolt out of the clutch disk. The way they assembled the combination of disk/bolt/bearing appears to have been to install all of these into a bottom clutch disk assembly and then weld the top half to the bottom.
Hope I explained my situation well enough. Basically, I am on a learning curve and that curve is not with out a mistake or two.
Thank you again,
SteelersFan
#9
wingless
Thanks. Ask anyone, everything I do is waaay over the top.
The bolt remains captive within the disc. The bolt cannot be replaced. It is all within the crimped assembly.
The aftermarket disc replacement is available on eBay from several manufacturers. Here is one. My suggestion is to pack the opening w/ wheel bearing grease prior to assembly.
The down side is that there are brush and roller marks, instead of a fully glossy aerosol spray job. IMO, it is MUCH better to have the thick epoxy protection, than the high gloss.
#10
wingless
Also, on the bare steel I first applied Pettit Metal Primer before applying the epoxy.
Awesome job... it looks great. Your "Over-the-Top" efforts show - your mower looks amazing and I am sure it will last many more years because of the extra efforts.
Thanks for all the information and help. I am retired now and just starting to "tinker" with small engines and lawn mowers. I am not sure how much or how long this "interest" will last... but for now - I am very interested in learning. I got my son's old mower running after cleaning the carburetor and so I thought I would tackle an ancient Snapper walk-behind that I still owned. I am taking it a step further though... hence my novice questions.
I really appreciate someone like you taking your time to educate and provide helpful information towards my efforts.
Thanks again,
SteelersFan
#12
wingless
Glad to help.
My prior Snapper restoration topic was destroyed by the Photobucket extortion. It was impossible to edit, so the topic has been recreated here. All the images are now provided by Flickr.