Have you checked the water in the battery? Being on a constant trickle charger, and I assume unlike a car, it is unregulated, the battery emits a small amount of hydrogen gas/water vapor through the vent holes in the battery caps. I only charge a battery when it is low and @ 2amps. A low battery can still show 12v, but the amps are not enough for good cranking.
You are using an out of date browser. It may not display this or other websites correctly.
You should upgrade or use an alternative browser.
You should upgrade or use an alternative browser.
Riding Mower barely turns once and doesn't start
- Thread starter hauker
- Start date
More options
Export threadOne of these two manuals should contain your engine.
http://dl.dropbox.com/u/12502267/B&S Service Manuals/03_272144VanguardTwinCylinderOHV.pdf
http://dl.dropbox.com/u/12502267/B&S Service Manuals/05_273521TwinCylinderOHV.pdf
http://dl.dropbox.com/u/12502267/B&S Service Manuals/03_272144VanguardTwinCylinderOHV.pdf
http://dl.dropbox.com/u/12502267/B&S Service Manuals/05_273521TwinCylinderOHV.pdf
natenkiki2004
Well-Known Member
- Joined
- Apr 22, 2011
- Threads
- 13
- Messages
- 177
I mentioned earlier that I'm going through some electrical problems on my mower as well and today I did some measurements to get an insight on what's going on. I won't bloat up this thread with my findings but someone, somewhere (doesn't look like this thread but I thought it was) posted this:
https://dl.dropbox.com/u/464376/sma...18-46 Riding Mower/MTD Electrical Testing.pdf
It's a document by MTD that shows the ins and outs of their 700 series electrical system. About 1/2 way through, it starts talking about voltage drop and this will apply for any mower. It shows you how to test for bad grounds, cables, solenoid and switches by bypassing them with a multimeter and whatever value you get on the multimeter shows you how much electricity is bypassing and thus how much you're losing due to resistance from bad connections or corrosion or whatever.
Also, I looked up rebuilding a starter motor and it seems really cheap and easy. You can get a new bottom plate that contains the contacts and brushes for about $20 (at least in my case). Beyond that, all you need are basic tools, a piece of sandpaper and a pinch of general purpose grease:
How to rebuild a Briggs and Stratton starter motor (replacing bottom end cap assembly) - YouTube
I'm not sure how old your mower is but mine's 18 years and I don't want to forever be chasing electrical gremlins so I'm going to redo a fair bit of the electrical. New gold plated ring terminals (after sanding/wire brushing the metal) soldered directly on overkill gauge wire (4AWG for starter & solenoid, 14AWG for anything else). Also using dielectric grease on all contacts. Soldering will eliminate over half the connections and create less areas that corrosion can cause problems down the road. Again, it's overkill but I enjoy the work knowing that I won't ever have to second guess the electrical system except maybe the battery in a few years.
This is a lot of info but hopefully your answer lies somewhere in this thread. Lotta documents to read")
https://dl.dropbox.com/u/464376/sma...18-46 Riding Mower/MTD Electrical Testing.pdf
It's a document by MTD that shows the ins and outs of their 700 series electrical system. About 1/2 way through, it starts talking about voltage drop and this will apply for any mower. It shows you how to test for bad grounds, cables, solenoid and switches by bypassing them with a multimeter and whatever value you get on the multimeter shows you how much electricity is bypassing and thus how much you're losing due to resistance from bad connections or corrosion or whatever.
Also, I looked up rebuilding a starter motor and it seems really cheap and easy. You can get a new bottom plate that contains the contacts and brushes for about $20 (at least in my case). Beyond that, all you need are basic tools, a piece of sandpaper and a pinch of general purpose grease:
How to rebuild a Briggs and Stratton starter motor (replacing bottom end cap assembly) - YouTube
I'm not sure how old your mower is but mine's 18 years and I don't want to forever be chasing electrical gremlins so I'm going to redo a fair bit of the electrical. New gold plated ring terminals (after sanding/wire brushing the metal) soldered directly on overkill gauge wire (4AWG for starter & solenoid, 14AWG for anything else). Also using dielectric grease on all contacts. Soldering will eliminate over half the connections and create less areas that corrosion can cause problems down the road. Again, it's overkill but I enjoy the work knowing that I won't ever have to second guess the electrical system except maybe the battery in a few years.
This is a lot of info but hopefully your answer lies somewhere in this thread. Lotta documents to read
No problem :thumbsup: Dropbox should be back up now but if it's not for you, then here's the values you need:
Intake Valve: .003-.005"
Exhaust Valve: .005-.007"
Remember to do it with the engine cold. If my thinking is right, the exhaust one should have a much larger gap compared to those values which would cause the exhaust to not leave the engine. I could be wrong though.
Okay I did the adjustments (upper/intake: 0.004; lower/exhaust: 0.005) and lo and behold, it started spinning (not great, but better than not at all). Despite some help with starter fluid, it would not start, though, and the battery got weak after a few attempts. So I closed the gap on the exhaust a bit further (0.003), sanded the plug a bit for better spark and checked the oil. The oil looked a bit used (blackish, but still partially translucent), but more importantly, it was a good bit low. Given my impatience at this point and the fact that I did an oil change in spring I simply added about 10 oz to fill the oil to just above min, recharged the battery and gave it another try.
I fired up and ran smooth. (Yeah!!!)
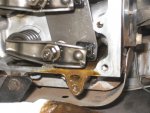
I took the choke out and ran it for a while (10 sec) with the valve cover off. While expecting a bit of oil spray, all the sudden there was a stream of oil (a chocolaty goo - picture 1) running out of the front. I could not see where exactly, but I believe for the lower pushrod. I assume that is not normal - the stream was too much to look normal to me anyway, so I cut the engine, and did what I should have done in the first place: Removed the dipstick and did a complete oil change. The oil drained rather slowly, I thought (slow but steady stream), but maybe that is normal ...
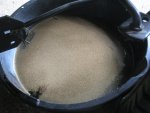
Oddly, though, the oil came out all bubbly (aerated - picture 2) I am no expert, but could it be that with pressure building up in the engine and me running it without the cover allowed both air into the system and a pressure differential that forced the oil out through the pushrod guide?
Anyway, I cleaned up the mess, fill with fresh oil, checked the spark plug gap (which was at almost 0.035", so I adjusted it to 0.03" and closed the valve cover. I crossed my fingers and gave it another shot. It started, ran smooth, purred like a kitten and developed no leaks during the next 1/2 acre of mowing ... at least after I could see through the smoke from oil burn-oo on the exhaust ;-).
I'd say, that did the trick. :thumbsup:
Thanks to everyone who piched in with ideas, support and links ... you guys rock!
Attachments
Have you checked the water in the battery? Being on a constant trickle charger, and I assume unlike a car, it is unregulated, the battery emits a small amount of hydrogen gas/water vapor through the vent holes in the battery caps. I only charge a battery when it is low and @ 2amps. A low battery can still show 12v, but the amps are not enough for good cranking.
Good point - I didn't do a hydrometer check (because I don't have one, nor do I know where to get one ...), but eyeballing it looks okay.
One of these two manuals should contain your engine.
http://dl.dropbox.com/u/12502267/B&S Service Manuals/03_272144VanguardTwinCylinderOHV.pdf
http://dl.dropbox.com/u/12502267/B&S Service Manuals/05_273521TwinCylinderOHV.pdf
Awesome - thanks.
I mentioned earlier that I'm going through some electrical problems on my mower as well and today I did some measurements to get an insight on what's going on. I won't bloat up this thread with my findings but someone, somewhere (doesn't look like this thread but I thought it was) posted this:
https://dl.dropbox.com/u/464376/sma...18-46 Riding Mower/MTD Electrical Testing.pdf
It's a document by MTD that shows the ins and outs of their 700 series electrical system. About 1/2 way through, it starts talking about voltage drop and this will apply for any mower. It shows you how to test for bad grounds, cables, solenoid and switches by bypassing them with a multimeter and whatever value you get on the multimeter shows you how much electricity is bypassing and thus how much you're losing due to resistance from bad connections or corrosion or whatever.
Also, I looked up rebuilding a starter motor and it seems really cheap and easy. You can get a new bottom plate that contains the contacts and brushes for about $20 (at least in my case). Beyond that, all you need are basic tools, a piece of sandpaper and a pinch of general purpose grease:
How to rebuild a Briggs and Stratton starter motor (replacing bottom end cap assembly) - YouTube
I'm not sure how old your mower is but mine's 18 years and I don't want to forever be chasing electrical gremlins so I'm going to redo a fair bit of the electrical. New gold plated ring terminals (after sanding/wire brushing the metal) soldered directly on overkill gauge wire (4AWG for starter & solenoid, 14AWG for anything else). Also using dielectric grease on all contacts. Soldering will eliminate over half the connections and create less areas that corrosion can cause problems down the road. Again, it's overkill but I enjoy the work knowing that I won't ever have to second guess the electrical system except maybe the battery in a few years.
This is a lot of info but hopefully your answer lies somewhere in this thread. Lotta documents to read
Excellent - I'll add that to my library ... next trouble shooting will start with these docs in my backpocket! :thumbsup:
natenkiki2004
Well-Known Member
- Joined
- Apr 22, 2011
- Threads
- 13
- Messages
- 177
Good to hear you got it going again!
If you have the exhaust valve set at .00, you will have problems down the road. That clearance is to small and will become even less as the valve heats up and expands. Air bubbles in the oil were caused by running with the valve cover off.
If you have the exhaust valve set at .00, you will have problems down the road. That clearance is to small and will become even less as the valve heats up and expands. Air bubbles in the oil were caused by running with the valve cover off.
+1 You will end up burning that valve