Kawasaki FH641V mixture issues

treeder65

Forum Newbie
Joined
Jun 12, 2017
Threads
1
Messages
6
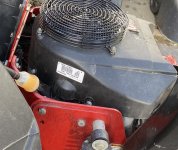
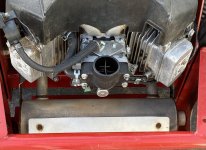
Mower: Ferris IS1500Z
Engine: Kawasaki FH641V-BS33
Approx 2007 with 1400 hrs
Issue: Bogs down and seems to run very rich under load

Hi all,
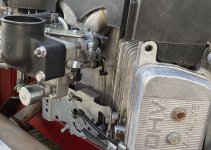
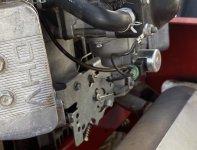
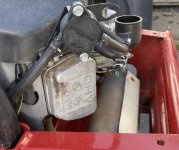
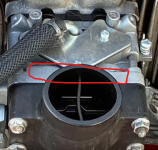
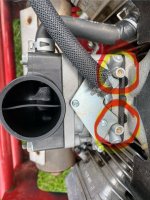
I’m stumped on this issue with a mower I purchased over the winter. Unfortunately I didn’t test run it long enough to verify there weren’t any issues like the one I’m having. As soon as a load is added (drive is ok until blades are engaged) it starts to bog down and I can smell the fuel as if it’s running very rich. I changed the plugs & coils, cleaned the double barrel carb and the choke is open when it’s supposed to be. It just runs really rich as soon as load is added. It will occasionally give a burst of power (as if the mixture is suddenly correct) for 15-20 seconds every 15 minutes or so. I was able to get the lawn cut, but it was somewhat of a slow pace, and the RPMs were barely at the point where the blades would be moving fast enough to cut. It looks like the guy had put a new carburetor on it, but the control board/governor spring looks a bit worse for wear. The only other thing I can think of is that maybe the jets need replacing. I don’t think there’s any mixture adjustments on this. I’m also not sure what type of governor it is, and that seems to be a possible issue since it’s just not running well under load. Thanks in advance for any thoughts.
Tom
 

txmowman

Well-Known Member
Joined
Oct 8, 2018
Threads
0
Messages
246
Hi Tom,
Can you confirm the part number of the carburetor? If it is genuine Kawasaki, it will have the part number on top and will start out 15003 or 15004.
 

treeder65

Forum Newbie
Joined
Jun 12, 2017
Threads
1
Messages
6
I can almost guarantee it’s aftermarket and not OEM, but I’ll check it out and get back in a few hours. I honestly think the guy was flipping it and either I got scammed or he just did not really know what he was doing and never checked out the extended engine running..
 

txmowman

Well-Known Member
Joined
Oct 8, 2018
Threads
0
Messages
246
Ok, if it isn’t Nikki brand or doesn’t have a Kawasaki part number on it, also please check to see if it has a vent tube next to the fuel line inlet.
 

treeder65

Forum Newbie
Joined
Jun 12, 2017
Threads
1
Messages
6
Ok, if it isn’t Nikki brand or doesn’t have a Kawasaki part number on it, also please check to see if it has a vent tube next to the fuel line inlet.
Not seeing a name or part # but including some photos in case I’m missing something.
 

Attachments

  • IMG_5727.jpeg
    IMG_5727.jpeg
    992.2 KB · Views: 3
  • IMG_5726.jpeg
    IMG_5726.jpeg
    1,015.8 KB · Views: 3
  • IMG_5725.jpeg
    IMG_5725.jpeg
    450.8 KB · Views: 4
  • IMG_5724.jpeg
    IMG_5724.jpeg
    898.5 KB · Views: 4
  • IMG_5723.jpeg
    IMG_5723.jpeg
    490 KB · Views: 5

txmowman

Well-Known Member
Joined
Oct 8, 2018
Threads
0
Messages
246
The carburetor style is correct. I agree it is not genuine Kawasaki as the numbers would be as pictured below. So, who know what jetting this carburetor has. That could be an issue. What do your spark plugs look like after running in this condition? Are they black with dry soot?

You had the carburetor apart. Did you install new o-rings upon reassembly? If the o-rings are leaking internally the engine will run rich. Specifically, the o-ring at the bottom of the plastic spacer where it meets the float bowl and the two other o-rings on the top. One is round to seal the float valve seat and the other is butterfly shaped. Also you will want to pay attention to the air bleeds to make sure they are clear. The air bleeds are two of the smaller holes on the choke side of the carburetor, you will see brass jets pressed in. They are not intended to be removed but with the top plate off, you can clearly see light through them if not plugged. The larger holes are bowl vents. If they are not clear the engine will run rich. The main jets are pressed into the plastic spacer should have a size stamped in them. Might need a magnifying glass to read. To get at them you can use a drill bit and press then in and out. Just make sure you use a drill bit large enough as to not bugger up the metering hole size. The jets also have o-rings installed.
 

Attachments

  • carb.png
    carb.png
    279.2 KB · Views: 2

treeder65

Forum Newbie
Joined
Jun 12, 2017
Threads
1
Messages
6
The carburetor style is correct. I agree it is not genuine Kawasaki as the numbers would be as pictured below. So, who know what jetting this carburetor has. That could be an issue. What do your spark plugs look like after running in this condition? Are they black with dry soot?

You had the carburetor apart. Did you install new o-rings upon reassembly? If the o-rings are leaking internally the engine will run rich. Specifically, the o-ring at the bottom of the plastic spacer where it meets the float bowl and the two other o-rings on the top. One is round to seal the float valve seat and the other is butterfly shaped. Also you will want to pay attention to the air bleeds to make sure they are clear. The air bleeds are two of the smaller holes on the choke side of the carburetor, you will see brass jets pressed in. They are not intended to be removed but with the top plate off, you can clearly see light through them if not plugged. The larger holes are bowl vents. If they are not clear the engine will run rich. The main jets are pressed into the plastic spacer should have a size stamped in them. Might need a magnifying glass to read. To get at them you can use a drill bit and press then in and out. Just make sure you use a drill bit large enough as to not bugger up the metering hole size. The jets also have o-rings installed.
I’ll check those things out tomorrow. Thanks again for the suggestions.
 

treeder65

Forum Newbie
Joined
Jun 12, 2017
Threads
1
Messages
6
I’ll check those things out tomorrow. Thanks again for the suggestions.
A video popped up in my YouTube feed that discussed these screws. I screwed them all the way in and then back them off one full turn each and started adjusting from there backing them out a half each until I was finally able to get it running fairly smooth underload. Seems like I still need to make some adjustments on both the screws and on the control panel/board to set the idle correctly, but it seems like it’s well on its way and at least I know it can and will run smoothly.
 

Attachments

  • IMG_5730.jpeg
    IMG_5730.jpeg
    784.2 KB · Views: 3

txmowman

Well-Known Member
Joined
Oct 8, 2018
Threads
0
Messages
246
These are idle port screws. They provide air/fuel at low throttle angle but are continuing to provide air/fuel as well at high throttle angle. Backing them out would provide slightly more air/fuel. This doesn't match up with a previously reported rich (fuel smell) condition. Typically you wouldn't see much change with the engine from adjustment of these. You would however notice it with a AFR meter. But, whatever works to improve your situation.
 

treeder65

Forum Newbie
Joined
Jun 12, 2017
Threads
1
Messages
6
These are idle port screws. They provide air/fuel at low throttle angle but are continuing to provide air/fuel as well at high throttle angle. Backing them out would provide slightly more air/fuel. This doesn't match up with a previously reported rich (fuel smell) condition. Typically you wouldn't see much change with the engine from adjustment of these. You would however notice it with a AFR meter. But, whatever works to improve your situation.
Thanks again for all your guidance and suggestions on this. I really do appreciate it. What I did was I closed them fully first and then I slowly backed them out a half at a time. So it actually might be closed more than it originally was.
 
Top