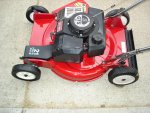
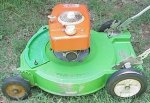
The 10550 Lawnboy I bought off Craigslist had typical abrasion caused by somebody running the mower against a house or brick retaining wall. Here is a how to sequence of repairing the damaged paint for somebody who has never attempted this, so it's fairly simplistic.
1. Clean the entire deck. I use Mr. Clean in water as hot as will come out of the faucet. Pic DSC00097 shows the damaged area after the deck was cleaned.
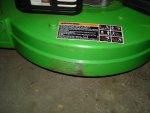
2. Sand the damaged area with a 5" plastic disk sander made for a hand drill. Don't use too rough a sanding disk, 120 grit works well. Pic DSC00098 shows what the damaged area should look like after sanding.
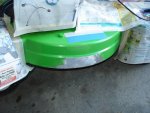
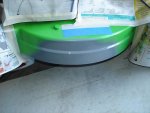
3. Mask off the areas on the mower you don't want paint on, including any decals. Work carefully, as I hate seeing overspray on parts that shouldn't be painted. Pic DSC00099 shows what the masking job should look like.
4. Prime the repair area with primer. I used Rust-Oleum painters touch 2X ultra cover flat gray. I used about 8 coats with wet sanding done with 400 grit sandpaper after every 2nd or 3rd coat. Pic DSC000100 shows the repair after priming.
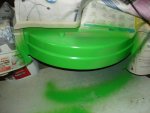
5. Paint the area with VHT engine enamel Grabber Green. Use light coats, don't try to spray a heavy coat as you'll inevitably cause the paint to run. Several light coats are better than one or two heavy coats. Pic DSC00101 shows the area after the color coat.
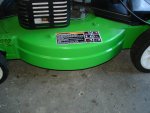
6. Allow the paint to dry for 2 hours before removing the masking tape and newspaper. Pic DSC00102 shows the completed repair.
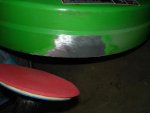
As you can tell from the area just to the right of the warning decal, it is a shade lighter than the original paint. I was told the primer color affects the color coat shade. I'll have to test a piece of bare aluminum with flat white primer, gray primer and red oxide primer one day to see if that's true. The repair overall looks pretty good. I use this mower weekly, so it's not like it's a Henry Ford museum piece.
Regards
Jeff
1. Clean the entire deck. I use Mr. Clean in water as hot as will come out of the faucet. Pic DSC00097 shows the damaged area after the deck was cleaned.
2. Sand the damaged area with a 5" plastic disk sander made for a hand drill. Don't use too rough a sanding disk, 120 grit works well. Pic DSC00098 shows what the damaged area should look like after sanding.
3. Mask off the areas on the mower you don't want paint on, including any decals. Work carefully, as I hate seeing overspray on parts that shouldn't be painted. Pic DSC00099 shows what the masking job should look like.
4. Prime the repair area with primer. I used Rust-Oleum painters touch 2X ultra cover flat gray. I used about 8 coats with wet sanding done with 400 grit sandpaper after every 2nd or 3rd coat. Pic DSC000100 shows the repair after priming.
5. Paint the area with VHT engine enamel Grabber Green. Use light coats, don't try to spray a heavy coat as you'll inevitably cause the paint to run. Several light coats are better than one or two heavy coats. Pic DSC00101 shows the area after the color coat.
6. Allow the paint to dry for 2 hours before removing the masking tape and newspaper. Pic DSC00102 shows the completed repair.
As you can tell from the area just to the right of the warning decal, it is a shade lighter than the original paint. I was told the primer color affects the color coat shade. I'll have to test a piece of bare aluminum with flat white primer, gray primer and red oxide primer one day to see if that's true. The repair overall looks pretty good. I use this mower weekly, so it's not like it's a Henry Ford museum piece.
Regards
Jeff
.jpg")