Briggs 42A707 Stator output measurement

Bentoolong

Member
Joined
Feb 12, 2021
Threads
2
Messages
19
This mower won't charge. I have tested it and I'm not getting any power past the diode. I could replace the diode but I'm thinking about replacing the entire stator.

I've been looking at parts diagrams and it looks like there are more than one that is similar to mine. It is a "Dual Voltage" type. They all look the same electrically.

The one that looks similar to mine is the 696459.
I am not sure what the "engine" numbers mean in the upper right corner of each stator. They don't seem to match anything I have and I don't see a explanation
My motor is type 2238E1

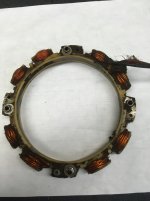
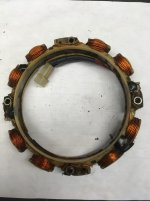
Can anyone confirm I am looking at the right part #. See pic of my stator.

Also I may be replacing the starter.
I have the 3 5/8" starer housing.
My research came up with: 497596 for the starter.

Also I see some oil leakage past the upper crank seal
I'm looking at 391806S.

Can anyone confirm that I am looking at the right parts to purchase?


Thanks
MarkIMG_3741.jpegIMG_3740.jpeg
 

StarTech

Lawn Royalty
Top Poster Of Month
Joined
Feb 19, 2020
Threads
79
Messages
10,255
Yes it is a dual circuit Part# 691063 (Superseded to 592831) but replacing the diode is much cheaper the replacing the whole stator at $85. Diode PN 391507 or Oregon 33-414 for the complete pigtail.

Starter is Part# 497596 for 3-5/8 housing.

Flywheel side oil seal is 391806S; unless, you need the bushing too. Then it is Part# 399265 (Superseded to 797673) for the seal and bushing.
 

Bentoolong

Member
Joined
Feb 12, 2021
Threads
2
Messages
19
Yes it is a dual circuit Part# 691063 (Superseded to 592831) but replacing the diode is much cheaper the replacing the whole stator at $85. Diode PN 391507 or Oregon 33-414 for the complete pigtail.

Starter is Part# 497596 for 3-5/8 housing.

Flywheel side oil seal is 391806S; unless, you need the bushing too. Then it is Part# 399265 (Superseded to 797673) for the seal and bushing.
Looks like I'm OK on the numbers then. I thought about getting a diode. How do you attach it back into the conenctor since it looks like the diode is attached directly to the connector. I don't have any shrink tube either so that would add. I think I can scare up an aftermarket stator for around $40.

THe stator other than being grimy doesn't look to bad. No burned coils. I may still try a diode.

Mine was pretty fowled from a seal leak.

Thanks for the help.
 

Bentoolong

Member
Joined
Feb 12, 2021
Threads
2
Messages
19
How would you test the actual windings to see if just replacing the diode would be OK.
I have a VOM.
What should I see as far as resistance?
 

StarTech

Lawn Royalty
Top Poster Of Month
Joined
Feb 19, 2020
Threads
79
Messages
10,255
Normally these are tested for output voltage and amperage. I don't the resistance off the top of my head. I can get you that later but right now I am in the middle of an ICE storm and it is not stay yo go to the shop. I do it going very low but not the same sas both meter leads touching each. Since each winding has one end grounded the stator metal frame if you get an open reading there is a break in the windings.

For the diode replacement yes it is crimped the pin of the connector that why I suggest the Oregon assemly where you just under solder the two wires and solder the new assembly in place. As a shop I have the Molex pins, heat shrink, and the ferrel for attaching the diode to the wire. .
 

Bentoolong

Member
Joined
Feb 12, 2021
Threads
2
Messages
19
StarTech,
I did test for output voltage. I had AC to run the lights but no DC to measure amps with on the diode side.
I may just cut the pigtail off and do some measuring. Now that I know that each winding is grounded to the frame, I can make some initial measurements.

You must be south of me a little to be having and Ice storm. Its around 20 in Michigan right now. I don't think we have been up to 32 in around 2 weeks. We can deal with cold and snow but I feel bad for folks down south right now.

Take your time but I would be curious about those readings. I my just try the diode if I can confirm the rest os OK.

Mark
 

StarTech

Lawn Royalty
Top Poster Of Month
Joined
Feb 19, 2020
Threads
79
Messages
10,255
I would say I am little bit South by being 3 miles North of the Alabama/Tennessee state line. Expecting up to an inch of ice plus another 1-2 snow/sleet. Really nervous about that Red Maple at the back of my shop. At least the insurance is paid up.
 

Bentoolong

Member
Joined
Feb 12, 2021
Threads
2
Messages
19
I would say I am little bit South by being 3 miles North of the Alabama/Tennessee state line. Expecting up to an inch of ice plus another 1-2 snow/sleet. Really nervous about that Red Maple at the back of my shop. At least the insurance is paid up.
Ice is always tough. We had ice a few years ago and out power was out for around 5 days in a cold snap.

I'll be thinking of you.

I just ordered the pigtail. I'd still be interested in the measurements when you feel like it.

Mark
 

Bentoolong

Member
Joined
Feb 12, 2021
Threads
2
Messages
19
StarTech,
I've been thinking about your seal/bushing part #. I'm wondering why the upper crank seal is leaking but not the bottom one. Maybe the bushing is bad as well. I just assumed that there was a roller bearing of some sort on both ends of the crank. I'm not clear on the function of the bushing in this case.
Are these parts typically changed as a set or can I get by with just the seal? Maybe the bushing is getting sloppy and that is causing issues for the seal.

Is the bushing a drop in unit? How to remove it?

I don't feel a lot of radial play in the crank in that area. I may put a dial indicator on it just to make sure.
What should I see for movement. I'll assume less is best.

mark
 

bertsmobile1

Lawn Royalty
Joined
Nov 29, 2014
Threads
64
Messages
24,705
Unless you have a $ 100 + meter forget about doing resistance measurements .
Cheap HF meters are just not good enough and even then you get different readings depending upon how you make the contacts.
I have tried cheaper stators and all have failed .
The reliable ones from reliable aftermarket suppliers are not much cheaper than genuine down here .
Replacing the diodes is very simple.
Easiest is the complete pigtail including the plug about $ 15 ( Aus ) down here which is what I generally do because it is a 5 minute job & looks professional to the customers.
Although pensioners and other cash strapped customers get the plain diode .
 
Top