I have a Lawnflite Mower B/115 (year 2000 model?) that I am overhauling and needed to get the rear wheels off because the rear axle bearings need replacing. I am experienced at mechanics; I worked in a car dealers workshop once, have a huge range of tools at home, and in time I have dealt with getting car transmissions and wheel bearings apart, removed "cemented-on" car cylinder heads, and removed car brake drums that had rusted onto their hubs with brake shoes seized on, etc. But removing these lawnmower wheels was about the most difficult and unpleasant job I have ever done.
The wheel hubs are meant to be a push fit to the axle ends with two flats to stop rotation, plus an axial retaining bolt. They had rusted on . One wheel I managed to knock off with a 2 lb hammer and drift applied to the inside of the hub, but the other wheel refused to budge. So I took the axle shaft out of the axle housing and set everything up on wooden blocks on the workshop floor. I had an old bench vice on the floor with the axle slightly loose between the jaws to provide an inertial reaction against the wheel hub. I then drove the axle shaft out of the wheel hub with a 15(?) lb sledge hammer. It took about 100 blows and a whole day, swinging the hammer through about 45 degrees with all my strength each time. I had to be accurate or wreck the wheel. For this at first I was hitting the head of the wheel retaining bolt in the axle end (obviously with the hub retaining washer removed); later as the axle was driven further in I was hitting via a drift. Each blow scattered the wooden blocks and bench vice everywhere and everything had to be set up again (taking several minutes). Every 4-5 whacks I would stop to heat the hub to paint-smoking level with blowlamps. I measured progress now and then and found I was shifting it only about half a mm with each blow; the length is 70 mm but the last 20mm came out easily.
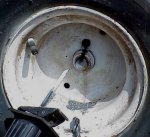
Once off I cleaned up the surfaces with emery paper and a half-round file in the hub and now the wheels are a smooth fit on the axle. The rust layer does not have to be very thick to cause seizure (see picture of axle before cleaning up) - it has no room to be! This will be greased when I re-assemble.
If this method had not worked I would have made holes in the wheel disks to allow a 2 claws of a puller to go through. I's a pity that the wheel maker had not provided such holes.
I hope this account might help someone else.

The wheel hubs are meant to be a push fit to the axle ends with two flats to stop rotation, plus an axial retaining bolt. They had rusted on . One wheel I managed to knock off with a 2 lb hammer and drift applied to the inside of the hub, but the other wheel refused to budge. So I took the axle shaft out of the axle housing and set everything up on wooden blocks on the workshop floor. I had an old bench vice on the floor with the axle slightly loose between the jaws to provide an inertial reaction against the wheel hub. I then drove the axle shaft out of the wheel hub with a 15(?) lb sledge hammer. It took about 100 blows and a whole day, swinging the hammer through about 45 degrees with all my strength each time. I had to be accurate or wreck the wheel. For this at first I was hitting the head of the wheel retaining bolt in the axle end (obviously with the hub retaining washer removed); later as the axle was driven further in I was hitting via a drift. Each blow scattered the wooden blocks and bench vice everywhere and everything had to be set up again (taking several minutes). Every 4-5 whacks I would stop to heat the hub to paint-smoking level with blowlamps. I measured progress now and then and found I was shifting it only about half a mm with each blow; the length is 70 mm but the last 20mm came out easily.
Once off I cleaned up the surfaces with emery paper and a half-round file in the hub and now the wheels are a smooth fit on the axle. The rust layer does not have to be very thick to cause seizure (see picture of axle before cleaning up) - it has no room to be! This will be greased when I re-assemble.
If this method had not worked I would have made holes in the wheel disks to allow a 2 claws of a puller to go through. I's a pity that the wheel maker had not provided such holes.
I hope this account might help someone else.