Electrical Demons in my STT61A-27KA

TheVirginian

Member
Joined
Jun 11, 2019
Threads
2
Messages
32
Thanks. And i'll go check what you said there. The way the air filter is on this unit, it would be VERY hard for a mouse to get into. The cover screws down tight to front top of motor and the filter itself is closed/sealed except for the paper "fins" which were perfectly in tact still under the prefilter (foam sleeve). I will delve deeper into it to be CERTAIN but it'd be really hard for that to be the case of mice in the "blower housing". Thanks for all the helpful suggestions. I have a new list to start from in morning to narrow it down.
 

bertsmobile1

Lawn Royalty
Joined
Nov 29, 2014
Threads
64
Messages
24,702
Well therre has to be some where for the cooling air to exit the engine.
Unless that has a very fine screen on it there is space for mice, lizards or other critters to get in there.
 

TheVirginian

Member
Joined
Jun 11, 2019
Threads
2
Messages
32
Blower housing was pretty clean surprisingly (other than dust buildup on outer rim). Thanks for all your advice and help on the Craftsman, working on another theory on that.

I'm going to focus on the Scag in THIS forum going forward so the topic doesn't get muddied and end up not getting anywhere with it. The electric clutch for it comes today (said before i had it and harness in possession but it was the 3 spindles for Craftsman that came in other box the day harness came) and hopefully between it and the wire harness i'll have it back in action very soon. I'm just NOT confident in that boy's word, as it already was proven to be worthless when he said "there's no issues with the mower other than cosmetic"..... The fact that one PTO harness plug (or ignition, i forget which it was now) was partially melted tells me WAY too much amperage is traveling through that electrical system to get those wires that hot. It's a 20A system and he had 30A fuses in the holders which blow too, so..... Also, when i replaced the PTO knob, i thought they sent me the wrong one even though the part number matched. The one HE had in there had pins, literal round tiny pins, instead of the blade terminals like the new one. I noticed a short "jumper" harness adaptor that DID come from the normal spade connector and terminated into the PTO knob with the pin config..... so i don't know WHAT ALL this clown has gone in and done but he has stuff so dorked up i feel confident ONLY in replacing entire wire harness and electric clutch, and then seeing where we are from there. I know seat safety switches are a pain in the butt but honestly i don't need it to keep running if i get up anyway. It's 3 seconds to restart the machine.......

I just wanna mow my grass.........lol :rolleyes::confused2:
 

Luffydog

Well-Known Member
Joined
Jan 31, 2018
Threads
6
Messages
566
If you are talking about the pto switch that is the new upgraded version from scag part#463034. On the key switch the yellow wire is the burnt one your talking about there more likely your right about the over voltage or amp pull leading into a clutch issue
 

TheVirginian

Member
Joined
Jun 11, 2019
Threads
2
Messages
32
Ok, so the wire harness and electric PTO clutch for the TT came in today and i dove head first into the wire harness. Entire control box is rewired, seat is now on the harness again (he'd defeated it with jumper), left control arm hooked in. HOW IN THE WORLD am i supposed to get to whatever that next plug just after it goes under body from there and the right control arm interlock switch???? Is that a from underneath thing? And do i have/need to pull the deck to get to it? I'm working on the ground here and haven't used/needed a jack yet but wondering how i get to those? The rest, where it goes down and hooks to ground, fuel solenoid and across frame rail to go hook to starter/solenoid and regulator/rectifier and PTO clutch is easy peasey looking and straight forward. Just not sure how i'll get to the right stick interlock and whatever else that other plug goes to. Progress pic of control box after just wiring all that mess :) Tomorrow, i'll finish harness and delve into the PTO clutch swap. Would be NICE if i have this Scag back up and running to cut by weekend :) Here's to hoping! :thumbsup:
EDIT*** forgot to mention, i had bought and TRIED to put in, a new "Upgraded 10AMP PTO knob" but it will NOT fit in that opening all the way down to secure. It's the one with the normal blade config on the harness plug but i had to put the one with the jumper harness from the blade type back to the tiny pin type that was in it when i got it. The manual calls for the part number i ordered with blade type so i'm not sure how/where this pin type and harness jumper came from or if i should even be using it?
EDIT #2*** I just remembered seeing a plate cover, bolted on back and lower portion under back "hood" to pto and drive gears. Is that a PTO shaft? and what could/would you hook to that to use as an implement on this thing?
 

Attachments

  • ScagHarness1.jpg
    ScagHarness1.jpg
    172.6 KB · Views: 8

Luffydog

Well-Known Member
Joined
Jan 31, 2018
Threads
6
Messages
566
That pto switch is the new type scag came out with that replaces the type switch that supposed to handle heat vibrations and other stuff better. Should be able to do all the harness from above.
 

TheVirginian

Member
Joined
Jun 11, 2019
Threads
2
Messages
32
Hmm, i'll take pics of where it goes down into a hole from left side of seat to feed whatever that next plug is in line, and the right interlock switch. I don't see HOW that would accessible from above.... not saying you're wrong brother i just haven't seen a way yet to get to it from above.
 

Luffydog

Well-Known Member
Joined
Jan 31, 2018
Threads
6
Messages
566
On the left side should be parking brake
 

TheVirginian

Member
Joined
Jun 11, 2019
Threads
2
Messages
32
Didn't even think about the P brake interlock. Still appears it goes under the frame/body first.... Like i said i'll take pics in morning in some daylight. Had to rush out and tarp EVERYTHING cause we got rain that blew up from nowhere.....
 

TheVirginian

Member
Joined
Jun 11, 2019
Threads
2
Messages
32
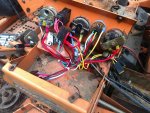
Ok, so i can SEE, and can kind of touch (with my finger tips), the parking brake connector, and i can SEE and partially touch (with finger tips) the right side control arm interlock connector.......but that is going to be a MARTYR FLOGGER to route..... On each side, where i reached up (indeed it's from underneath like i was asking), it goes into the square stock of frame under the seat and has a "solid panel" (except the hole it comes through) just a few inches beyond them (on either side)........ EVERYTHING else, is now connected/wired up on the new harness, just those two plugs to somehow get to. Included the pics (as promised) of where it goes down into the frame like i was talking about.........

EDIT*** I forgot to mention, i'll have to go to the shop that looked up the regulator/rectifier for me to see if i can't get the short ENGINE harness that goes from the regulator/rectifier, down to the main wire harness. THAT plug, that connects on the main HARNESS side, but also to the rectifier plug on other end of it , has/had a HORRIBLY burnt female socket and i'm gonna look tomorrow but i would almost BET, it's the light blue, or yellow wire position (one of which, i don't remember, sends the voltage back to charge the battery). If you remember from my FIRST posts about killing battery and not charging? I wonder if THAT plug has been the problem the WHOLE time and i replaced the rectifier AND harness and HOPE i don't still have issue. That short engine harness i'm speaking of, looks like it grounds to the engine on that side also (right side, or else he just did that) and then the temp sending unit wire/plug goes snaked through engine over to it's position on left side from off that short harness too. temp guage hasn't been working since i got it either so i'm going to have to track that short harness down too i think.....
 

Attachments

  • ScagHarness3.jpg
    ScagHarness3.jpg
    120 KB · Views: 8
  • ScagHarness4.jpg
    ScagHarness4.jpg
    137.6 KB · Views: 7
Last edited:
Top