Looking at the pics, in my opinion only, it is not the seal or the sump gasket. Looks to me like the engine had been sitting or used in a dirty environment and had an accumulation of dirt and oil all over it, which would not be uncommon. Before I would pull the unit apart, I would clean everything up, reassemble and mount it on your unit. My system for finding oil leaks is after cleaning and drying I spray flour over all areas where I feel oil may be coming for. Start the unit and run it for 1/2 an hour, then let it sit. If there are any leaks you will be able to trace them to the source. May be a bit messy, but will solve your problem.
You are using an out of date browser. It may not display this or other websites correctly.
You should upgrade or use an alternative browser.
You should upgrade or use an alternative browser.
Push mower oil leak Briggs
- Thread starter rwomack
- Start date
More options
Export threadBoudreaux In Eunice La.
Lawn Addict
- Joined
- Jul 22, 2017
- Threads
- 21
- Messages
- 2,154
I agree with Rivets, I don't see anything leaking in the pics.......
I would put it on a deck and mount a blade on it before I try and start it .........
I would put it on a deck and mount a blade on it before I try and start it .........
I agree with Rivets, I don't see anything leaking in the pics.......
I would put it on a deck and mount a blade on it before I try and start it .........
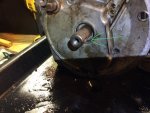
Well this was after I THOROUGHLY cleaned it. The arrows were where the oil was caked on. Should have mentioned that.
Boudreaux In Eunice La.
Lawn Addict
- Joined
- Jul 22, 2017
- Threads
- 21
- Messages
- 2,154
Well this was after I THOROUGHLY cleaned it. The arrows were where the oil was caked on. Should have mentioned that.
Ok that changes the equation in this problem you have ............. That would be the sump gasket that's leaking.... Let me see if I have a video on my channel where I take one apart ....
Be back in a bit ........ ~!~!
Boudreaux In Eunice La.
Lawn Addict
- Joined
- Jul 22, 2017
- Threads
- 21
- Messages
- 2,154
Ok I found a video for you ....... This is not your engine though ..... You will be minus 1 sump bolt to take out ....
This video shows you what you have to do with the Governor also..... Like I said its easy to do .... You might have to shoe shine the shaft to let the cover off easier........
The seal is in the cover and it goes around the shaft ..... A screwdriver pops it out easily most of the time...... Look to see how far your seal is down into the cover for later reference ...... Pictures or a video made with your phone will be a lot of help ...... Then a good cleaning of the inside will be beneficial to you........ Make sure you align the timing marks on the cam and crank gear when you put it back together ...... Take picture of that before you pop it out or it falls out....
When you reassemble it make sure you PRE OIL everything.... Even the holes where the cam goes into and the shaft so the seal just slides easily......
If you need the part numbers let me know.....
https://youtu.be/tqQQ618XeiE
Ok I found a video for you ....... This is not your engine though ..... You will be minus 1 sump bolt to take out ....
This video shows you what you have to do with the Governor also..... Like I said its easy to do .... You might have to shoe shine the shaft to let the cover off easier........
The seal is in the cover and it goes around the shaft ..... A screwdriver pops it out easily most of the time...... Look to see how far your seal is down into the cover for later reference ...... Pictures or a video made with your phone will be a lot of help ...... Then a good cleaning of the inside will be beneficial to you........ Make sure you align the timing marks on the cam and crank gear when you put it back together ...... Take picture of that before you pop it out or it falls out....
When you reassemble it make sure you PRE OIL everything.... Even the holes where the cam goes into and the shaft so the seal just slides easily......
If you need the part numbers let me know.....
https://youtu.be/tqQQ618XeiE
Thank you for the help once again. I’d like to do a rebuild but cannot locate a service manual for my model. Also, I can’t figure out how to remove crankshaft with that big plate and nut on the end of it! See pic above.
tom3
Lawn Addict
- Joined
- Apr 9, 2018
- Threads
- 25
- Messages
- 1,579
One way I've removed the blade adapter is to soak it well with parts loosener, screw in the bolt almost all the way, hold the motor upside down holding it by the adapter plate, and smack the bolt head with a hammer a couple times. This will usually pop the adapter loose. And if the motor has been stored quite a while it might not actually be leaking that badly, with it cleaned up I'd put some fresh oil in it and run it some, might be good enough as is.
Boudreaux In Eunice La.
Lawn Addict
- Joined
- Jul 22, 2017
- Threads
- 21
- Messages
- 2,154
Why do you want to remove the crank ??? You might need a 2 jawed puller to get the blade adapter off and then sand the crank like I said in the video ..... I show how to remove "that big plate" in the video.... Bolt for bolt minus 1 in your case....
(Account Closed)
Well-Known Member
- Joined
- Dec 3, 2018
- Threads
- 6
- Messages
- 260
I'd replace the crank seal while the base and while doing so, as noted, polish the crank to get rod of the rust.
I personally would use a puller (try to keep the smacking to a minimum) and since your replacing the seal, a HEAT GUN used on the blade adapter should make removal way easier.. Just heat the adapter, squirt some liquid wrench in between the crank and adapter. Should come pretty easily.
The only thing that could be damaged would be the seal (with the heat) and your replacing that anyway..
I'd replace the crank seal while the base and while doing so, as noted, polish the crank to get rod of the rust.
I personally would use a puller (try to keep the smacking to a minimum) and since your replacing the seal, a HEAT GUN used on the blade adapter should make removal way easier.. Just heat the adapter, squirt some liquid wrench in between the crank and adapter. Should come pretty easily.
The only thing that could be damaged would be the seal (with the heat) and your replacing that anyway..
Ok so I’m at an empass. Look at the pic here. Seal out, sump loose, and now there is a key way keeping me from getting the sump off!!!