locked engine

wivrrat

Forum Newbie
Joined
Dec 10, 2018
Threads
1
Messages
5
Good info and thanks. I'm not one to mess with a carburetor but maybe I can clean it. I baby that generator more than any piece of equipment I own. Add fuel stabilizer religiously, make sure I use a clean funnel to add gas, and generally keep it covered and secure. Can't believe this on a 2 year old engine.
So once I get the carb cleaned, do I just drain the oil and add new and its good to go? I had thought of adding a fuel filter, but put it off. It will be a must now. Thanks again for the info.
 

(Account Closed)

Well-Known Member
Joined
Dec 3, 2018
Threads
6
Messages
260
Good info and thanks. I'm not one to mess with a carburetor but maybe I can clean it. I baby that generator more than any piece of equipment I own. Add fuel stabilizer religiously, make sure I use a clean funnel to add gas, and generally keep it covered and secure. Can't believe this on a 2 year old engine.
So once I get the carb cleaned, do I just drain the oil and add new and its good to go? I had thought of adding a fuel filter, but put it off. It will be a must now. Thanks again for the info.

Yes, drain the oil fully, tilt the machine and get it all out.

As the video shows, that WHITE, PLASTIC PIECE, once the bowl is off, holds the needle and seat. I believe there's a O-ring between the two (besides the weird seal).

Gently clamp the carb in a vise upside down (with something soft so as not to damage the flange).

Just go slow. Probably 50% of the time, those TWO SCREWS that hold the bowl on, are a PIA to remove (you can see the allen head bolts I replaced mine with).

There usually is a medium sized spring that will push the bowl upwards (and the plastic into the carb body), it just sits between 3 prongs. It won't "shoot out", just don't loose it.

If your not comfy with getting into the carb, I would order a NEW OEM carb (about $125 from "Jacks"), swap and your done. It'd be WAY cheaper than going to a shop.

Good luck.
 

Pumper54

Well-Known Member
Joined
Jun 19, 2014
Threads
19
Messages
819
+1 ^^^^

That engine (short of a high end, 4x's the price Honda), is an excellent engine. Parts are available everywhere. And that float/needle, etc (as shown in the video) IS very easy to clean.

Once cleaned, put an in-line filter between the tank and engine, that'll keep crap out.

Note: Even running the engine dry, a little bit of fuel WILL REMAIN in the bowl and if it's ethanol and NOT Stabilized, will gum up the main jet which is right at lowest end of that plastic piece. One month of sitting can clog it..

Being your running it often, I'd simply clean the carb, install a filter, and use a stabilizer like "Gas Shok". I'd keep away from Stabil (long story-IME- junk)


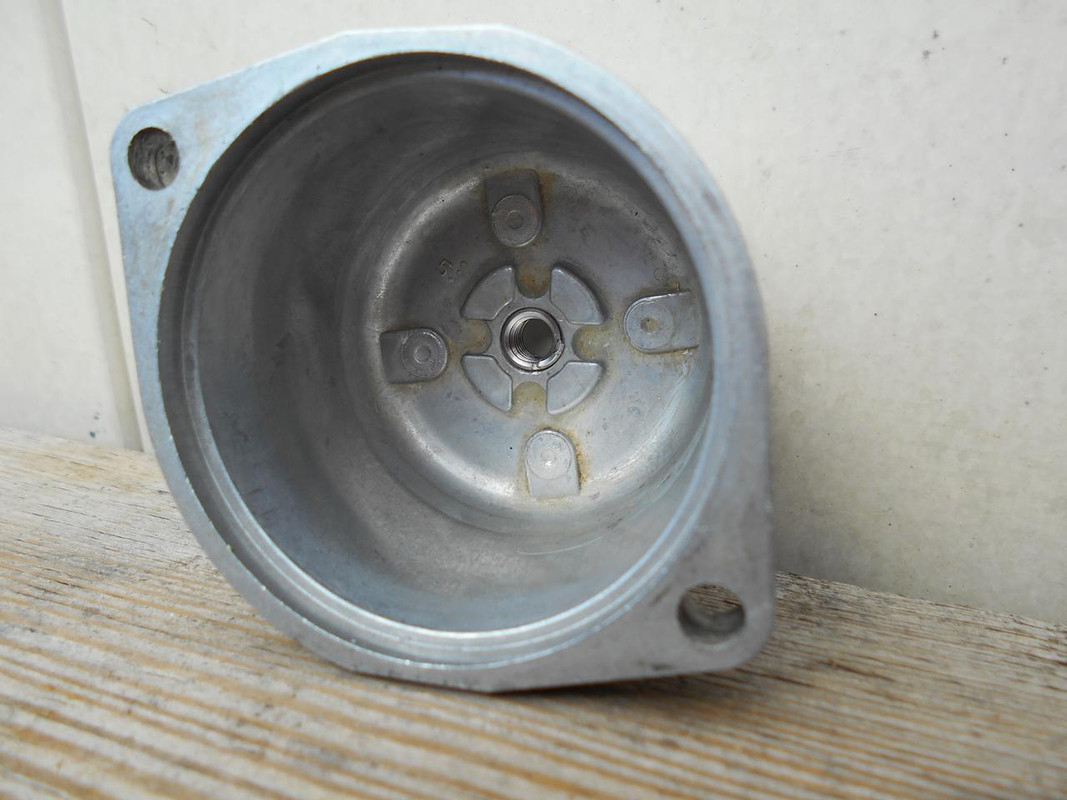
Just an FYI, for every engine of mine (and most customers) with this engine, I modify the float bowl for FULL DRAINAGE with ONE bolt.

I remove the bowl, drill and tap the center for a heli-coil (with RED Loctite). Then install a simple drain plug (see below). You just have to remove the black plastic lower cover to access the bowl to drain... No more clogging...

Some pic's:

Tapping the drilled hole:


The inserted Heli-coil:


Bowl now with a drain plug (where fuel WILL collect and varnish shut the main jet)

That is a great idea. The older carbs came set up like that and I guess they stopped doing to save a few pennies. Most likely will modify the bowls on a few of my carbs.
Tom
 

(Account Closed)

Well-Known Member
Joined
Dec 3, 2018
Threads
6
Messages
260
Thanks Tom.

Most of these engines (down here) are on generators that'll sit for years till a storm shows up. Then I'm busy as heck (unplugging main jets)...

That aluminum, where drilled, is EXTREMLY THIN. I'd suggest using a drill press (to keep everything straight), and wipe out the inside of the Loctite before it dries (or you'll be running a tap thru it the next day).

Those SS threads in that thin aluminum are much stronger than you would expect.

As noted earlier, mine ran 28 hours with the mod, no issues. Just tighten the drain good and snug..


*Just to add, for a Tecumseh 10 HP generator I have that has a steel bowl, I did something similar.

There wasn't enough material to tap so I drilled 1/4" hole in the low part of the bowl (removed from carb).
Then bolted a nut and bolt, NUT on the OUTSIDE of the bowl.

Then brazed the nut to the bowl.
Remove the bolt, clean up, now you have the same thing, a place to screw in a drain bolt when necessary.

Just assemble so you have access to the new drain bolt.
 

Pumper54

Well-Known Member
Joined
Jun 19, 2014
Threads
19
Messages
819
Scott, wonder if something like J-B weld could be usec to attach the nut to the outside of the bowl if the metal is to thi to take the treaded insert. Do you think a riv-nut would seal against the bowl enough to not leak?
Tom
 
Joined
Jul 22, 2017
Threads
21
Messages
2,154
That generator is bolted down to a concrete pad (aluminum straps on each sides and the chain). It's for hurricane season down here and stays outside (under cover) 365. (Bought it used, 0 hours for $300.00 right before Hurricane Irma which got ran 28 hours straight)


Agreed to the above, the carb needs cleaning, you got crap stuck in the needle seat (leaking fuel into the combustion chamber) and eventually into the crankcase.

Here ya go, a VIDEO: https://www.youtube.com/watch?v=G1zIgTWmq68 (Look closely at 5 minutes thru 6 minutes)

(Same carb, different intake manifold, etc.)

Getting the carb off requires a really small 12 point socket which you'll see with the air filter cover removed.

You very likely have the NIKKI carb: https://www.jackssmallengines.com/j...12-0147-e1/carburetor-kit-carburetor-overhaul I haven't seen any other carbs on these engines but check with your model # before ordering anything

It has a funky rubber gasket inside once you pull the center, main plastic off (the float and needle are attached to that part).

With ethanol fuel, that rubber gasket comes loose, expands and doesn't fit well (a light coating of grease on that seal helps hold it in place)


Scott............. There are 2 carbs that look exactly alike..... The one in the video on the mower and the one on those Genny's.....They look alike but take different kits....... Most of the time just the NOODLE gasket needs to be changed ...

He needs gasket number 695426 It's a one piece gasket.... The one in the video is 698781 and is a two piece gasket.... Well 1 gasket and 1 o ring for the fuel inlet.......LOL......

Those whole kits are 50 bux and most of the time you don't need the needle..... Also I recommend to use NON ETHO GAS ... There are plenty of stations in Florida that has NON E gas.....

Scott I thought I would throw that in for you ..........

Plus Tard Mon Ami .............
 

(Account Closed)

Well-Known Member
Joined
Dec 3, 2018
Threads
6
Messages
260
Scott............. There are 2 carbs that look exactly alike..... The one in the video on the mower and the one on those Genny's.....They look alike but take different kits....... Most of the time just the NOODLE gasket needs to be changed ...

He needs gasket number 695426 It's a one piece gasket.... The one in the video is 698781 and is a two piece gasket.... Well 1 gasket and 1 o ring for the fuel inlet.......LOL......

Those whole kits are 50 bux and most of the time you don't need the needle..... Also I recommend to use NON ETHO GAS ... There are plenty of stations in Florida that has NON E gas.....

Scott I thought I would throw that in for you ..........

Tks. I use non E-fuel in the boat, regular in everything else (but it's treated with Gas Shok and Yamaha's RingFree-HIGHLY RECOMMENDED).

As posted earlier he would need to check his engine model #before ordering anything.

I suspect he won't need any parts, just pull the white part out, clean and re-assemble...

50 for a kit?? Wow. Never bought a kit, just the weird gasket. I'd buy a new carb if I couldn't figure out the issue.


*I have spare float bowl however it doesn't fit correctly to a carb body (from my junk/spare parts box, probably the different carb as you mentioned)..
 

(Account Closed)

Well-Known Member
Joined
Dec 3, 2018
Threads
6
Messages
260
Scott, wonder if something like J-B weld could be usec to attach the nut to the outside of the bowl if the metal is to thi to take the treaded insert. Do you think a riv-nut would seal against the bowl enough to not leak?
Tom

I've used JB weld before but IDK if constant exposure to fuel (when used at least), would hold up and not leak. A small enough Riv-nut would certainly hold but you'd need to find a sealer, again that would hold up against fuel.

Someone may chime in or call who ever makes JB weld and ask. Obviously, you don't want that failing (major fire hazard).

For the carbs (most) with the single, center screw holding the bowl on, you could always loosen the bolt a bit (don't remove) and let drain. A spritz of air would remove any remaining fuel in the bowl.. Just makes sure your gaskets, etc are in good shape (and clean) so you don't induce a leak.


In the old days, as least the Tecumseh engines had that "spring release valve" in the bottom of the bowl to drain crap/fuel out of.
I remember the bowl had a flat surface for the seal and worked great. To get/find something like that would be the cat's meow!
 

Pumper54

Well-Known Member
Joined
Jun 19, 2014
Threads
19
Messages
819
Scott,
I just might give J-B Weld a call, the world headquarters is just up the road from me about 200 miles but what the hey this is Texas. LOL
Tom
 

(Account Closed)

Well-Known Member
Joined
Dec 3, 2018
Threads
6
Messages
260
Being new to the forum, it'd be nice to have a "thanks" button, or "like" button to click on..

;)
 
Top