You are using an out of date browser. It may not display this or other websites correctly.
You should upgrade or use an alternative browser.
You should upgrade or use an alternative browser.
Export thread
Snapper Repower Wiring Problem
#1
J
JoeCool
J
JoeCool
Hi everyone! I'm new here but, I can already see that this looks like a great place to get some friendly advice. For this post, please assume that I know absolutely nothing about lawnmowers. Thanks!
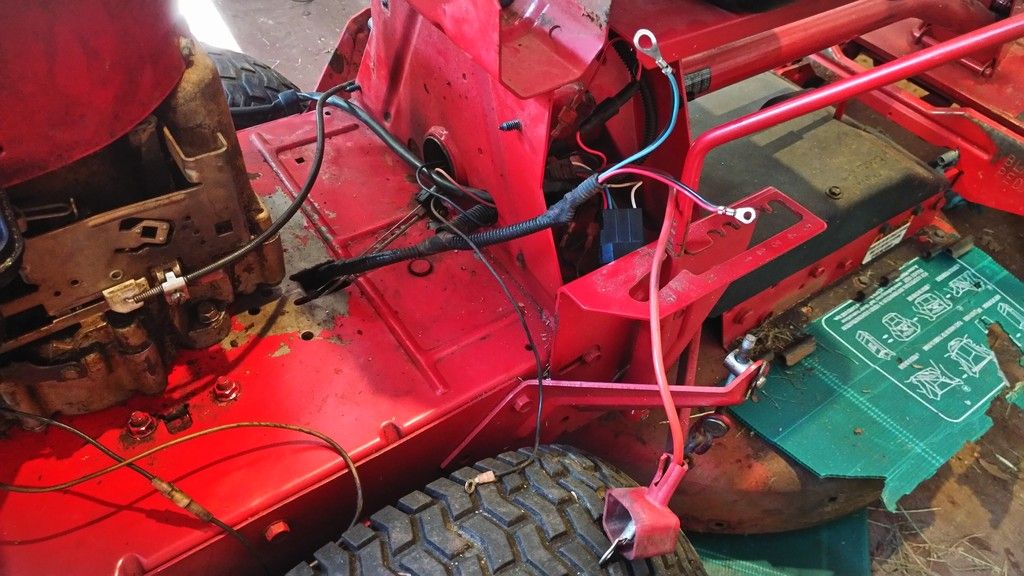
I bought an old Snapper RER from a friend recently for dirt cheap. It originally had a 10hp Briggs but, they had replaced that with an 8hp. They also had a 14 hp lying around and I bought that too. I just swapped the engines out but, I don't have a clue how to wire it. The old 8hp had a pull start so, they didn't have anything wired. They just had the throttle hooked up. I'm including the model numbers for the mower and the engine and I can take any pics that might help. Thanks!
Snapper model: M281019BE
Engine model: 287707-0153-01 Code 9211244A
Here's some pics of the wires:


#2

Boobala
Might try sending a PM to member (mattm55) of this site he just finished a nice re-build with pics on the site ..
Boobala
Hi everyone! I'm new here but, I can already see that this looks like a great place to get some friendly advice. For this post, please assume that I know absolutely nothing about lawnmowers. Thanks!
I bought an old Snapper RER from a friend recently for dirt cheap. It originally had a 10hp Briggs but, they had replaced that with an 8hp. They also had a 14 hp lying around and I bought that too. I just swapped the engines out but, I don't have a clue how to wire it. The old 8hp had a pull start so, they didn't have anything wired. They just had the throttle hooked up. I'm including the model numbers for the mower and the engine and I can take any pics that might help. Thanks!
Snapper model: M281019BE
Engine model: 287707-0153-01 Code 9211244A
Might try sending a PM to member (mattm55) of this site he just finished a nice re-build with pics on the site ..
#3

mattm55
OK, it looks like you have a mess right? A cheap continuity tester will be invaluable even when you get all the wires sorted. Harbor Freight has these for under $10 if you don't have one.
So, to start... (and color of wires may be what I specify or not. You have to trace each one to be sure). Also, batteries store a lot of energy and dangerous so if your unsure, please seek help from someone with experience. You could get hurt.
Sm = ~16AWG
Lrg = ~6-8AWG
1. The Briggs has a starter and flywheel for a starter, correct? The Briggs will have a kill wire going to around the throttle linkage area and a larger black wire going to the starter lug. That's basically the minimum. There could be a sm white charging circuit wire that runs with the lrg black wire back to the Briggs starter. Some Briggs have a charging circuit, some don't. If it doesn't make sure you put electrical tape to cover it temporarily.
2. I marked the solenoid in your picture to specify what each does and how to wire. I can't see where the sm red and blue wires go but they should go to a key switch. The sm red and blue will complete the circuit and cause the lrg red and lrg black to complete a circuit and trigger the starter. There should be interlocks and a magneto kill wire that would be in between the sml red and sm blue solenoid circuit to prevent starting (a no ground condition) so the engine won't start until all conditions are met (i.e. blade off, gear in park or neutral, etc...)

Hope this helps.
mattm55
Hi everyone! I'm new here but, I can already see that this looks like a great place to get some friendly advice. For this post, please assume that I know absolutely nothing about lawnmowers. Thanks!
I bought an old Snapper RER from a friend recently for dirt cheap. It originally had a 10hp Briggs but, they had replaced that with an 8hp. They also had a 14 hp lying around and I bought that too. I just swapped the engines out but, I don't have a clue how to wire it. The old 8hp had a pull start so, they didn't have anything wired. They just had the throttle hooked up. I'm including the model numbers for the mower and the engine and I can take any pics that might help. Thanks!
Snapper model: M281019BE
Engine model: 287707-0153-01 Code 9211244A
Here's some pics of the wires:
OK, it looks like you have a mess right? A cheap continuity tester will be invaluable even when you get all the wires sorted. Harbor Freight has these for under $10 if you don't have one.
So, to start... (and color of wires may be what I specify or not. You have to trace each one to be sure). Also, batteries store a lot of energy and dangerous so if your unsure, please seek help from someone with experience. You could get hurt.
Sm = ~16AWG
Lrg = ~6-8AWG
1. The Briggs has a starter and flywheel for a starter, correct? The Briggs will have a kill wire going to around the throttle linkage area and a larger black wire going to the starter lug. That's basically the minimum. There could be a sm white charging circuit wire that runs with the lrg black wire back to the Briggs starter. Some Briggs have a charging circuit, some don't. If it doesn't make sure you put electrical tape to cover it temporarily.
2. I marked the solenoid in your picture to specify what each does and how to wire. I can't see where the sm red and blue wires go but they should go to a key switch. The sm red and blue will complete the circuit and cause the lrg red and lrg black to complete a circuit and trigger the starter. There should be interlocks and a magneto kill wire that would be in between the sml red and sm blue solenoid circuit to prevent starting (a no ground condition) so the engine won't start until all conditions are met (i.e. blade off, gear in park or neutral, etc...)
Hope this helps.
#4
J
JoeCool
J
JoeCool
Yeah, I do! Haha. I have a continuity tester already.
1. Yeah, that should be the fourth pic. Should I plug that white wire in with the red and black wire?
2.I'll work on tracing everything now.
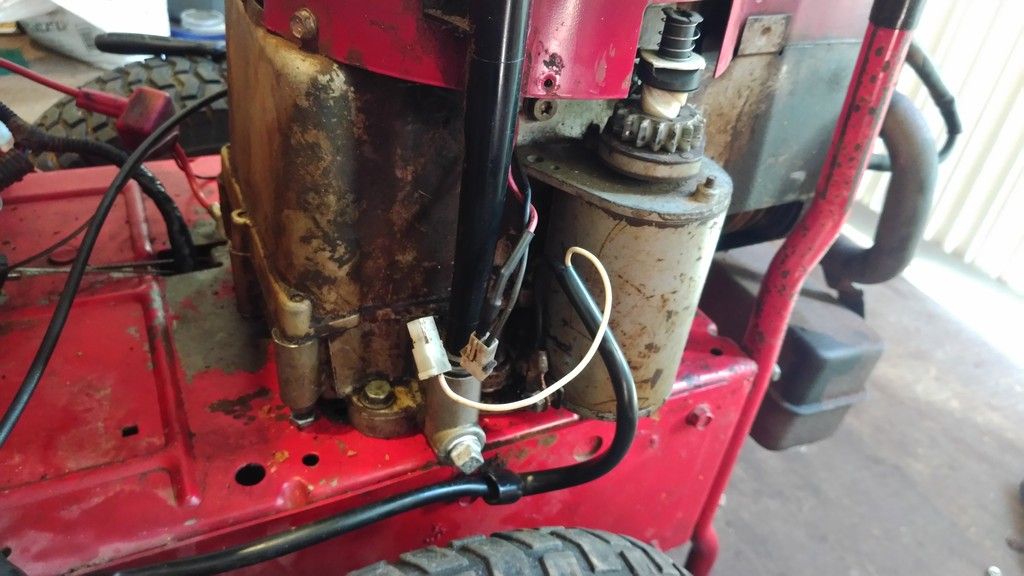
A. Do you have any idea what the blue/black and red/black wires are in the third pic?
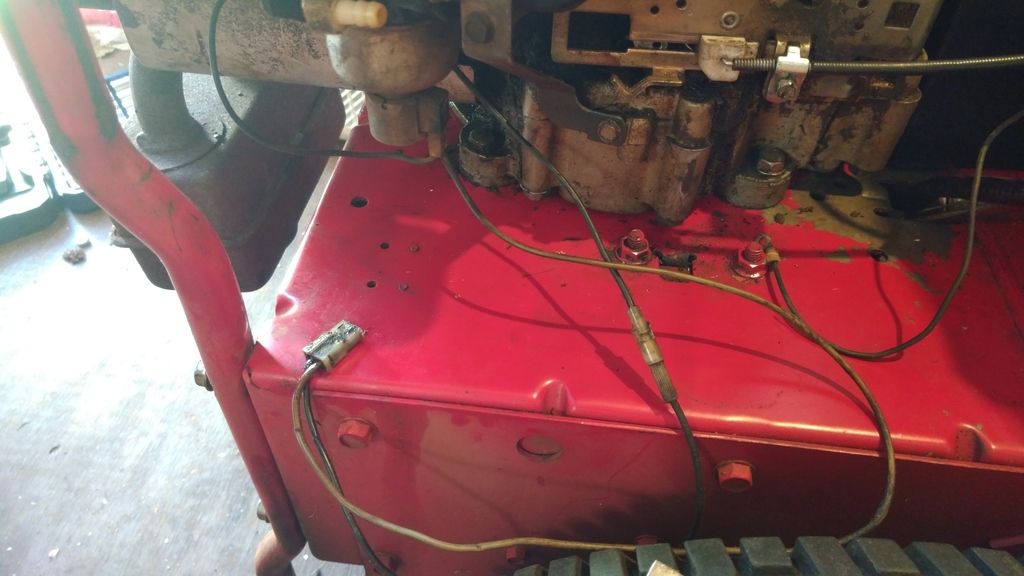
B. And what about the plug coming off the back of the engine in the last pic?
1. Yeah, that should be the fourth pic. Should I plug that white wire in with the red and black wire?
2.I'll work on tracing everything now.
A. Do you have any idea what the blue/black and red/black wires are in the third pic?
B. And what about the plug coming off the back of the engine in the last pic?
#5
mattm55
That's great to hear. You'll need it ;o)
Matt
mattm55
Yeah, I do! Haha. I have a continuity tester already.
That's great to hear. You'll need it ;o)
That should be the charging circuit. It only puts the charge back in the battery so that's optional for now. Won't effect start or run.1. Yeah, that should be the fourth pic. Should I plug that white wire in with the red and black wire?
Yes. And it might help to mark with tape and labels.2.I'll work on tracing everything now.
It can't say for certain but with those round lugs, it may be to the chassis ground from the Neg term on the battery. Here is where I would take precautions to trace where those go in the cable sleeve. The battery location on this one is different than mine.A. Do you have any idea what the blue/black and red/black wires are in the third pic?
That would need to be traced. Some interlock maybe?B. And what about the plug coming off the back of the engine in the last pic?
Matt
#6
J
JoeCool
J
JoeCool
Yeah, the small red and small blue plus the long small black wire that's sitting on the tire in the third pic are coming from the switch.
The wires in the last pic are connected to the engine. One wire is connected to the bottom of the carb which is also running onto the block, I guess as a ground. And, the other wire is running under the shroud.
The wires in the last pic are connected to the engine. One wire is connected to the bottom of the carb which is also running onto the block, I guess as a ground. And, the other wire is running under the shroud.
#7
mattm55
So, looking at my diagram, those should match my switch. The sm blue goes to the small connector on one side of the solenoid, the sm red goes to the battery (battery pos term or top red lug on solenoid that has lrg red to Pos term. The black is the magneto ground which stops engine when switch is in off position.
Matt
mattm55
Yeah, the small red and small blue plus the long small black wire that's sitting on the tire in the third pic are coming from the switch.
So, looking at my diagram, those should match my switch. The sm blue goes to the small connector on one side of the solenoid, the sm red goes to the battery (battery pos term or top red lug on solenoid that has lrg red to Pos term. The black is the magneto ground which stops engine when switch is in off position.
Yes, the ground. Find out where the other wire goes under shroud. If its to the magneto, thats a kill wire, if its to the charging circuit then thats the "white" wire. The charging is optional for now. Keep it simple first.The wires in the last pic are connected to the engine. One wire is connected to the bottom of the carb which is also running onto the block, I guess as a ground. And, the other wire is running under the shroud.
Matt
#8
J
JoeCool
J
JoeCool
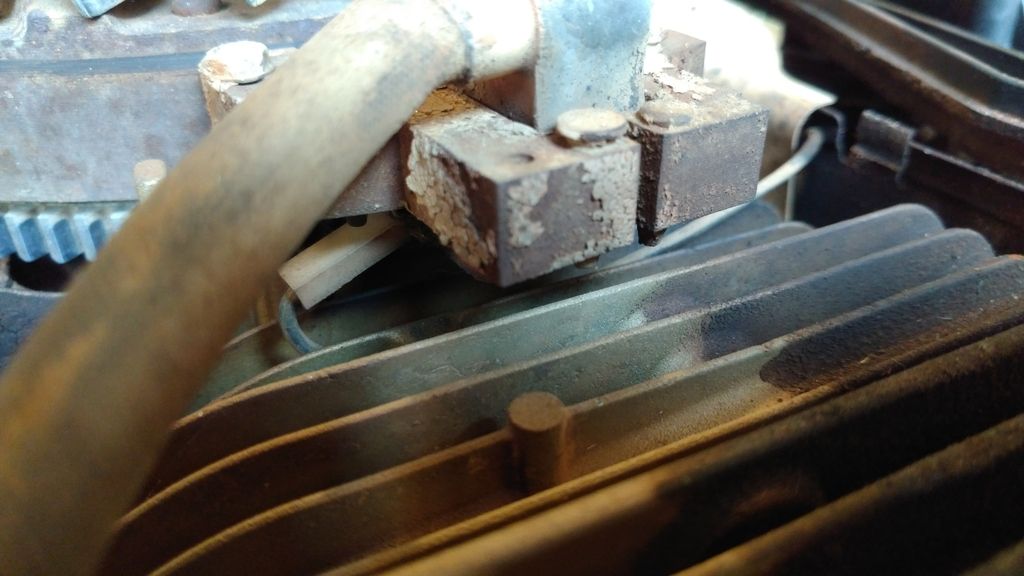
Ok, where should I attach the magneto ground? I traced the blue/black and red/black wires. The blue and red wires go to that plastic box under the seat. The black wire with the red goes to a plug under the engine and the black with the blue goes to a plug under the seat. That wire under the shroud goes to this:

#9
mattm55
So let me explain what that magneto ground wire does. Without that wire or that wire connected to anything the engine will run. Connecting that wire to a potential ground (not grounded at the time) so at any time you need to stop the engine, you push a button, turn off switch, interlock is triggered, etc.. and it completes the circuit and grounds to chassis.
Usually, near the throttle linkage by carb there is a connector so that when you move your throttle to Stop, this causes that wire to ground and stop engine. Now wiring this in series to any or all the potential grounds might be desired. So a case where the blade is engaged, the connection grounds the magneto and you won't start. You really want it so it won't crank either so wiring to the ground small leg of the solenoid is optimal. Google how a 4 pole solenoid works. You really have to understand more of why it goes where it goes rather than what goes where as each machine/model is different and may have been changed thru its life.

Magneto wire attaches around here for the throttle ground. This could be different depending on wiring.

Matt
mattm55
Ok, where should I attach the magneto ground? I traced the blue/black and red/black wires. The blue and red wires go to that plastic box under the seat. The black wire with the red goes to a plug under the engine and the black with the blue goes to a plug under the seat. That wire under the shroud goes to this:
So let me explain what that magneto ground wire does. Without that wire or that wire connected to anything the engine will run. Connecting that wire to a potential ground (not grounded at the time) so at any time you need to stop the engine, you push a button, turn off switch, interlock is triggered, etc.. and it completes the circuit and grounds to chassis.
Usually, near the throttle linkage by carb there is a connector so that when you move your throttle to Stop, this causes that wire to ground and stop engine. Now wiring this in series to any or all the potential grounds might be desired. So a case where the blade is engaged, the connection grounds the magneto and you won't start. You really want it so it won't crank either so wiring to the ground small leg of the solenoid is optimal. Google how a 4 pole solenoid works. You really have to understand more of why it goes where it goes rather than what goes where as each machine/model is different and may have been changed thru its life.
Magneto wire attaches around here for the throttle ground. This could be different depending on wiring.
Matt
#10
T
txzrider2
T
txzrider2
I am not trying to step on Matts excellent advice but I would add Briggs website has a alternator_identification.pdf file you can download which will help identifying what you have as far as the type of alternator and what they wiring might look like from the eng side! It tells you things like if a black wire comes from the stator and has a white connector is ac only and if a red wire it could be 3 amp dc only. I repowered my yardcruiser a few years ago and it was very helpful, I also found wiring diags on the snapper website but I dont know it they still have it for the old stuff now.
#11
mattm55
No problem at all. That's why we moved from PM's to the forum so everyone can see and help. I'm no expert on electric and have had my share of spark plug grabs, shocks, sparks, etc...
Good idea. This is also available for your model > https://www.partstree.com/parts/snapper/mowers-rear-engine-riding-lawn-mower/m281019be-snapper-28-rear-engine-rider-10-hp-m-series-19/electrical-systems-for-electric-start/
Matt ;o)
mattm55
I am not trying to step on Matts excellent advice but I would add Briggs website has a alternator_identification.pdf file you can download which will help identifying what you have as far as the type of alternator and what they wiring might look like from the eng side! It tells you things like if a black wire comes from the stator and has a white connector is ac only and if a red wire it could be 3 amp dc only. I repowered my yardcruiser a few years ago and it was very helpful, I also found wiring diags on the snapper website but I dont know it they still have it for the old stuff now.
No problem at all. That's why we moved from PM's to the forum so everyone can see and help. I'm no expert on electric and have had my share of spark plug grabs, shocks, sparks, etc...
Good idea. This is also available for your model > https://www.partstree.com/parts/snapper/mowers-rear-engine-riding-lawn-mower/m281019be-snapper-28-rear-engine-rider-10-hp-m-series-19/electrical-systems-for-electric-start/
Matt ;o)
#12
Boobala
Boobala
Got nosy about you guys ... did some investigating ... thought I'd add a few things that may ( or not ) help !!
..http://www4.briggsandstratton.com/m...rical from MA-S-1612 2004 Quick Reference.pdf
https://www.briggsandstratton.com/c...n_us/Files/FAQs/alternator_specifications.pdf
https://www.vanguardengines.com/con...a/en_us/Files/FAQs/alternator_replacement.pdf
https://www.vanguardengines.com/content/dam/briggsandstratton/na/en_us/Files/FAQs/alternator_id.pdf
..............jpg") ...
...
BETTER an overload of information ...than NONE at all .. ...Boobala
..http://www4.briggsandstratton.com/m...rical from MA-S-1612 2004 Quick Reference.pdf
https://www.briggsandstratton.com/c...n_us/Files/FAQs/alternator_specifications.pdf
https://www.vanguardengines.com/con...a/en_us/Files/FAQs/alternator_replacement.pdf
https://www.vanguardengines.com/content/dam/briggsandstratton/na/en_us/Files/FAQs/alternator_id.pdf
.............
...BETTER an overload of information ...than NONE at all .. ...Boobala
#13
J
JoeCool
J
JoeCool
Thanks for all the help so far! I'm still feeling kinda lost. I still don't know what to do with the blue/black and red/black wires. Or the wires coming from the mag kill wire and engine block. And what exactly needs to be hooked to the battery? Where do I ground the battery? Sorry for all the newbness guys!
#14
mattm55
Yes, your welcome. I figured from your questions we need to step back and see if we can get the very basic wiring first with some reasons why. Me telling you to hook the black wire to terminal A doesn't really help. And for us not being there we can't exactly see what's what and make sure the connection explanation is what you interpret to be the same.
So, lets take a step back and wire just what we need first. Once these are connected the loose or unconnected wire count gets smaller and thus should be easier.
Print my wiring as a ref to colors and make adjustments where necessary. Wire colors may not be the same.
Get that far and we can proceed.
Matt
mattm55
Thanks for all the help so far! I'm still feeling kinda lost. I still don't know what to do with the blue/black and red/black wires. Or the wires coming from the mag kill wire and engine block. And what exactly needs to be hooked to the battery? Where do I ground the battery? Sorry for all the newbness guys!
Yes, your welcome. I figured from your questions we need to step back and see if we can get the very basic wiring first with some reasons why. Me telling you to hook the black wire to terminal A doesn't really help. And for us not being there we can't exactly see what's what and make sure the connection explanation is what you interpret to be the same.
So, lets take a step back and wire just what we need first. Once these are connected the loose or unconnected wire count gets smaller and thus should be easier.
Print my wiring as a ref to colors and make adjustments where necessary. Wire colors may not be the same.
- Battery Neg Terminal - *This should be the last connection you make. A 6 or 8 AWG black wire that connects to the metal chassis. Mine is connected to the bolt that holds the throttle linkage. The bolt goes thru the lug eye on the black wire.
- Battery Pos Terminal - A 6 or 8 AWG red wire that goes from the battery to the larger nut on the solenoid.
- Solenoid - You probably have 4 connections on the solenoid? Two on top which are larger and two smaller ones. The small ones actually actuate the 2 top ones when there is current flow. So the 2 top ones are "open" initially until the 2 smaller ones have current passing thru. When current passes thru the bottom, the 2 tops are linked and sends current to starter.
Top1 = Red Lrg Battery wire & B blue wire to B on switch
Top2 = Black wire to engine starter that has the white wire (dont connect the white wire for now
Small1 = Starter Switch red wire to this terminal. When you turn key, this takes the blue and connects to the red which sends current to activate solenoid.
Small2 = A small green wire to any screw to chassis for ground
- Magneto - This black wire forget about it for now. Make sure it doesn't ground to chassis. Electrical tape it.
Get that far and we can proceed.
Matt
#15
J
JoeCool
J
JoeCool
I only have three connections on my solenoid. It has two big posts and a flat connector. Does that change a lot?
#16
mattm55
To me it looked like a 4 terminal solenoid so yes. Here is a diagram from Google which should help understand what that solenoid is doing. Google is your friend...
The solenoid is grounded by the unit itself so no ground wire is needed. Feed the key switch from battery with 12v B (blue), on turning the key switch to start the 12v (red) goes back to the small terminal on the solenoid and activates the starter (Pos Term on 1 and starter wire on other) to complete circuit. When you release the key to run, it stops the starter 12v.
Make sense?

Matt
mattm55
I only have three connections on my solenoid. It has two big posts and a flat connector. Does that change a lot?
To me it looked like a 4 terminal solenoid so yes. Here is a diagram from Google which should help understand what that solenoid is doing. Google is your friend...
The solenoid is grounded by the unit itself so no ground wire is needed. Feed the key switch from battery with 12v B (blue), on turning the key switch to start the 12v (red) goes back to the small terminal on the solenoid and activates the starter (Pos Term on 1 and starter wire on other) to complete circuit. When you release the key to run, it stops the starter 12v.
Make sense?
Matt
#17
C
cashman
C
cashman
I noticed that there's a fuel shutoff solenoid on the carburetor. The red and black wires under the shroud might be a wire harness for the fuel shutoff solenoid if the red wire connects to the tab on the fuel solenoid? That circuit will have to be fed in both the start and run and not in the off position on the ignition switch. Is the ignition switch a three position switch with off, run and start positions? If so, the terminals on the rear of the ignition switch may have letters either stamped on or near each terminal? If they are lettered, it will be a great help to get you from point A to point B a lot easier. If they are not lettered, might have to connect your ohm meter and see which terminals do and do not have continuity with the "B" or battery input terminal of the ignition switch which can be easily identified with your ohm meter.
#18
mattm55
Good catch. I missed that and being this machine went from a 10HP > 8Hp > 14HP currently, it may not have the appropriate wiring or connector yet for that? Same for the charging circuit. I think I'd be happy to get it to the cranking stage with key. Running is secondary with all the interlocks (now fuel shutoff) and mag kill. :thumbsup:

Matt
mattm55
I noticed that there's a fuel shutoff solenoid on the carburetor.
Good catch. I missed that and being this machine went from a 10HP > 8Hp > 14HP currently, it may not have the appropriate wiring or connector yet for that? Same for the charging circuit. I think I'd be happy to get it to the cranking stage with key. Running is secondary with all the interlocks (now fuel shutoff) and mag kill. :thumbsup:
Matt
#19
C
cashman
C
cashman
He will have to have an ignition switch that has a hot terminal in both the run and start position and not in the off position. Don't know if his original Snapper switch is going to have that function or not but he can check it with his ohm meter. Also check in the parts breakdown of the engine model and type number of the engine he is going to use to see if it has a auxiliary 70 watt lighting coil for headlights. That might explain the extra wires he is talking about? If it has, just tape them off. The engine probably still has the wire harness for the fuel shutoff solenoid and connect to the terminal that is hot in both run and start and not in off position. The kill lead can connect to the "M" terminal or any terminal on the rear of the switch that has continuity to the body of the switch in the off position. The charging lead can connect to any wire that has continuity to the positive post of the battery or the "R" terminal on the rear of the ignition switch. There should also be an inline fuse of 30 amps in the wire between the positive battery terminal wire at the starting solenoid and the "B" terminal or voltage input to the ignition switch.
#20
J
JoeCool
J
JoeCool
So, do I need a new ignition switch? My Lowes has a couple of different ones and they're cheap. What would I look for? And, if I get one, where would that fuel shutoff wire attach?
#21

cpurvis
That is what you need to look for in a switch.
cpurvis
To the post on the switch mentioned above which is hot during 'start' and 'run' positions but not while in the 'off' position.So, do I need a new ignition switch? My Lowes has a couple of different ones and they're cheap. What would I look for? And, if I get one, where would that fuel shutoff wire attach?
That is what you need to look for in a switch.
#22
mattm55
I would not buy a new switch until you see what you already have in the Snapper. Since you changed engines, your probably going to have to improvise on wiring (i.e. the carb solenoid, etc...). Matt
mattm55
So, do I need a new ignition switch? My Lowes has a couple of different ones and they're cheap. What would I look for? And, if I get one, where would that fuel shutoff wire attach?
I would not buy a new switch until you see what you already have in the Snapper. Since you changed engines, your probably going to have to improvise on wiring (i.e. the carb solenoid, etc...). Matt
#23
J
JoeCool
J
JoeCool
Hey, I hope everyone had a good Mother's Day with their moms! So, what am I looking for? I know my switch only has three prongs. What else do I need to look for?
#24
mattm55
Yes, Mom's day weather-wise wasn't too bad in upstate NY. Thx
I think your switch is fine with 3 prongs. Here is the wiring diagram for 3 pole switch off a Snapper. Changing switches will require adding extra wires. Do you really want to do that? )
)
Update: If the switch isn't marked on the bottom of what it does (M=Magneto, B=Battery, etc...) you will have to use the tester on the wires to see how it functions. So in start position, which 2 wires have continuity and then release start and see if they break continuity until you know what each prong does.
The letters on the back of an ignition switch stand for the following:
M = Magneto
S = Starter Solenoid
L = Lights
A = Accessory
B = Battery
G = Ground
I = Ignition
R = Regulator/Rectifier
This should help.

Matt
mattm55
Hey, I hope everyone had a good Mother's Day with their moms! So, what am I looking for? I know my switch only has three prongs. What else do I need to look for?
Yes, Mom's day weather-wise wasn't too bad in upstate NY. Thx
I think your switch is fine with 3 prongs. Here is the wiring diagram for 3 pole switch off a Snapper. Changing switches will require adding extra wires. Do you really want to do that?
)Update: If the switch isn't marked on the bottom of what it does (M=Magneto, B=Battery, etc...) you will have to use the tester on the wires to see how it functions. So in start position, which 2 wires have continuity and then release start and see if they break continuity until you know what each prong does.
The letters on the back of an ignition switch stand for the following:
M = Magneto
S = Starter Solenoid
L = Lights
A = Accessory
B = Battery
G = Ground
I = Ignition
R = Regulator/Rectifier
This should help.
Matt
#26
mattm55
And here is where they would go according to the diagram.

Matt
mattm55
Ok, I have B,M and S.
And here is where they would go according to the diagram.
Matt
#27
J
JoeCool
J
JoeCool
OK, so I think i pretty much have everything hooked up now. I went back and studied a diagram from the parts list and figured the extra wires on the mower out. Just to be sure, is the magneto shorting block the plate that the throttle attaches to? I still don't know where to hook the fuel shutoff wires, though. One other thing is that the negative cable is getting hot. I have it bolted to the engine block like the pic shows. The wire is real old. Could that be an issue?
#28
mattm55
Yes. wires should not be getting hot. This could cause a fire. Remove the ground from the battery until you make 100% sure you have everything correct.
Matt
mattm55
OK, so I think i pretty much have everything hooked up now. I went back and studied a diagram from the parts list and figured the extra wires on the mower out. Just to be sure, is the magneto shorting block the plate that the throttle attaches to? I still don't know where to hook the fuel shutoff wires, though. One other thing is that the negative cable is getting hot. I have it bolted to the engine block like the pic shows. The wire is real old. Could that be an issue?
Yes. wires should not be getting hot. This could cause a fire. Remove the ground from the battery until you make 100% sure you have everything correct.
Matt
#29
J
JoeCool
J
JoeCool
Yeah, I unhooked it immediately! I'm about to head to Lowes and buy a new ground wire. So, what about what cashman said here:
"The engine probably still has the wire harness for the fuel shutoff solenoid and connect to the terminal that is hot in both run and start and not in off position. The kill lead can connect to the "M" terminal or any terminal on the rear of the switch that has continuity to the body of the switch in the off position. The charging lead can connect to any wire that has continuity to the positive post of the battery or the "R" terminal on the rear of the ignition switch."
Is that how I hook up the fuel shutoff?
Update: I got a new negative cable and it helped some. It still wouldn't start though. Well, I went to unhook it but, I tried the key a couple more times. I noticed some smoke coming from the starter. The terminal hooked to it was touching the body and I guess it was grounding. I bent it away from the starter and tried the key again and the engine turned over! Things went south again after that though.
I put some gas in the carb and turned the key and it cranked immediately! It was 5 AM so, I cut it back off. However, the starter wouldn't quit spinning. I tried pulling the plug off the back of the switch and it didn't stop. I removed the negative from the battery but, not before the starter smoked real bad and finally stopped. I've since removed that starter and attached the one from the 8 HP. The one I removed looks like it has a crack on the bottom of it. So, does it sound like the starter was bad?
#30
mattm55
Smoke is never a good sign. There is a lot to your post that is a little hard for me to decipher but it looks like you got the starter to trigger but it's not correct if you released the key and the starter kept turning. That is bad. Starting was the next step but looks like you went further to try to get it to run. The starter is really not meant to continuously crank either and you will end up burning them up with constant cranking.
To run, you'll need to make sure the plug has spark, and the carb solenoid is wired up.
mattm55
Yeah, I unhooked it immediately! I'm about to head to Lowes and buy a new ground wire. So, what about what cashman said here:
"The engine probably still has the wire harness for the fuel shutoff solenoid and connect to the terminal that is hot in both run and start and not in off position. The kill lead can connect to the "M" terminal or any terminal on the rear of the switch that has continuity to the body of the switch in the off position. The charging lead can connect to any wire that has continuity to the positive post of the battery or the "R" terminal on the rear of the ignition switch."
Is that how I hook up the fuel shutoff?
Update: I got a new negative cable and it helped some. It still wouldn't start though. Well, I went to unhook it but, I tried the key a couple more times. I noticed some smoke coming from the starter. The terminal hooked to it was touching the body and I guess it was grounding. I bent it away from the starter and tried the key again and the engine turned over! Things went south again after that though.
I put some gas in the carb and turned the key and it cranked immediately! It was 5 AM so, I cut it back off. However, the starter wouldn't quit spinning. I tried pulling the plug off the back of the switch and it didn't stop. I removed the negative from the battery but, not before the starter smoked real bad and finally stopped. I've since removed that starter and attached the one from the 8 HP. The one I removed looks like it has a crack on the bottom of it. So, does it sound like the starter was bad?
Smoke is never a good sign. There is a lot to your post that is a little hard for me to decipher but it looks like you got the starter to trigger but it's not correct if you released the key and the starter kept turning. That is bad. Starting was the next step but looks like you went further to try to get it to run. The starter is really not meant to continuously crank either and you will end up burning them up with constant cranking.
To run, you'll need to make sure the plug has spark, and the carb solenoid is wired up.
#31
J
JoeCool
J
JoeCool
I got the starter from the 8 HP hooked up now and it's working good. If I put gas in the carb, it fires right up and the starter stops turning. The starter I took off must have been bad. Now, I just need to hook up the carb solenoid, like you said. Any ideas?
#32
T
txzrider2
T
txzrider2
my carb solenoid has a gray wire that has 12volts when the key is turned on. The other wire is ground.(I think)
#33
mattm55
Although mine does not have this feature, a feature I heard has issues, this wiring is correct. 12v on one wire when key is in start or on and a ground for the other wire. This is supposed to prevent fuel leaking in the non-run position. It can get stuck, dirty and not work.
Matt
mattm55
my carb solenoid has a gray wire that has 12volts when the key is turned on. The other wire is ground.(I think)
Although mine does not have this feature, a feature I heard has issues, this wiring is correct. 12v on one wire when key is in start or on and a ground for the other wire. This is supposed to prevent fuel leaking in the non-run position. It can get stuck, dirty and not work.
Matt
#34
J
JoeCool
J
JoeCool
I've seen people cut the pin off the solenoid and use a fuel cutoff in the fuel line. Would that be okay?
#35
T
txzrider2
T
txzrider2
I have heard of this as well... however it is easy to make it work, run a hot wire from the key to one of the pins and the other is ground. you will hear a click when it is enabled, as long as it goes through the keyswitch, it is only on when the key is on. FYI I still put an inline fuel cutoff due to the above mentioned problem where it does not cut off the fuel.
#36
C
cashman
C
cashman
The reason for the fuel shut off solenoid is to help reduce an after-boom situation on some applications, in the muffler when the engine is turned off. After the ignition switch is turned off and the engine coasts down to a stop, without the fuel solenoid, raw fuel is still forced through the venturi of the carburetor and ultimately into the muffler where heat from the muffler will cause the raw fuel to explode creating an after-boom. It doesn't shut off fuel between the tank and carburetor. Just between the bowl of carburetor and the venturi. Although having a shut off between the tank and carburetor is still a good idea. If you can locate the wire harness under the shroud that feeds the fuel shut off solenoid, if nothing else, just put a switch between the wire harness and any good source of 12v and be sure to turn it off when not in use. I would try to run it through the wire harness under the shroud because there is probably a diode in that harness that would prevent the reverse flow of 12v that could back feed any other circuits. And be sure to have an inline (30 amp) fuse between the battery and the "B" terminal of the ignition switch and any circuits that are fed 12V as this will protect them from a short and possibly causing a fire.
#37
mattm55
Thanks for that info. I learned something today. It makes sense. I like to spool the engine down and then do a shutoff.
Matt
mattm55
The reason for the fuel shut off solenoid is to help reduce an after-boom situation on some applications, in the muffler when the engine is turned off. After the ignition switch is turned off and the engine coasts down to a stop, without the fuel solenoid, raw fuel is still forced through the venturi of the carburetor and ultimately into the muffler where heat from the muffler will cause the raw fuel to explode creating an after-boom. It doesn't shut off fuel between the tank and carburetor. Just between the bowl of carburetor and the venturi. Although having a shut off between the tank and carburetor is still a good idea. If you can locate the wire harness under the shroud that feeds the fuel shut off solenoid, if nothing else, just put a switch between the wire harness and any good source of 12v and be sure to turn it off when not in use. I would try to run it through the wire harness under the shroud because there is probably a diode in that harness that would prevent the reverse flow of 12v that could back feed any other circuits. And be sure to have an inline (30 amp) fuse between the battery and the "B" terminal of the ignition switch and any circuits that are fed 12V as this will protect them from a short and possibly causing a fire.
Thanks for that info. I learned something today. It makes sense. I like to spool the engine down and then do a shutoff.
Matt
#38
cpurvis
The carb on my old 2140 Cub Cadet doesn't have a fuel cut-off solenoid. I, too, idle the engine as slow as it will go; then I engage the mower deck and very quickly turn off the key when the engine rpm drops even lower.
cpurvis
Thanks for that info. I learned something today. It makes sense. I like to spool the engine down and then do a shutoff.
Matt
The carb on my old 2140 Cub Cadet doesn't have a fuel cut-off solenoid. I, too, idle the engine as slow as it will go; then I engage the mower deck and very quickly turn off the key when the engine rpm drops even lower.