You are using an out of date browser. It may not display this or other websites correctly.
You should upgrade or use an alternative browser.
You should upgrade or use an alternative browser.
Export thread
Restoration HR215 SXA
#1

wfsway

Forum, I am new to this site and wanted to share my experience and efforts to restore the titled subject. I am Quality Engineer by trade and explains why I am so detailed and meticulous about this restoration, and was great experience to learn about this fine equipment piece by piece. Presently I will just list the actions done without explanation.
* Blasted aluminum mower deck to bare metal, repaired 2" hole in deck by aluminum welding and primed with Zinc Chromate.
* Single stage topcoat Toyota dark metallic gray.
* Rebuilt recoil assembly, blasted and painted Candy Apple Red.
* Reworked rusted out areas of grass bag frame assembly and repainted with POR 15. New cloth bag.
* Rebuilt rotor driven disk and brake assembly and surfaced contact faces, new driven disk.
* Top end rebuild engine GXV140 ported and polished intake/exhaust.
* Re-seated valves with lapping compound.
* Drilled oil ports (1mm) larger.
* Added inline fuel filter, new fuel lines.
* Zinc anodized small parts as dissembled.
* Dissembled SX Transmission refilled w/Honda gear fluid and restored.
* Wheels reworked with new bearings. Rubber switched front to rear.
* Restored handle mechanism, cabling and bearing points.
I am sure I have left something out but you folks get the picture, what an experience. I have not put the new stickers caution etc. for the paint to fully cure. Thanks to comment, question.


wfsway
Forum, I am new to this site and wanted to share my experience and efforts to restore the titled subject. I am Quality Engineer by trade and explains why I am so detailed and meticulous about this restoration, and was great experience to learn about this fine equipment piece by piece. Presently I will just list the actions done without explanation.
* Blasted aluminum mower deck to bare metal, repaired 2" hole in deck by aluminum welding and primed with Zinc Chromate.
* Single stage topcoat Toyota dark metallic gray.
* Rebuilt recoil assembly, blasted and painted Candy Apple Red.
* Reworked rusted out areas of grass bag frame assembly and repainted with POR 15. New cloth bag.
* Rebuilt rotor driven disk and brake assembly and surfaced contact faces, new driven disk.
* Top end rebuild engine GXV140 ported and polished intake/exhaust.
* Re-seated valves with lapping compound.
* Drilled oil ports (1mm) larger.
* Added inline fuel filter, new fuel lines.
* Zinc anodized small parts as dissembled.
* Dissembled SX Transmission refilled w/Honda gear fluid and restored.
* Wheels reworked with new bearings. Rubber switched front to rear.
* Restored handle mechanism, cabling and bearing points.
I am sure I have left something out but you folks get the picture, what an experience. I have not put the new stickers caution etc. for the paint to fully cure. Thanks to comment, question.
#2

robert@honda
robert@honda
Dat chrome, doe.
Where in NC are you located?
That mower was built at the Honda plant in Swepsonville, NC. Engine and many parts came from Japan, mower deck from Mexico (probably)
Where in NC are you located?
That mower was built at the Honda plant in Swepsonville, NC. Engine and many parts came from Japan, mower deck from Mexico (probably)
#3
wfsway
wfsway
I live in Greenville NC coastal region, from my data I have the following.
(1989-1994) 21" 4.5 HP Self Propelled Rear Bagger Blade Brake Clutch (BBC} Cast
(Frame Serial MZAM-6000001 to 6199999)
Model: HR 215-AF
Serial #: MZAM-6069675 SXA
Engine Serial #: GJAB-6126933
The machine runs like a dream, incredible equipment.
(1989-1994) 21" 4.5 HP Self Propelled Rear Bagger Blade Brake Clutch (BBC} Cast
(Frame Serial MZAM-6000001 to 6199999)
Model: HR 215-AF
Serial #: MZAM-6069675 SXA
Engine Serial #: GJAB-6126933
The machine runs like a dream, incredible equipment.
#4
robert@honda
Okay, that mower was mostly likely built in 1990, and was wholesaled by American Honda to Weingartz Supply of Utica, MI, on 3/18/1991. It was sold to Tim M., of Mt. Clements, MI, on 3/30/1991 and registered as a homeowner / non-commercial use. The original factory warranty expired on 4/7/1993. There are no open campaigns, recalls, or active updates for this unit. The engine serial number shows it is the original engine fitted to that mower.
Finally, if you would send me a private message with your name and address, and I will update the registration database to show you as the new owner. Honda asks for this in the unlikely event there is ever a product safety recall and needs to contact you.
robert@honda
Serial #: MZAM-6069675 SXA
Engine Serial #: GJAB-6126933
The machine runs like a dream, incredible equipment.
Okay, that mower was mostly likely built in 1990, and was wholesaled by American Honda to Weingartz Supply of Utica, MI, on 3/18/1991. It was sold to Tim M., of Mt. Clements, MI, on 3/30/1991 and registered as a homeowner / non-commercial use. The original factory warranty expired on 4/7/1993. There are no open campaigns, recalls, or active updates for this unit. The engine serial number shows it is the original engine fitted to that mower.
Finally, if you would send me a private message with your name and address, and I will update the registration database to show you as the new owner. Honda asks for this in the unlikely event there is ever a product safety recall and needs to contact you.
#5

Myamada1230
Myamada1230
That's incredible, if I had that, I'd have a hard time mowing with it because it looks so good.well done. Love the color
Sent from my iPhone using LMF
Sent from my iPhone using LMF
#6
wfsway
wfsway
Thanks for the kind comment and assistance, I think this is the best mower ever made.
#8

Snapperfreak
Snapperfreak
Outstanding. It looks like it's right off the showroom floor!
#9
Myamada1230
Myamada1230
You're mower is giving me reason to do something similar with my old commercial snapper...
Sent from my iPhone using LMF
Sent from my iPhone using LMF
#10
wfsway
wfsway
The quality of the commercial snappers is worth preserving, i would love to see the progress. Just make sure you can get parts, because when you disassemble, you find stuff that needs to be fixed.
#11
Snapperfreak
I'm interested in that!
Snapperfreak
You're mower is giving me reason to do something similar with my old commercial snapper... Sent from my iPhone using LMF
I'm interested in that!
#12
O
onedivinemower
O
onedivinemower
Your sweetness is my weakness. Outstanding job on the restoration, but you have to replace the cable zip ties with black ones. C'mon on now.
#13
wfsway
wfsway
Hey Folks
Update to thread, starting another Restoration. I found 1994 Masters 5.0 to begin new restoration. The SX transmission was almost ruined so presently pulled apart and checked changed fluid and will need weld repair to the axle shaft. Just confirming full functionality.


Update to thread, starting another Restoration. I found 1994 Masters 5.0 to begin new restoration. The SX transmission was almost ruined so presently pulled apart and checked changed fluid and will need weld repair to the axle shaft. Just confirming full functionality.
#14
wfsway
wfsway
Does anyone know how to determine the ring sizes in the 5.0 Masters engine (GXV140) before taking it apart. The unit is the HR215K1 SXA and lists multiple options for piston rings such as .25, .50, .75.
#15

primerbulb120
primerbulb120
If you give Robert@Honda the engine serial number, he could probably find it for you.
I wish you lived closer, I'd give you an old HR215 HX to restore. Don't have the time, money or patience to do it myself. :laughing: I don't need it anyway, I've got a customized HRR216VKA and love it.
I wish you lived closer, I'd give you an old HR215 HX to restore. Don't have the time, money or patience to do it myself. :laughing: I don't need it anyway, I've got a customized HRR216VKA and love it.
#16
wfsway
wfsway
Yes I will try that with the engine serial number, I was preparing to order some parts to begin after mowing season. I do work on the mowers in the evenings, I have learned so much and enjoy productive activity. I also rebuild vintage trimmers such as Shindaiwa, McCulloch anything higher quality because the consumer stuff is junk and not worth any time.

#17
primerbulb120
Nice!
I don't have a lot of high-end equipment to work on, so I restore low-end equipment instead. :laughing:
primerbulb120
Yes I will try that with the engine serial number, I was preparing to order some parts to begin after mowing season. I do work on the mowers in the evenings, I have learned so much and enjoy productive activity. I also rebuild vintage trimmers such as Shindaiwa, McCulloch anything higher quality because the consumer stuff is junk and not worth any time.
Nice!
I don't have a lot of high-end equipment to work on, so I restore low-end equipment instead. :laughing:
#18
wfsway
wfsway
Sorry not to offend, I have seen the difference inside the motors, double ringed, forged pistons, chromium cylinders and are manufactured to last extended usage hours. I was tired of equipment not working as well most folks will send to trash and was something simple wrong or just needed proper care and maintenance. Thank you the kind comment.
#19
robert@honda
Don't know the original ring size, but the .25/.50/.75 are the optional 'oversize' rings Honda offers for the engine, in the case that the cylinder is heavily worn or scored, and you bore it out and increase the size/diameter of the cylinder. Use the appropriate oversize ring to compensate for the larger bore and provide proper compression.
The 'std' ring is listed in in the catalog under four part numbers, but two are superceeded and the other two fit all versions of the GXV140 / Master's mower engine, Honda part number 13010-ZG9-003.
robert@honda
Does anyone know how to determine the ring sizes in the 5.0 Masters engine (GXV140) before taking it apart. The unit is the HR215K1 SXA and lists multiple options for piston rings such as .25, .50, .75. (which are the available 'oversize' dimensions in mm (NOT decimal inches!))
Don't know the original ring size, but the .25/.50/.75 are the optional 'oversize' rings Honda offers for the engine, in the case that the cylinder is heavily worn or scored, and you bore it out and increase the size/diameter of the cylinder. Use the appropriate oversize ring to compensate for the larger bore and provide proper compression.
The 'std' ring is listed in in the catalog under four part numbers, but two are superceeded and the other two fit all versions of the GXV140 / Master's mower engine, Honda part number 13010-ZG9-003.
#20
wfsway
wfsway
OK that answers the question, I will need to spec. and determine from tolerances. Hopefully I will only need to lightly hone the cylinder.
#21
robert@honda
FYI, the oversize rings I listed are in MILLIMETERS, not decimal inches. So the size of the '.25' ring set is 0.25 mm larger than stock, '.50' is 0.50 mm larger than stock, etc.
The factory shop manual has complete inspection procedures to check the rings, gaps, sizes, tolerances, etc.
Honda Power Equipment Shop Manuals on eBay
Honda Power Equipment Shop Manuals on Amazon
robert@honda
OK that answers the question, I will need to spec. and determine from tolerances. Hopefully I will only need to lightly hone the cylinder.
FYI, the oversize rings I listed are in MILLIMETERS, not decimal inches. So the size of the '.25' ring set is 0.25 mm larger than stock, '.50' is 0.50 mm larger than stock, etc.
The factory shop manual has complete inspection procedures to check the rings, gaps, sizes, tolerances, etc.
Honda Power Equipment Shop Manuals on eBay
Honda Power Equipment Shop Manuals on Amazon
#22
primerbulb120
No offense, I know what you mean. The newer Homelite weedeaters don't even have air filters! :laughing:
You are really going the extra mile to make these machines perfect. They look like they came right off the showroom floor. I enjoy reading your thread and watching these old machines come back to life. I think you would enjoy reading this thread: http://www.lawnmowerforum.com/showthread.php/5601-My-Lawn-Mower-Repair-Thread-(56k-warning)
primerbulb120
Sorry not to offend, I have seen the difference inside the motors, double ringed, forged pistons, chromium cylinders and are manufactured to last extended usage hours. I was tired of equipment not working as well most folks will send to trash and was something simple wrong or just needed proper care and maintenance. Thank you the kind comment.
No offense, I know what you mean. The newer Homelite weedeaters don't even have air filters! :laughing:
You are really going the extra mile to make these machines perfect. They look like they came right off the showroom floor. I enjoy reading your thread and watching these old machines come back to life. I think you would enjoy reading this thread: http://www.lawnmowerforum.com/showthread.php/5601-My-Lawn-Mower-Repair-Thread-(56k-warning)
#23
wfsway
wfsway
Robert, I just purchased the shop manual with Supplements Y & Z from Honda Power Equipment. I was concentrating on the transmission and maybe missed the piston ring details ? Also I have rebuilt the rear axle adjusters with sealed bearings, so far they are working great. This is the only Achilles heel with these machines. See photo.

#24
wfsway
wfsway
Thank you primerbulb for the link that is so cool to me, I really understand that guy.
#25
robert@honda
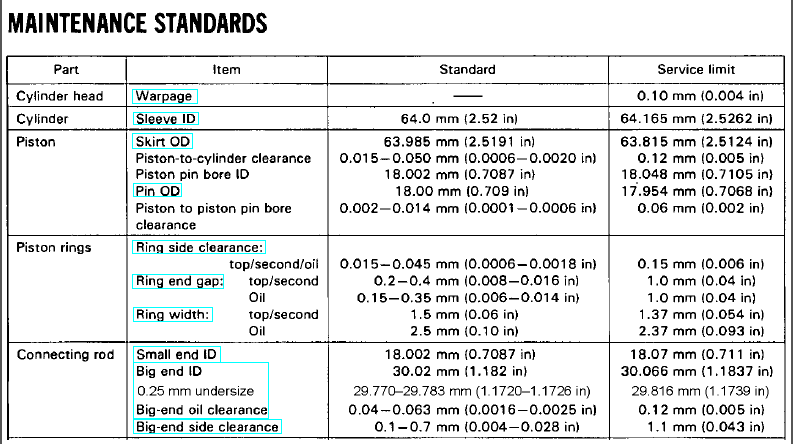
All the piston/rings/bore/crank etc. inspection and service specs are in the DISASSEMBLY and SERVICE part of the manual in the "CRANKSHAFT/PISTON" section. The actual "MAINTENANE STANDARDS" including service limits are in the SERVICE INFORMATION chapter, in the MAINTENANCE STANDARDS chart:
robert@honda
Robert, I just purchased the shop manual with Supplements Y & Z from Honda Power Equipment. I was concentrating on the transmission and maybe missed the piston ring details ?
All the piston/rings/bore/crank etc. inspection and service specs are in the DISASSEMBLY and SERVICE part of the manual in the "CRANKSHAFT/PISTON" section. The actual "MAINTENANE STANDARDS" including service limits are in the SERVICE INFORMATION chapter, in the MAINTENANCE STANDARDS chart:
#26
primerbulb120
You are so completely right about that! And it's not just the HR215 mowers, the HRR and HRX series don't have bearings either. It's a major headache for me, I use my HRR216VKA commercially and I have to re-lubricate or replace the axle bushings every month to keep the wheels from locking up when I try to pull the mower backwards. If Honda would put in sealed bearings instead of bushings, I think their mowers would be as close to perfect as mowers can get.
primerbulb120
Also I have rebuilt the rear axle adjusters with sealed bearings, so far they are working great. This is the only Achilles heel with these machines. See photo.View attachment 29981View attachment 29982
You are so completely right about that! And it's not just the HR215 mowers, the HRR and HRX series don't have bearings either. It's a major headache for me, I use my HRR216VKA commercially and I have to re-lubricate or replace the axle bushings every month to keep the wheels from locking up when I try to pull the mower backwards. If Honda would put in sealed bearings instead of bushings, I think their mowers would be as close to perfect as mowers can get.
#27
primerbulb120
You're welcome! That thread has to be one of the best on this forum. I'm using that rubbing compound trick on a regular basis to restore the paint on the mowers I sell.
You might also enjoy this one:
http://www.lawnmowerforum.com/showthread.php/24676-My-mower-repair-thread
I would make a thread to chronicle my mower projects, but I don't have the patience to take pictures as I go and post them on the forum. (If you search the forum you'll see that I've actually tried 3 times, but I've never been able to keep a thread going once I started it.:laughing")
primerbulb120
Thank you primerbulb for the link that is so cool to me, I really understand that guy.
You're welcome! That thread has to be one of the best on this forum. I'm using that rubbing compound trick on a regular basis to restore the paint on the mowers I sell.
You might also enjoy this one:
http://www.lawnmowerforum.com/showthread.php/24676-My-mower-repair-thread
I would make a thread to chronicle my mower projects, but I don't have the patience to take pictures as I go and post them on the forum. (If you search the forum you'll see that I've actually tried 3 times, but I've never been able to keep a thread going once I started it.:laughing
#28
wfsway
wfsway
Robert, thank you for the Maintenance Standards and direction. You are a great asset to the forum.:thumbsup:
#29
wfsway
wfsway
Here is another set of axle adjusters that I reworked. These bearings were for Honda Baja and worked even better. I finished the adjuster close tolerance and put both items in the freezer, then press fit for the final result.
![DSCN1105[1].JPG](https://www.lawnmowerforum.com/data/attachments/18/18873-eb68b8d3b9b0dfcc7d4fd4605fca6cf6.jpg "DSCN1105[1].JPG")
![DSCN1109[1].JPG](https://www.lawnmowerforum.com/data/attachments/18/18887-28354148bb4deb4dc9736a1d162035fb.jpg "DSCN1109[1].JPG")
#30
primerbulb120
Nice! :thumbsup: I wish I had the tools to do that.
primerbulb120
Here is another set of axle adjusters that I reworked. These bearings were for Honda Baja and worked even better. I finished the adjuster close tolerance and put both items in the freezer, then press fit for the final result.
View attachment 29985View attachment 29986
Nice! :thumbsup: I wish I had the tools to do that.
#31
S
Saril
S
Saril
If that was my mower I'd have it in my living room - too darn pretty to put in garage; seriously, thanks for the post, I'm, more motivated to do a thorough job restoring my HRB215HRX that I bought in 1999. Your HR215 is absolutely killer looking!
#32
wfsway

wfsway
Thank you for the kind words, presently I am working on some other Honda but little slow due to winter, cannot paint in cold weather. If you have any question in your rebuild please to let me know. Also just finished this summer partial rework of Hustler Fastrak Transmission and Walker GHS 42" should post in another thread.
HRC 215 K1 SX
HRC 216 K1 SX
HRM 215 HX
HRC 215 K1 SX
HRC 216 K1 SX
HRM 215 HX
Attachments
#33

Boobala
Boobala
I admire your work, it shows PATIENCE ! and profound attention to detail. It's nice you have Robert @ Honda as a friend, he IS, a true asset to the site. Although I'm not into restoring, I would like to know what brand of paint you are using, and it appears ( in the photo's ) you might be putting on a "clear-coat" am I correct on that ?? also, it may help fellow restoration folks, if you posted the P/Ns of the bearings you used in the adjusters, and finally (this is what I'm curious about) where do you get your "stickers" ?? Your Honda desrves to be in a museum, NOT a garage ! you are truly an inspiration to the members of this site, OH yeah, .... Happy New Year !! ........Boobala
#34
wfsway
wfsway
BooBala
The mower housing was blasted, solvent cleaned and primed with Zinc Chromate which is recommended for Aluminum, the trick is cleaning really well and coating quickly before the Aluminum begins to oxidize or self passivate. The color coat is single stage Toyota Charcoal Metallic. I have wanted to color sand and clear coat, but friends were criticize me for going so far on lawnmower ? The motor cover and crown was done with Ford Cherry Red single stage 2K Urethane. I should have gotten closer to the original Honda colors i.e. R8 Bright Red.
The rear adjusters just happened, but I have learned since that Honda does this (sealed bearings) on HRC 216 Commercial Series. The bearing numbers are Nachi 6202-2NSE9 15 x 35 x 11 mm, these are double sealed made in Japan and are not expensive on Ebay, the fitment is perfect. I get most of my parts, stickers etc. from Parts Pit Stop, they have the best prices and a pleasure to deal.
Presently I am working on HMA 215 K1 Hydro Masters, the hydro pump was not working and leaked. I simply cleaned really well and replaced fluid & seals. I learned to use over size seals at the axle to pump housing 15 x 24 x 7 mm, the housing boss accommodates very well.
You are correct Robert Honda is a great asset and is always helping everyone. God Bless, Happy New Year. Please to let me know if I can help.
#35
primerbulb120
primerbulb120
Do you ever come down to Florida for anything? I have a HR215 HX with hydrostatic transmission that needs a new home. I'd like to give it to someone who will restore it and take care of it. It runs, drives and mows, but it's in bad shape and needs some love.
Let me know!
Let me know!
#36
primerbulb120


The deck has some corrosion, but it's solid and has no holes.
primerbulb120
The deck has some corrosion, but it's solid and has no holes.
#37
primerbulb120
primerbulb120
Your Hustler looks new as well. :thumbsup:
#38
wfsway
wfsway
I was in West Palm last week just before Christmas and will be in Cape Coral soon, I did not see where you are located. Thank you.
#39

willys55
willys55
this may be the first time someone starts a push mower show and swap meet, with a best of show award near the end of the last day of the two day event
#40
primerbulb120
I sent you a PM.
primerbulb120
I was in West Palm last week just before Christmas and will be in Cape Coral soon, I did not see where you are located. Thank you.
I sent you a PM.
#41
S
Saril
Dissembled SX Transmission refilled w/Honda gear fluid and restored.
My first question - what is the part number for the transmission fluid, can I get on Amazon, will Mobile synthetic 10W-30 oil work? Thanks for offering youir help!
S
Saril
Thank you for the kind words, presently I am working on some other Honda but little slow due to winter, cannot paint in cold weather. If you have any question in your rebuild please to let me know. Also just finished this summer partial rework of Hustler Fastrak Transmission and Walker GHS 42" should post in another thread.
HRC 215 K1 SX
HRC 216 K1 SX
HRM 215 HX
Dissembled SX Transmission refilled w/Honda gear fluid and restored.
My first question - what is the part number for the transmission fluid, can I get on Amazon, will Mobile synthetic 10W-30 oil work? Thanks for offering youir help!
#42
S
Saril
I'm new here , but I agree, Robert is definitely a great resource. I learned about Robert before I joined this forum - I was asking questions about my old HRB215 at a Home Depot in Bethlehem Ga., and this guy (not an employee) says, "go to LawnWorld and search for a dude named Robert - he is famous". So I did; and, because I could not post, I sent a private message to Robert (actually several) and he answered them!
So yes indeed, Robert is an awesome resource! :thumbsup:
S
Saril
Robert, thank you for the Maintenance Standards and direction. You are a great asset to the forum.:thumbsup:
I'm new here , but I agree, Robert is definitely a great resource. I learned about Robert before I joined this forum - I was asking questions about my old HRB215 at a Home Depot in Bethlehem Ga., and this guy (not an employee) says, "go to LawnWorld and search for a dude named Robert - he is famous". So I did; and, because I could not post, I sent a private message to Robert (actually several) and he answered them!
So yes indeed, Robert is an awesome resource! :thumbsup:
#43
wfsway
wfsway
Saril,
Honestly Honda would say "do not do this" but I am running Castrol Synthec Edge 5W-40 in my pump. It is actually more expensive than the Honda Hydrostatic Fluid, but I figured Honda does not own a refinery and the newer lubricants are superior and take far more abuse in engines. The viscosity range was broad temperatures and similar specific gravity. Some folks on the riding mowers are using quarts to refill their hydro transmissions and can be expensive. I researched this extensively. My pump is working perfectly.
I also have the Honda Hydrostatic Fluid, #08208HST02, it takes approximately 11.9 oz and costs about 6.50 for a 12 oz bottle and can be found on Ebay. I hope this helps your effort.
#44
S
Saril
Thanks for the response!
So if I understand correcty, you prefer the Castrol 5W-40 over the Honda gear fluid? Also, if my hydrostatic transmission is working fine, should I still replace the fluid? It's hard to believe, but yes, my 1999 Honda HRB215HXA hydro drive still works great!
S
Saril
Saril,
Dissembled SX Transmission refilled w/Honda gear fluid and restored.
I am running Castrol Synthec Edge 5W-40 in my pump.
I also have the Honda Hydrostatic Fluid, #08208HST02, it takes approximately 11.9 oz and costs about 6.50 for a 12 oz bottle and can be found on Ebay. I hope this helps your effort.
Thanks for the response!
So if I understand correcty, you prefer the Castrol 5W-40 over the Honda gear fluid? Also, if my hydrostatic transmission is working fine, should I still replace the fluid? It's hard to believe, but yes, my 1999 Honda HRB215HXA hydro drive still works great!
#45
wfsway
wfsway
I am saying if you are not in hurry or have seal leaks, functionality etc. purchase the Honda recommended fluid. The Castrol was option and has worked in my pump without problem. You need to remove the pump from the mower to do a complete drain and refill. Honda data says to change the fluid after 1000 hrs of operation and check level every 300 hrs. Minimum I would check the level with the top cap/dip stick, usually it is Black or White and add if needed. Logically at 18 years I imagine the pump fluid has broken down. If you do drain & refill, you will need to purge air simply by rotating the input shaft and drive axle engaged. If you open the pump anywhere, cleanliness is important (do not let any debris get in). It only costs 6.50 and some effort for peace of mind to last another 18 years.
#46
S
Saril
I agree - can't imagine the fluid is not worth replacing after 18 years. I ordered the Honda fluid from Amazon. I am going to completely remove the hydrostatic drive as you suggested.
Thanks again for your help!
S
Saril
I am saying if you are not in hurry or have seal leaks, functionality etc. purchase the Honda recommended fluid. The Castrol was option and has worked in my pump without problem. You need to remove the pump from the mower to do a complete drain and refill. Honda data says to change the fluid after 1000 hrs of operation and check level every 300 hrs. Minimum I would check the level with the top cap/dip stick, usually it is Black or White and add if needed. Logically at 18 years I imagine the pump fluid has broken down. If you do drain & refill, you will need to purge air simply by rotating the input shaft and drive axle engaged. If you open the pump anywhere, cleanliness is important (do not let any debris get in). It only costs 6.50 and some effort for peace of mind to last another 18 years.
I agree - can't imagine the fluid is not worth replacing after 18 years. I ordered the Honda fluid from Amazon. I am going to completely remove the hydrostatic drive as you suggested.
Thanks again for your help!
#47
S
Saril
S
Saril
wfsway - I removed my transmission (HRB215HXA) and followed drain and bleed procedure using the Honda fluid. I filled to the top as shown in the pdf from Robert. Before I reinstalled, I tested with drill at a fairly slow rpm and the shaft turned when I engaged the lever and stopped when I disengaged, so I assumed I was good. I also replaced with new transmission cable. However, with everything back in place, the transmission does not have enough power to move the mower, i.e., when I lift the back of mower the wheel turns, when I put on the ground it stops - it seems to be very weak? I have adjusted the cable and no change.
Do you or anyone else have any advice? I am at a loss and don't want to remove transmission if it could be something else. Also, the transmission worked before I changed the fluid - it was just slow compared to my HRX217K2 HXA.
Thanks for your help!
Do you or anyone else have any advice? I am at a loss and don't want to remove transmission if it could be something else. Also, the transmission worked before I changed the fluid - it was just slow compared to my HRX217K2 HXA.
Thanks for your help!
#48
robert@honda
Let me look up some tech details....after you tell me the full serial number (back upper mower deck) It is the form of MXXX-1234567
robert@honda
wfsway - I removed my transmission (HRB215HXA) and followed drain and bleed procedure using the Honda fluid. I filled to the top as shown in the pdf from Robert. Before I reinstalled, I tested with drill at a fairly slow rpm and the shaft turned when I engaged the lever and stopped when I disengaged, so I assumed I was good. I also replaced with new transmission cable. However, with everything back in place, the transmission does not have enough power to move the mower, i.e., when I lift the back of mower the wheel turns, when I put on the ground it stops - it seems to be very weak? I have adjusted the cable and no change.
Do you or anyone else have any advice? I am at a loss and don't want to remove transmission if it could be something else. Also, the transmission worked before I changed the fluid - it was just slow compared to my HRX217K2 HXA.
Thanks for your help!
Let me look up some tech details....after you tell me the full serial number (back upper mower deck) It is the form of MXXX-1234567
#49
S
Saril
Robert - thanks for the quick response:
Purchased July 1999
HRB215-JK
MZBA-6342486
I did remove the transmission since my last post and the level was full. I did notice that the seal that covers the fill hole on the vent hole side (next to metal cover) was very dirty. The vent hole appeared clogged. So I removed the seal from the metal cap and cleaned. I topped off with Honda fluid and put back together.
Prior to putting back into mower, I tested the transmission and it seemed to be working. With my wife holding drill on shaft, I would engage the lever and the drive shafts would turn. This time however, I gripped the drive shaft to see how strong it was and it was absolutely strong, i.e., more than enough to move mower. Again, it seem that the transmission was working perfectly. I would release the lever and the drive shafts would stop turning, at a higher speed, it was even harder to hold the drive shaft with my hand.
So I thought it was fixed this time around and put transmission back into mower. Filled with gas and oil, fired it up and still no motion. No motion on the ground, if I lift the back of the mower up, the wheels turn, set on ground and no motion - arg!! I have the adjustment pretty much at the max as far as transmission cable tension is concerned.
I compared the transmission cable tension with my newer HRX217K2 HXA, MAGA - 1688490, and it seemed to be the same.
So I am completely at a loss as to why this is happening.
Questions:
Can you overfill the hydrostatic transmission? I had a hard time determining where the low and high fill levels were - any help appreciated.
The small fill hole has very small reservoir where the rubber seal goes and I filled that to the upper limit. Of course when I put the seal on some fluid leaked out. Again, I tested (after filling) with my hand and the transmission seemed to be strong.
I really appreciate your help and hope you can help me resolve this. Thanks!
S
Saril
Let me look up some tech details....after you tell me the full serial number (back upper mower deck) It is the form of MXXX-1234567
Robert - thanks for the quick response:
Purchased July 1999
HRB215-JK
MZBA-6342486
I did remove the transmission since my last post and the level was full. I did notice that the seal that covers the fill hole on the vent hole side (next to metal cover) was very dirty. The vent hole appeared clogged. So I removed the seal from the metal cap and cleaned. I topped off with Honda fluid and put back together.
Prior to putting back into mower, I tested the transmission and it seemed to be working. With my wife holding drill on shaft, I would engage the lever and the drive shafts would turn. This time however, I gripped the drive shaft to see how strong it was and it was absolutely strong, i.e., more than enough to move mower. Again, it seem that the transmission was working perfectly. I would release the lever and the drive shafts would stop turning, at a higher speed, it was even harder to hold the drive shaft with my hand.
So I thought it was fixed this time around and put transmission back into mower. Filled with gas and oil, fired it up and still no motion. No motion on the ground, if I lift the back of the mower up, the wheels turn, set on ground and no motion - arg!! I have the adjustment pretty much at the max as far as transmission cable tension is concerned.
I compared the transmission cable tension with my newer HRX217K2 HXA, MAGA - 1688490, and it seemed to be the same.
So I am completely at a loss as to why this is happening.
Questions:
Can you overfill the hydrostatic transmission? I had a hard time determining where the low and high fill levels were - any help appreciated.
The small fill hole has very small reservoir where the rubber seal goes and I filled that to the upper limit. Of course when I put the seal on some fluid leaked out. Again, I tested (after filling) with my hand and the transmission seemed to be strong.
I really appreciate your help and hope you can help me resolve this. Thanks!
#50
S
Saril
S
Saril
Robert - Sorry, forgot to ask:
On the HRB215HXA the ratcheting of the wheels should occur when moving forward or reverse? Mine clicks when moving in reverse - the opposite of my newer HRX217. Is this correct?
Again - thanks!
On the HRB215HXA the ratcheting of the wheels should occur when moving forward or reverse? Mine clicks when moving in reverse - the opposite of my newer HRX217. Is this correct?
Again - thanks!
#51
wfsway
wfsway
Sari it does not sound correct that the pump should be filled completely. It needs space to vent and expand when it get warm from operation. My top has a dip stick and can tell exactly how much is used level also the purge procedure is simple enough as the bench purge and then the running purge against wall or something. Do you understand these procedures. The left and right wheel ratchets should be forward engaging and reverse clicking.
#52
S
Saril

This is the picture that has me confused. Is the upper/lower level the thickness of the small fill hole or the reservoir that engulfs the fill hole. Also when I reinstall the seal the fluid in the reservoir is pushed out a bit. With the seal install, I have a small fluid bubble with no air. Sorry if this is confusing.
So I'm good with the reverse clicking, no dip stick on my unit; and, I thought I understood the bleed procedure. But clearly I'm doing something wrong.
I used the info from Robert's post, "Re: HRM215 Hydrostatic Transmission fluid change", which included great documentation.
Again, when tested on bench the shatfs had power. This is driving me crazy so I appreciate and thank you for your help.
S
Saril
Sari it does not sound correct that the pump should be filled completely. It needs space to vent and expand when it get warm from operation. My top has a dip stick and can tell exactly how much is used level also the purge procedure is simple enough as the bench purge and then the running purge against wall or something. Do you understand these procedures. The left and right wheel ratchets should be forward engaging and reverse clicking.
This is the picture that has me confused. Is the upper/lower level the thickness of the small fill hole or the reservoir that engulfs the fill hole. Also when I reinstall the seal the fluid in the reservoir is pushed out a bit. With the seal install, I have a small fluid bubble with no air. Sorry if this is confusing.
So I'm good with the reverse clicking, no dip stick on my unit; and, I thought I understood the bleed procedure. But clearly I'm doing something wrong.
I used the info from Robert's post, "Re: HRM215 Hydrostatic Transmission fluid change", which included great documentation.
Again, when tested on bench the shatfs had power. This is driving me crazy so I appreciate and thank you for your help.
#53
primerbulb120
No, it's not correct! You have your drive gears put on backwards. The mower should click when rolled forward.
Flip the drive gears around and your problem is solved.
primerbulb120
Robert - Sorry, forgot to ask:
On the HRB215HXA the ratcheting of the wheels should occur when moving forward or reverse? Mine clicks when moving in reverse - the opposite of my newer HRX217. Is this correct?
Again - thanks!
No, it's not correct! You have your drive gears put on backwards. The mower should click when rolled forward.
Flip the drive gears around and your problem is solved.
#54
S
Saril
You are absolutely correct! Thanks for your post! When I got home I decided to take the wheel off and see if the shaft was moving - it was, even when I stopped the gear! I then realized the transmission was OK and the gears were most likely on backwards. I was actually nervous about switching the gears because I have read, from more than 1 source, it should click going backwards. Anyway, problem solved. Transmission works like it did 19 years ago. This old HRB215 now looks and runs as good as my newer HRX217.
Thanks to all that took the time help me through this! This forum is awesome!
Lesson learned - I made the mistake of not noting direction of click when I removed parts. Actually, I dont even think it clicked in any direction and that should have raised a flag.
S
Saril
No, it's not correct! You have your drive gears put on backwards. The mower should click when rolled forward.
Flip the drive gears around and your problem is solved.
You are absolutely correct! Thanks for your post! When I got home I decided to take the wheel off and see if the shaft was moving - it was, even when I stopped the gear! I then realized the transmission was OK and the gears were most likely on backwards. I was actually nervous about switching the gears because I have read, from more than 1 source, it should click going backwards. Anyway, problem solved. Transmission works like it did 19 years ago. This old HRB215 now looks and runs as good as my newer HRX217.
Thanks to all that took the time help me through this! This forum is awesome!
Lesson learned - I made the mistake of not noting direction of click when I removed parts. Actually, I dont even think it clicked in any direction and that should have raised a flag.
#55
M
MWalton
I have a HRA 214 with holes in the deck. Is mine aluminum too? What makes the holes in it if it's aluminum, it's not rusting through.
M
MWalton
View attachment 29171
Forum, I am new to this site and wanted to share my experience and efforts to restore the titled subject. I am Quality Engineer by trade and explains why I am so detailed and meticulous about this restoration, and was great experience to learn about this fine equipment piece by piece. Presently I will just list the actions done without explanation.
* Blasted aluminum mower deck to bare metal, repaired 2" hole in deck by aluminum welding and primed with Zinc Chromate.
* Single stage topcoat Toyota dark metallic gray.
* Rebuilt recoil assembly, blasted and painted Candy Apple Red.
* Reworked rusted out areas of grass bag frame assembly and repainted with POR 15. New cloth bag.
* Rebuilt rotor driven disk and brake assembly and surfaced contact faces, new driven disk.
* Top end rebuild engine GXV140 ported and polished intake/exhaust.
* Re-seated valves with lapping compound.
* Drilled oil ports (1mm) larger.
* Added inline fuel filter, new fuel lines.
* Zinc anodized small parts as dissembled.
* Dissembled SX Transmission refilled w/Honda gear fluid and restored.
* Wheels reworked with new bearings. Rubber switched front to rear.
* Restored handle mechanism, cabling and bearing points.
I am sure I have left something out but you folks get the picture, what an experience. I have not put the new stickers caution etc. for the paint to fully cure. Thanks to comment, question.
View attachment 29168View attachment 29169View attachment 29170
I have a HRA 214 with holes in the deck. Is mine aluminum too? What makes the holes in it if it's aluminum, it's not rusting through.
#56
D
Darryl G
D
Darryl G
That restoration looks great!
I have a HR215 I think. Master's series hydro with electric start purchased in the spring of 2005. Probably the biggest mistake I've ever made as far an equipment purchase. I paid $1,110.24 for it with the double blade adapter, bag and tax. I wanted the commercial unit but my local dealer didn't carry it. It's a great mower and all, but I just don't use it/don't need it/wasted my money on it really. It's probably got under 20 hours on it running the original blades and all. But at least I've got it if I ever need it, lol.
Note: Edited purchase date and price.
#57
wfsway
wfsway
Hello MWalton
The aluminum will pit sometimes enough to corrode all the way thru. You should be able to see if you have pitting from the underside, likely near the outlet chute. Grass and fertilizers have a lot of chemicals and enzymes that can attack aluminum. Occasionally the underside cleanings washing get the clippings out of the edges. Aluminum will oxidize. If the holes are not to large yet, you could skim coat the backside with JB Weld Epoxy.
The aluminum will pit sometimes enough to corrode all the way thru. You should be able to see if you have pitting from the underside, likely near the outlet chute. Grass and fertilizers have a lot of chemicals and enzymes that can attack aluminum. Occasionally the underside cleanings washing get the clippings out of the edges. Aluminum will oxidize. If the holes are not to large yet, you could skim coat the backside with JB Weld Epoxy.
#58
wfsway
wfsway
MWalton, I just looked some parts sites, it appears to me your mower may be carbon steel deck, just take magnet and test will know for sure.:smile:
#59
M
MowGrass
M
MowGrass
WOW and double WOW. What you did is masterful. Thank you for sharing that here at this forum along with the pictures and a good level of detail. That is a special post!
#60
G
golfergordy
G
golfergordy
Great restoration job, but why wasn't the original Honda color used, which I believe is Gently Silver Metallic (NH192M)?
#61
T
tadawson
T
tadawson
Early HR215 were the light silver, and later models the darker more grey color. Both are valid for the model . . . and without the S/N, can't know which one this was originally.
#62
wfsway
Thank you for the kind words, I am presently working on some other equipment and should post maybe in another thread ? The latest is a HRC215 SX Commercial.
wfsway
WOW and double WOW. What you did is masterful. Thank you for sharing that here at this forum along with the pictures and a good level of detail. That is a special post!
Thank you for the kind words, I am presently working on some other equipment and should post maybe in another thread ? The latest is a HRC215 SX Commercial.
#63
wfsway
wfsway
Relating to the color choice, I had some Toyota Dark Gray Metallic on hand. What was important at the time was doing it right. The blast cleaned deck was primed with Chromate proper for aluminum and then top coated as you see. Also the Red engine cover and crown is Ford Candy Apple Red, then both were compounded and buffed. Originality is certainly important, although I wanted best quality workmanship and longevity all while working out of my simple garage and resources.
#64
G
golfergordy
Very interesting, because I fixed up an HRC215 SXA last year. When I bought it, it appeared like it was never in commercial use, and it came with grass bag and mulching plug and the mulching blades were brand new. One side was nicked up a bit and I repainted one side only below the "COMMERCIAL" lettering from front wheel to rear wheel. The paint I used was Chrysler # DSCC331 (charcoal Grey), which is available in rattle can form at automotive stores. This color is extremely close to the original Honda color. Where I had to blend the paint in to the original paint I used rubbing compound and you can't tell where this is unless you look very closely. Normally a lawnmower is covered with some dust and grass clippings making telling the paint color difference impossible. I also spray painted the side protective deck guards and parts of the handlebar with a flat black spray paint where some paint damage was present and it now looks great. I also cleaned and power wire wheel cleaned the deck underside, and painted it with self priming Hammerite "Rust Cap". After a few mowings I noticed a few paint chips falling off the underside so this paint wasn't the perfect solution. The engine was fine (no smoke) so I didn't touch it. I Adjusted all the cables according to the owner's manual, cleaned out the carburetor, adjusted the valves, did all the typical maintenance tasks (oil, plug, air filter), and went thru the shop manual procedure to set the engine running speed. One interesting problem came up while trying to set the running speed - I couldn't get the engine to run quite fast enough. In setting engine speed, the manual says that you place the governor spring into the 2nd lowest hole in the control lever, and if the rpm isn't fast enough, to move the spring into the lowest (3rd) hole. Well, that still didn't get the rpm fast enough so I drilled a 4th hole and put the governor spring into this hole and only then was the rpm ok. One other unusual repair was in one rear wheel where a hairline crack was present in the wheel hub. To reinforce the wheel I epoxy glued onto both rear wheels a 1/4" piece of 1" (I think it was 1") schedule 40 plastic pipe which nicely fit onto the outside wheel hubs. I gave this mower to one of my sons earlier this year, who uses it as a trim mower for areas where his rider mower won't reach. Good luck restoring your new project HRC215.

G
golfergordy
Thank you for the kind words, I am presently working on some other equipment and should post maybe in another thread ? The latest is a HRC215 SX Commercial.
Very interesting, because I fixed up an HRC215 SXA last year. When I bought it, it appeared like it was never in commercial use, and it came with grass bag and mulching plug and the mulching blades were brand new. One side was nicked up a bit and I repainted one side only below the "COMMERCIAL" lettering from front wheel to rear wheel. The paint I used was Chrysler # DSCC331 (charcoal Grey), which is available in rattle can form at automotive stores. This color is extremely close to the original Honda color. Where I had to blend the paint in to the original paint I used rubbing compound and you can't tell where this is unless you look very closely. Normally a lawnmower is covered with some dust and grass clippings making telling the paint color difference impossible. I also spray painted the side protective deck guards and parts of the handlebar with a flat black spray paint where some paint damage was present and it now looks great. I also cleaned and power wire wheel cleaned the deck underside, and painted it with self priming Hammerite "Rust Cap". After a few mowings I noticed a few paint chips falling off the underside so this paint wasn't the perfect solution. The engine was fine (no smoke) so I didn't touch it. I Adjusted all the cables according to the owner's manual, cleaned out the carburetor, adjusted the valves, did all the typical maintenance tasks (oil, plug, air filter), and went thru the shop manual procedure to set the engine running speed. One interesting problem came up while trying to set the running speed - I couldn't get the engine to run quite fast enough. In setting engine speed, the manual says that you place the governor spring into the 2nd lowest hole in the control lever, and if the rpm isn't fast enough, to move the spring into the lowest (3rd) hole. Well, that still didn't get the rpm fast enough so I drilled a 4th hole and put the governor spring into this hole and only then was the rpm ok. One other unusual repair was in one rear wheel where a hairline crack was present in the wheel hub. To reinforce the wheel I epoxy glued onto both rear wheels a 1/4" piece of 1" (I think it was 1") schedule 40 plastic pipe which nicely fit onto the outside wheel hubs. I gave this mower to one of my sons earlier this year, who uses it as a trim mower for areas where his rider mower won't reach. Good luck restoring your new project HRC215.
Attachments
#65
wfsway
wfsway
That is a very nice machine, you have kept it very well. I am curious about how you used the 1" PVC on the rear wheel. I have my original light grey and they have some cracking. My machine was literally pulled from the trash and in flood zone. I attached the photo of original where I started and have disassembled, blasted and primed.


#66
G
golfergordy
First of all, I checked and I used 3/4" pipe coupling and not 1" as I previously thought.
The following is a part of the text of a new thread I'm working on and hopefully will post soon. The plastic wheel cracking is an issue with all the HR & HRC series that have plastic wheels. The pics posted here are from an HR215K1 Masters, but the plastic wheels on the HRC215 are the same. I have seen a half dozen or so HR series lawnmowers (all were SX models) and most of them have had this issue, which is hairline cracking in the plastic rear wheel hubs. I've never seen this problem in the front wheels – probably because the front wheel hubs contain ball bearings. The interior of the rear wheel hubs ride directly on the axle shaft coming from the transmission and hairline cracks develop right on the interior surface that rides on the axle. These cracks can propagate thru the hub until they are visible from the outside of the hub. I have previously written about reinforcing the outside of the hub by epoxying on a thin piece sawed off of a 3/4” schedule 40 pvc pipe coupling which fits nicely onto the plastic wheel hub on the outside of the wheel. I have recently noticed that these cracks (in the HR215K1 Masters) also propagate to the inside face of the wheel facing the mower deck, so I did the same repair on the inside face of the wheel by glueing a thin piece of 2” schedule 40 pvc pipe coupling, but the inside surface of this coupling had to be ground down approx. 1/64” to snugly fit onto the wheel hub. I used my high speed rotary tool (Dremel or equal) to do this. Also, be careful not to saw off a piece of the 2” pipe coupling wider than about 3/16” so it is less likely to rub against the wheel adjuster arm. If it does rub, just grind off the outer top edge of the pvc until there's a small clearance to the arm. Also when I recently installed this reinforcement I used pvc cement to glue it on. I used the epoxy gluing method about 2-yrs ago on some other wheels and it still appears to be holding up just fine, but time will tell if either the epoxy or the pvc cement method eventually fails or not. Naturally, thorough cleaning and sanding should be done prior to applying any type of adhesive. See the pics showing the wheel reinforcement.


G
golfergordy
That is a very nice machine, you have kept it very well. I am curious about how you used the 1" PVC on the rear wheel. I have my original light grey and they have some cracking. My machine was literally pulled from the trash and in flood zone. I attached the photo of original where I started and have disassembled, blasted and primed.
View attachment 44819View attachment 44820
First of all, I checked and I used 3/4" pipe coupling and not 1" as I previously thought.
The following is a part of the text of a new thread I'm working on and hopefully will post soon. The plastic wheel cracking is an issue with all the HR & HRC series that have plastic wheels. The pics posted here are from an HR215K1 Masters, but the plastic wheels on the HRC215 are the same. I have seen a half dozen or so HR series lawnmowers (all were SX models) and most of them have had this issue, which is hairline cracking in the plastic rear wheel hubs. I've never seen this problem in the front wheels – probably because the front wheel hubs contain ball bearings. The interior of the rear wheel hubs ride directly on the axle shaft coming from the transmission and hairline cracks develop right on the interior surface that rides on the axle. These cracks can propagate thru the hub until they are visible from the outside of the hub. I have previously written about reinforcing the outside of the hub by epoxying on a thin piece sawed off of a 3/4” schedule 40 pvc pipe coupling which fits nicely onto the plastic wheel hub on the outside of the wheel. I have recently noticed that these cracks (in the HR215K1 Masters) also propagate to the inside face of the wheel facing the mower deck, so I did the same repair on the inside face of the wheel by glueing a thin piece of 2” schedule 40 pvc pipe coupling, but the inside surface of this coupling had to be ground down approx. 1/64” to snugly fit onto the wheel hub. I used my high speed rotary tool (Dremel or equal) to do this. Also, be careful not to saw off a piece of the 2” pipe coupling wider than about 3/16” so it is less likely to rub against the wheel adjuster arm. If it does rub, just grind off the outer top edge of the pvc until there's a small clearance to the arm. Also when I recently installed this reinforcement I used pvc cement to glue it on. I used the epoxy gluing method about 2-yrs ago on some other wheels and it still appears to be holding up just fine, but time will tell if either the epoxy or the pvc cement method eventually fails or not. Naturally, thorough cleaning and sanding should be done prior to applying any type of adhesive. See the pics showing the wheel reinforcement.
Attachments
#67
wfsway
wfsway
Thank you so much for the detailed information, this tells and shows me exactly what to do. Your attention to detail and obvious love for these fine mowers is rare. I want to know more about your developing post so to follow you. I can also tell you have studied the service manuals and data, you are an asset to this forum. I appreciate.
The only up fit I have done is to the sloppy trailing arms that seize and will ruin the axle shaft by grooving. These sealed bearings are performing well in service.
![DSCN1105[1].JPG](https://www.lawnmowerforum.com/data/attachments/18/18878-eb68b8d3b9b0dfcc7d4fd4605fca6cf6.jpg "DSCN1105[1].JPG")

The only up fit I have done is to the sloppy trailing arms that seize and will ruin the axle shaft by grooving. These sealed bearings are performing well in service.
#68
G
golfergordy
Thanks for the compliment.
I like the new sealed bearings on the wheel adjuster arm. A few years ago I picked up (for $5) 2-boxes of HR214SX parts from an owner who gave up on a project he never got to in 20-yrs and then sold me the parts - too bad the total HR214 was packed into 3-boxes and the owner lost the other box when he moved 15-yrs ago. Anyway, I just checked these parts and discovered that the bearings on these same arms were shot and the transmission shaft was showing some signs of grooving due to the bad bearings. I'll now have to check these bearings on 5 HR series mowers (I have 3 and 2 of my sons have one each) because when I fixed them up I never looked very closely at these bearings - if a transmission shaft gets ruined it's very expensive to replace.
G
golfergordy
Thank you so much for the detailed information, this tells and shows me exactly what to do. Your attention to detail and obvious love for these fine mowers is rare. I want to know more about your developing post so to follow you. I can also tell you have studied the service manuals and data, you are an asset to this forum. I appreciate.
The only up fit I have done is to the sloppy trailing arms that seize and will ruin the axle shaft by grooving. These sealed bearings are performing well in service.
View attachment 44850View attachment 44851
Thanks for the compliment.
I like the new sealed bearings on the wheel adjuster arm. A few years ago I picked up (for $5) 2-boxes of HR214SX parts from an owner who gave up on a project he never got to in 20-yrs and then sold me the parts - too bad the total HR214 was packed into 3-boxes and the owner lost the other box when he moved 15-yrs ago. Anyway, I just checked these parts and discovered that the bearings on these same arms were shot and the transmission shaft was showing some signs of grooving due to the bad bearings. I'll now have to check these bearings on 5 HR series mowers (I have 3 and 2 of my sons have one each) because when I fixed them up I never looked very closely at these bearings - if a transmission shaft gets ruined it's very expensive to replace.
#69
T
tranchinh


T
tranchinh
That's exactly what I done for my HR214,HR215,HR216 .The correct size for rear wheel drive shaft bearing is flange bearing 15x31x11 in metric .You don't have to buy expensive bearing as these are low speed but need good seal .If the shaft worn out a little is OK .If it worn out too much you have to weld around that spot then file out to correct size .It may become too tight then you have to adjust both wheel at same time as these bearings much tighter tolerance than original one and sure last much longer .By the way its my new collection HR195 ,untouchedThanks for the compliment.
I like the new sealed bearings on the wheel adjuster arm. A few years ago I picked up (for $5) 2-boxes of HR214SX parts from an owner who gave up on a project he never got to in 20-yrs and then sold me the parts - too bad the total HR214 was packed into 3-boxes and the owner lost the other box when he moved 15-yrs ago. Anyway, I just checked these parts and discovered that the bearings on these same arms were shot and the transmission shaft was showing some signs of grooving due to the bad bearings. I'll now have to check these bearings on 5 HR series mowers (I have 3 and 2 of my sons have one each) because when I fixed them up I never looked very closely at these bearings - if a transmission shaft gets ruined it's very expensive to replace.
#70
D
dfbrown
D
dfbrown
How did you get the plastic air filter cover so glossy. whole mower looks awesome I wouldn’t even wanna use it it’s too nice.View attachment 29171
Forum, I am new to this site and wanted to share my experience and efforts to restore the titled subject. I am Quality Engineer by trade and explains why I am so detailed and meticulous about this restoration, and was great experience to learn about this fine equipment piece by piece. Presently I will just list the actions done without explanation.
* Blasted aluminum mower deck to bare metal, repaired 2" hole in deck by aluminum welding and primed with Zinc Chromate.
* Single stage topcoat Toyota dark metallic gray.
* Rebuilt recoil assembly, blasted and painted Candy Apple Red.
* Reworked rusted out areas of grass bag frame assembly and repainted with POR 15. New cloth bag.
* Rebuilt rotor driven disk and brake assembly and surfaced contact faces, new driven disk.
* Top end rebuild engine GXV140 ported and polished intake/exhaust.
* Re-seated valves with lapping compound.
* Drilled oil ports (1mm) larger.
* Added inline fuel filter, new fuel lines.
* Zinc anodized small parts as dissembled.
* Dissembled SX Transmission refilled w/Honda gear fluid and restored.
* Wheels reworked with new bearings. Rubber switched front to rear.
* Restored handle mechanism, cabling and bearing points.
I am sure I have left something out but you folks get the picture, what an experience. I have not put the new stickers caution etc. for the paint to fully cure. Thanks to comment, question.
View attachment 29168View attachment 29169View attachment 29170
#71
C
Chris Parman
wfsway, I'm currently restoring a HR214. I have finished rebuilding the GXV120 to perfection. Now I am concentrating on the Aluminum deck, 2-speed transmission, etc. In this postmortems you stated that you went away from the OEM adjuster wheel bracket bearing to a Sealed bearings. I was wondering if you have the part number for the Sealed bearings you used? Thank you, Sir.
C
Chris Parman
Robert, I just purchased the shop manual with Supplements Y & Z from Honda Power Equipment. I was concentrating on the transmission and maybe missed the piston ring details ? Also I have rebuilt the rear axle adjusters with sealed bearings, so far they are working great. This is the only Achilles heel with these machines. See photo.View attachment 29981View attachment 29982
wfsway, I'm currently restoring a HR214. I have finished rebuilding the GXV120 to perfection. Now I am concentrating on the Aluminum deck, 2-speed transmission, etc. In this postmortems you stated that you went away from the OEM adjuster wheel bracket bearing to a Sealed bearings. I was wondering if you have the part number for the Sealed bearings you used? Thank you, Sir.
#72
M
mahaffeymj
M
mahaffeymj
how do you get the old outside ring off the adjuster to press in the new bearings as this ring appears welded or pressed in. thanksRobert, I just purchased the shop manual with Supplements Y & Z from Honda Power Equipment. I was concentrating on the transmission and maybe missed the piston ring details ? Also I have rebuilt the rear axle adjusters with sealed bearings, so far they are working great. This is the only Achilles heel with these machines. See photo.View attachment 29981View attachment 29982
#73
M
mahaffeymj
M
mahaffeymj
Well got the old bearing out, but how can you get the new ones in? tried the heating up the rear wheel adjuster in oven and bearings in ice(not dry ice though) trick , to no avail. Since adjuster not flat , but curved/wavy it makes it more difficult. Any suggestions? thanks
#74
C
Chris Parman
I either used a Large socket or cups from a ball joint press kit and a very large vise. By the way I found these sealed bearings that could work in the rear adjuster bracket. I already pressed out one bearing per the rear adjuster. I am going to pressed out the other bearing per the rear adjuster and order two of the bearings below and give them a try.
The OE Bearing is 15mm I.D. x 35mm O.D x 14mm
The Sealed Flanged bearing (From VXB Bearings) below are 15mm I.D. x 35mm O.D x 11mm. I believe these are an exact fit and sealed bearing.

C
Chris Parman
Well got the old bearing out, but how can you get the new ones in? tried the heating up the rear wheel adjuster in oven and bearings in ice(not dry ice though) trick , to no avail. Since adjuster not flat , but curved/wavy it makes it more difficult. Any suggestions? thanks
I either used a Large socket or cups from a ball joint press kit and a very large vise. By the way I found these sealed bearings that could work in the rear adjuster bracket. I already pressed out one bearing per the rear adjuster. I am going to pressed out the other bearing per the rear adjuster and order two of the bearings below and give them a try.
The OE Bearing is 15mm I.D. x 35mm O.D x 14mm
The Sealed Flanged bearing (From VXB Bearings) below are 15mm I.D. x 35mm O.D x 11mm. I believe these are an exact fit and sealed bearing.
F6202-2RS Flanged Sealed Miniature Bearing 15x35x11
F6202-2RS Flanged Sealed Ball Bearing 15mm x 35mm x 11mm One Bearing F6202-2RS Flanged Sealed Ball Bearing, each F6202-2RS bearing is rubber sealed from both sides to protect the bearing from dust or any possible contamination Item: F6202-2RS Flanged Ball Bearing Type: Deep Groove Ball Bearing...
www.vxb.com
#75
M
mahaffeymj
M
mahaffeymj
thanks for info , Chris. I tried a vise with some large fender washers and no go for me, but will try your method or even better ask a more mechanically inclined friend down the street. I got these bearings off ebay and know nsk is good stuff. https://www.ebay.com/itm/291923069622
#76
C
Chris Parman
mahaffeymj: You can't go wrong with the NSK bearings. The only problem is you will need to stop at the 3.0 mm point because those bearing are not the "flange" type.
C
Chris Parman
thanks for info , Chris. I tried a vise with some large fender washers and no go for me, but will try your method or even better ask a more mechanically inclined friend down the street. I got these bearings off ebay and know nsk is good stuff. https://www.ebay.com/itm/291923069622
mahaffeymj: You can't go wrong with the NSK bearings. The only problem is you will need to stop at the 3.0 mm point because those bearing are not the "flange" type.
#77
M
mahaffeymj
M
mahaffeymj
gotcha, thxmahaffeymj: You can't go wrong with the NSK bearings. The only problem is you will need to stop at the 3.0 mm point because those bearing are not the "flange" type.
#78
C
Chris Parman
I will post a picture when the bearings arrive and when I get the bearings pressed into the rear adjusting bracket.
C
Chris Parman
gotcha, thx
I will post a picture when the bearings arrive and when I get the bearings pressed into the rear adjusting bracket.
#79
M
mahaffeymj
M
mahaffeymj
was able to get mine in amazingly. I found when trying to put in at first and upon holding the bearing in the bracket up to light that the indentations on one side of the bracket where the machine pressed the original bearings in caused a very slight bulge in the bracket. I took a rat tail file and judiciously remove a tiny bit of the bracket(about 2mm around circumference) in those areas. this seemed to help quite a bit. of course they may fall out in a month too .
.
#80
C
Chris Parman
mahaffeymj: Here are the bearings pressed in.


C
Chris Parman
was able to get mine in amazingly. I found when trying to put in at first and upon holding the bearing in the bracket up to light that the indentations on one side of the bracket where the machine pressed the original bearings in caused a very slight bulge in the bracket. I took a rat tail file and judiciously remove a tiny bit of the bracket(about 2mm) in those areas. this seemed to help quite a bit. of course they may fall out in a month too
mahaffeymj: Here are the bearings pressed in.