You are using an out of date browser. It may not display this or other websites correctly.
You should upgrade or use an alternative browser.
You should upgrade or use an alternative browser.
Export thread
Added some LED lights to my Raptor SD
#1
J
JDubya88
J
JDubya88
So the last time I mowed, I finished just as the sun was going down so my last 5min or so was in low light. I decided that I wanted to look into adding some lights to the mower. I looked at Hustler's light kit, but for $200 I thought I could do much better for a lot cheaper. I knew I wanted to use LED's because I didn't want the lights to draw too much power from the mower's battery. I looked at a lot of options, but I chose to go with some low-profile strip LEDs that use double-sided 3M tape to mount. I also purchased a pre made wiring harness to ease the install. I think it turned out pretty good.
Lights Off:

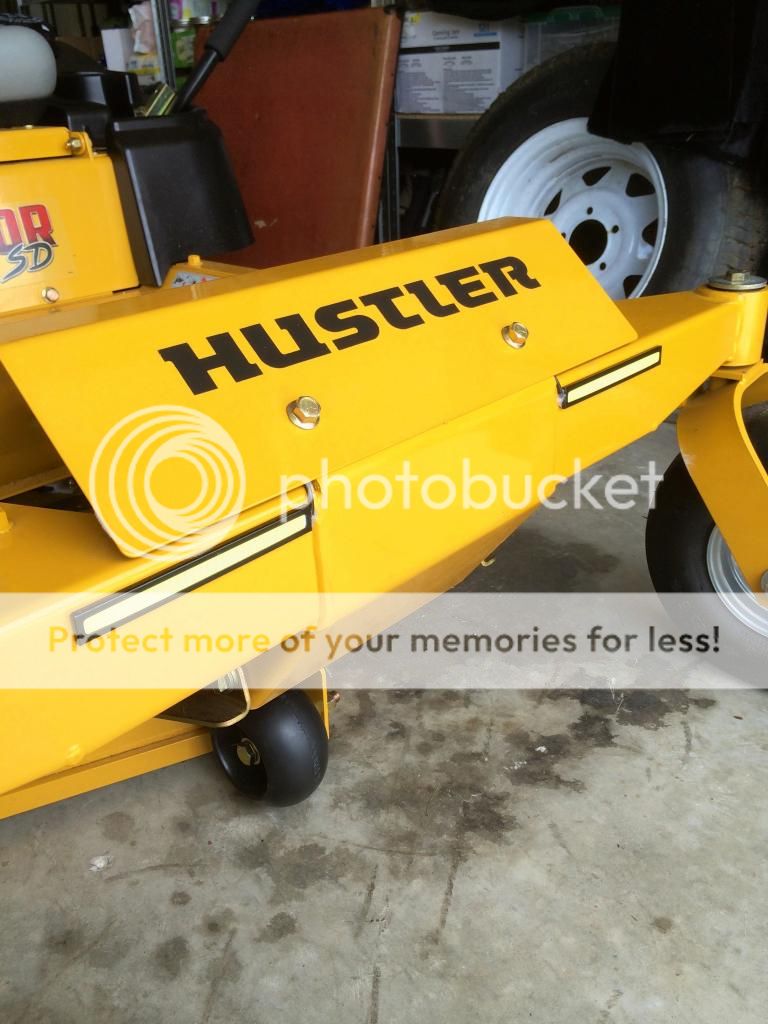
Lights On:


Switch:

The pictures really don't do the lights justice. They are surprisingly bright for how small they are. I am going to try to get some pictures with them on outside on the lawn tonight to show how bright they really are. I'm happy with how it turned out and I've only got about $30 into the whole project right now. Let me know what you guys think.
#2

serelaw
serelaw
Pretty bright idea. lol
Looking forward to where you bought it all.
Looking forward to where you bought it all.
#3
J
JDubya88
Sure thing. I picked the lights and wiring harness up off of Amazon.
Lights: Amazon.com: E-PRANCE New DRL Daytime Running Light Kit LED Fog Light Lamp,Black+yellow: Automotive
Wiring Harness: Amazon.com: Kawell® 2 Leg Wiring Harness Include Switch Kit 80W 40 Amp Relay Car Auto LED Work Lights Lamp Wire for Off Road LED Light Bars and LED Work Lamps/UTV/Truck/SUV: Automotive
I also picked up some zip tie bases that have double sided tape on them. I highly recommend these so you can place them on the frame and then zip tie the wiring to them.
Zip Tie Bases: Shop Gardner Bender 10-Pack Nylon Mounting Base Cable Ties at Lowes.com
I shut all the lights off in the garage and was able to take some better shots with the lights on. I will still try to get some pictures at night out on the lawn too.


J
JDubya88
Pretty bright idea. lol
Looking forward to where you bought it all.
Sure thing. I picked the lights and wiring harness up off of Amazon.
Lights: Amazon.com: E-PRANCE New DRL Daytime Running Light Kit LED Fog Light Lamp,Black+yellow: Automotive
Wiring Harness: Amazon.com: Kawell® 2 Leg Wiring Harness Include Switch Kit 80W 40 Amp Relay Car Auto LED Work Lights Lamp Wire for Off Road LED Light Bars and LED Work Lamps/UTV/Truck/SUV: Automotive
I also picked up some zip tie bases that have double sided tape on them. I highly recommend these so you can place them on the frame and then zip tie the wiring to them.
Zip Tie Bases: Shop Gardner Bender 10-Pack Nylon Mounting Base Cable Ties at Lowes.com
I shut all the lights off in the garage and was able to take some better shots with the lights on. I will still try to get some pictures at night out on the lawn too.


#4

djdicetn
http://www.lawnmowerforum.com/build-yourself/18564-ztr-light-kit.html
djdicetn
Yep, that turned out very well!!! I too came up with a inexpensive halogen solution(I checked into the amp load and have had absolutely no charging system/battery problems). Cost me about the same as you(approx. $36).One of the Mods turned my thread into a "Sticky" on the Build-it Yourself Forum. I hope you don't mind, but I pasted a link there to this thread so users searching for ZTR light options could see what you put together. I thought about mounting mine where you did, but opted for the easier wiring. Mine has a slight "shadow" of the footrest, but they still work very well for mowing after dark and I'm very pleased with them after using them 5 or 6 times since I installed them at the beginning of last season. Good job.....and you can check out my light kit version at the thread in the link below:Sure thing. I picked the lights and wiring harness up off of Amazon.
Lights: Amazon.com: E-PRANCE New DRL Daytime Running Light Kit LED Fog Light Lamp,Black+yellow: Automotive
Wiring Harness: Amazon.com: Kawellョ 2 Leg Wiring Harness Include Switch Kit 80W 40 Amp Relay Car Auto LED Work Lights Lamp Wire for Off Road LED Light Bars and LED Work Lamps/UTV/Truck/SUV: Automotive
I also picked up some zip tie bases that have double sided tape on them. I highly recommend these so you can place them on the frame and then zip tie the wiring to them.
Zip Tie Bases: Shop Gardner Bender 10-Pack Nylon Mounting Base Cable Ties at Lowes.com
I shut all the lights off in the garage and was able to take some better shots with the lights on. I will still try to get some pictures at night out on the lawn too.
http://www.lawnmowerforum.com/build-yourself/18564-ztr-light-kit.html
#5
J
JDubya88
J
JDubya88
So I was able to get some good night pics out on the lawn tonight. I think these are going to work out very good for my needs. I did not use any flash on my camera and did not touch up to photos at all so you could see how bright they really are. What do you guys think?


#6
djdicetn
That'll git er dun:0)
djdicetn
So I was able to get some good night pics out on the lawn tonight. I think these are going to work out very good for my needs. I did not use any flash on my camera and did not touch up to photos at all so you could see how bright they really are. What do you guys think?
That'll git er dun:0)
#8

LazerZLandscaping
LazerZLandscaping
You can now get the job done at anytime of the day!!
Maybe I should put some on my Lazer Z's.
Maybe I should put some on my Lazer Z's.
#10
K
Kremeneon
K
Kremeneon
Very slick! as non-obtrusive as those are I may look to get three of those light kits. One set for mounting on the front beam as you did, another set for forward /diagonal facing off the fenders, and another rear diagonal/facing on the fenders. Maybe separately switched. It would be great area lighting for maneuvering. The neighbors would certainly think aliens have landed if I were to be zipping around at 2am with everything on though.
#11
LazerZLandscaping
LazerZLandscaping
That is cool if you have to run to the convenience store at night.
#12
B
bricehome1
B
bricehome1
Very nice. But do you ever cut grass with that one?? Man, that is one clean mower. I got mine this spring and the guys said, don't wash it much beasue the only problems they have seen are the ones that get hosed off. I use a blower and blow it off, but getting dirty quick. Guess I might have to start washing her...
Nice job again..
Ken
Nice job again..
Ken
#13
J
JDubya88
Thanks. HAHA! I actually put those on after only 1 cut. I only have 2 cuts and 2.9hrs on the mower right now. I haven't washed it. I just use the blower to blow it all off while I'm doing the sidewalks. I'm not sure if I'm gonna use the hose on this one when it starts getting dirty. I may just use a rag with some detailer or something when that time comes.
J
JDubya88
Very nice. But do you ever cut grass with that one?? Man, that is one clean mower. I got mine this spring and the guys said, don't wash it much beasue the only problems they have seen are the ones that get hosed off. I use a blower and blow it off, but getting dirty quick. Guess I might have to start washing her...
Nice job again..
Ken
Thanks. HAHA! I actually put those on after only 1 cut. I only have 2 cuts and 2.9hrs on the mower right now. I haven't washed it. I just use the blower to blow it all off while I'm doing the sidewalks. I'm not sure if I'm gonna use the hose on this one when it starts getting dirty. I may just use a rag with some detailer or something when that time comes.
#14
C
cell6ida
C
cell6ida
I just installed these on my 42" Raptor. Man is this a nice and BRIGHT set of LEDs. Thanks for the write up. The installation was very straight forward and simple enough that even I could accomplish it !!!!!!!!!
#15
J
JDubya88
J
JDubya88
I'm glad to see it helped someone out. I mowed the other day and finished after the sun went down (time change) and had to use my lights to finish up and they are still working great.
#16
C
cell6ida
C
cell6ida
The installation of these lights worked out so well that I added a few more. At night time, this thing is as bright as the sun now. I have 4 lights in the front, 1 light on each side, and 2 lights at the rear. I am an amateur and I wish I could have hidden the wires a little better, but oh well. With as many lights as are on my Raptor now, some wires were bound to be visible. The only negative about installing these lights was that the wires from the lights were so thin that I had a difficult time connecting them with wire nuts. Other than that it's great. Here are a few pics.


On this one you can see the mulch kit that I installed. I also painted the chute cover yellow.


An hour meter I added


On this one you can see the mulch kit that I installed. I also painted the chute cover yellow.


An hour meter I added

#17
J
JDubya88
J
JDubya88
Looks great man! You went way beyond what I did. I bet people are gonna think you are a UFO making crop circles if you are ever out mowing at night. HAHA! I agree that the wires coming out of the lights are very thin. I actually had to strip back a bunch of the coating and fold the wire over 3 times to clamp a quick disconnect onto them. I also used some clear silicone where the wires come out of the light housing because the wire was so thin I didn't want it to rub through and short out. Did you drill holes through the engine guard to run the wires for the rear lights? How is the light spread with them mounted vertically? I hadn't thought about mounting them vertically, but it looks good on the rear. I really like how these lights look with the black frame and yellow light strip when they aren't lit up. It really looks like a factory add-on.
Post up some pics of how it looks lit up at night and how much light it is actually throwing out.:thumbsup:
Post up some pics of how it looks lit up at night and how much light it is actually throwing out.:thumbsup:
#18

ztrjim
ztrjim
Oh that light kit for your Hustler Raptor SD looks real nice!!! Thanks so much for sharing!!! 
#19
C
cell6ida
The engine guard already had the holes there. One set of holes at the top and another set at the bottom of the engine guard. The light spread is good at the rear, but the spread might have been a little better if I would have mounted them horizontally. That can easily be changed with a two new strips of double sided tape if I get the urge. I ended up putting the rear ones vertical just to try them out. Since the engine guard is angled back, I could have put them horizontally on the outer wings of the engine guard, but I wanted the lights to shine straight back instead of angling back.
Also if I would have put them horizontally on the part of the engine guard that faces straight back, I think they would have been too close together so I just tried them out vertically and they look really nice that way. I'll have to try and take some pictures looking outward from the seat tomorrow night, and hopefully the amount of light that shows up on the pictures will be an accurate view of how bright everything is. I left the lights on, stepped about 20 yards in front of the mower and looked back towards the 4 lights on the front and I was literally blinded!
C
cell6ida
Looks great man! You went way beyond what I did. I bet people are gonna think you are a UFO making crop circles if you are ever out mowing at night. HAHA! I agree that the wires coming out of the lights are very thin. I actually had to strip back a bunch of the coating and fold the wire over 3 times to clamp a quick disconnect onto them. I also used some clear silicone where the wires come out of the light housing because the wire was so thin I didn't want it to rub through and short out. Did you drill holes through the engine guard to run the wires for the rear lights? How is the light spread with them mounted vertically? I hadn't thought about mounting them vertically, but it looks good on the rear. I really like how these lights look with the black frame and yellow light strip when they aren't lit up. It really looks like a factory add-on.
Post up some pics of how it looks lit up at night and how much light it is actually throwing out.:thumbsup:
The engine guard already had the holes there. One set of holes at the top and another set at the bottom of the engine guard. The light spread is good at the rear, but the spread might have been a little better if I would have mounted them horizontally. That can easily be changed with a two new strips of double sided tape if I get the urge. I ended up putting the rear ones vertical just to try them out. Since the engine guard is angled back, I could have put them horizontally on the outer wings of the engine guard, but I wanted the lights to shine straight back instead of angling back.
Also if I would have put them horizontally on the part of the engine guard that faces straight back, I think they would have been too close together so I just tried them out vertically and they look really nice that way. I'll have to try and take some pictures looking outward from the seat tomorrow night, and hopefully the amount of light that shows up on the pictures will be an accurate view of how bright everything is. I left the lights on, stepped about 20 yards in front of the mower and looked back towards the 4 lights on the front and I was literally blinded!
#20
C
cell6ida
C
cell6ida
The first picture is the forward view from the seat, and the 2nd one is the side view from the seat. The third picture is looking back at the mower from the front right, and the 4th picture is of it in the shed. The shed has no lights and all the light you see is coming from the mower LED lights.


:drink:


:drink:
#23
Z
zmister11
Is ur raptor for sale on craigslist? I see the same mower and same night pics lol
Z
zmister11
So the last time I mowed, I finished just as the sun was going down so my last 5min or so was in low light. I decided that I wanted to look into adding some lights to the mower. I looked at Hustler's light kit, but for $200 I thought I could do much better for a lot cheaper. I knew I wanted to use LED's because I didn't want the lights to draw too much power from the mower's battery. I looked at a lot of options, but I chose to go with some low-profile strip LEDs that use double-sided 3M tape to mount. I also purchased a pre made wiring harness to ease the install. I think it turned out pretty good.
Lights Off:
http://s713.photobucket.com/user/Piraya33/media/Hustler Raptor SD 48/IMG_7775.jpg.html
http://s713.photobucket.com/user/Piraya33/media/Hustler Raptor SD 48/IMG_7779.jpg.html
Lights On:
http://s713.photobucket.com/user/Piraya33/media/Hustler Raptor SD 48/IMG_7776.jpg.html
http://s713.photobucket.com/user/Piraya33/media/Hustler Raptor SD 48/IMG_7777.jpg.html
Switch:
http://s713.photobucket.com/user/Piraya33/media/Hustler Raptor SD 48/IMG_7781.jpg.html
The pictures really don't do the lights justice. They are surprisingly bright for how small they are. I am going to try to get some pictures with them on outside on the lawn tonight to show how bright they really are. I'm happy with how it turned out and I've only got about $30 into the whole project right now. Let me know what you guys think.
Is ur raptor for sale on craigslist? I see the same mower and same night pics lol
#25
J
JDubya88
Nope. My Raptor is sitting nicely in my garage waiting for me to get off my butt and go mow the yard again.:laughing:
My lights are still working fine. No issues so far. I am happy with them.:thumbsup:
J
JDubya88
Is ur raptor for sale on craigslist? I see the same mower and same night pics lol
Nope. My Raptor is sitting nicely in my garage waiting for me to get off my butt and go mow the yard again.:laughing:
Any update on this light kit? Are they still holding up? Thanks!
My lights are still working fine. No issues so far. I am happy with them.:thumbsup:
#26
C
cell6ida
C
cell6ida
The only problem I've had is on the actual lights. One light consists of several small strips of lights together. I had a few of the small strips stop working on 2 of the lights. But it was very easy to replace those individual lights. Easy peasy!! The lights are not very expensive, and I guess sometimes you get what you pay for. Other than that the overall light system has been GREAT!!
#27
S
spta97
S
spta97
Great job. Did you do any measurements of the battery / alternator to see what power you had available for the lights? I want to mount a led light bar on my small mower but I don't want to draw too much power.
#29
C
cell6ida
C
cell6ida
I sold my 42" Raptor, for full asking price, due to having these lights installed on them. I turned around and bought a 60" Xonei, and I immediately installed these lights on them. This time, it was MUCH easier, and it has a MUCH CLEANER look to it, with all the wires hidden away. Take a look !


Here is were all the wires are spliced, bundled, secured, and hidden


Here is were all the wires are spliced, bundled, secured, and hidden


#30
Z
zmister11
Nice! Any night pics?
Z
zmister11
I sold my 42" Raptor, for full asking price, due to having these lights installed on them. I turned around and bought a 60" Xonei, and I immediately installed these lights on them. This time, it was MUCH easier, and it has a MUCH CLEANER look to it, with all the wires hidden away. Take a look !
http://s944.photobucket.com/user/cell6ida/media/image1-2_zpsh1xpiuq6.jpeg.html
http://s944.photobucket.com/user/cell6ida/media/image1-3_zps3hlfxenz.jpg.html
http://s944.photobucket.com/user/cell6ida/media/image1-4_zpsskdgqgj8.jpg.html
http://s944.photobucket.com/user/cell6ida/media/image2-2_zpsartmsr5u.jpg.html
http://s944.photobucket.com/user/cell6ida/media/image2-4_zpse1fkj0sa.jpeg.html
Here is were all the wires are spliced, bundled, secured, and hidden
http://s944.photobucket.com/user/cell6ida/media/image3-2_zpsk5p3hizc.jpg.html
http://s944.photobucket.com/user/cell6ida/media/image2-3_zpsgejn5qxq.jpg.html
Nice! Any night pics?
#31
S
shadeytree
:thumbsup: NICE! :thumbsup:
Where did you purchase the lights and switch?
I've been thinking of adding LED head lights to my mower.
I would like to add some red LED lights to the rear too, since I mow about 400' along the road adjacent to my house. Cars zoom by at 55+. At dusk it is difficult for the driver to see me without any lights.
S
shadeytree
So the last time I mowed, I finished just as the sun was going down so my last 5min or so was in low light. I decided that I wanted to look into adding some lights to the mower. I looked at Hustler's light kit, but for $200 I thought I could do much better for a lot cheaper. I knew I wanted to use LED's because I didn't want the lights to draw too much power from the mower's battery. I looked at a lot of options, but I chose to go with some low-profile strip LEDs that use double-sided 3M tape to mount. I also purchased a pre made wiring harness to ease the install. I think it turned out pretty good.
:thumbsup: NICE! :thumbsup:
Where did you purchase the lights and switch?
I've been thinking of adding LED head lights to my mower.
I would like to add some red LED lights to the rear too, since I mow about 400' along the road adjacent to my house. Cars zoom by at 55+. At dusk it is difficult for the driver to see me without any lights.
#32
M
martin1b
M
martin1b
Great idea. Decided to put the same kit on my Fastrak SD. I noticed the lights get very very hot in a short amount of time. Saw some pics with these on the gas tank. Although that was a great place to put them, decided not to as it might melt the plastic, and then kaboom.
here are some pics.


here are some pics.
#33
R
Robert Sauls
R
Robert Sauls
I did the same thing. Got a Lighted switch, found an LED 9" light bar for good price.
Had all the rest of the stuff laying around. I think it turned out better than the $180.00
halogen light kit they offered.....
For some reason I can't insert any images....?
Had all the rest of the stuff laying around. I think it turned out better than the $180.00
halogen light kit they offered.....
For some reason I can't insert any images....?
#34
D
Donkman
D
Donkman
Where did you hook up to? I would like to jump into the ignition switch but witch wire? (see attachment)
Donkman
Donkman
#36
J
Jefferey
J
Jefferey
I just did this today on my SDX still haven't mowed yet so everything is still shinny and clean, I also added 3 coats of top coat POR15 to the underside of the deck.
My Question is that on my wire harness when the lights are off there is a red led light on the switch
That stays on, I don't mow 5 months out of the year do to the weather in Iowa. So would this little LED
On the switch drain my battery over time? I did try and find a source that I can hook the POS wires too but what no luck in finding that source. I want the switch to power off after whe I turn the key to the off position .
Jeff
#38
J
Jefferey
J
Jefferey
Its in the on/off switch that came with the harness, OFF is a RED led / ON is a GREEN led.
Think I will just change out to a different type switch this morning.
Think I will just change out to a different type switch this morning.
#39
O
OUOUOU
O
OUOUOU
I bought the kit and look great and work great also. But they drain my battery after a while, what did I do wrong?
Thanks
Grant
Thanks
Grant
#41

rbsmith6
Use the orange wire at the Switch.
rbsmith6
Where did you hook up to? I would like to jump into the ignition switch but witch wire? (see attachment)View attachment 28031
Donkman
Use the orange wire at the Switch.
#42
rbsmith6

rbsmith6
This is what I did on my HSD.
Lights on ebay http://www.ebay.com/itm/2x-4inch-18...e=STRK:MEBIDX:IT&_trksid=p2055119.m1438.l2649
Lights on ebay http://www.ebay.com/itm/2x-4inch-18...e=STRK:MEBIDX:IT&_trksid=p2055119.m1438.l2649
Attachments
#43
B
bradmc
What is that black box on the front middle of your frame?
B
bradmc
This is what I did on my HSD.
Lights on ebay http://www.ebay.com/itm/2x-4inch-18...e=STRK:MEBIDX:IT&_trksid=p2055119.m1438.l2649
What is that black box on the front middle of your frame?
#44
rbsmith6
That is the weights that come with the grass bagging system. If you fill the bags full the front wheels may become too light.
rbsmith6
What is that black box on the front middle of your frame?
That is the weights that come with the grass bagging system. If you fill the bags full the front wheels may become too light.
#45

scrous
scrous
I'm definitely doing lights. Both regular and strip styles look good.. Hmm maybe both, like low and hi beams lol. Nice work!!
#46

mhavanti
mhavanti
This new video premieres Saturday, November 10th at 3 PM. We will be watching at the same time so that we can chat and answer questions as it plays.
Make time to go watch the Premiere and visit with us.
We're looking forward to hearing from you all.
https://www.youtube.com/watch?v=vF-PWkuouqQ&feature=youtu.be
Make time to go watch the Premiere and visit with us.
We're looking forward to hearing from you all.
https://www.youtube.com/watch?v=vF-PWkuouqQ&feature=youtu.be
#47
H
HDCowboy42
H
HDCowboy42
Has anyone found a rocker switch that will mount in the extra hole in the dash panel?? I bought a set of lights on Amazon last weekend along with this switch......... https://www.amazon.com/gp/product/B013TE56X4/ref=oh_aui_detailpage_o01_s00?ie=UTF8&psc=1 but after receiving the switch & comparing it with my old hour meter it seems a little to thin and skinny to fit in the hole, was wondering if anyone had any better ideas?
#48

Mr. Mower
Is there anyway possible that there would be enough space on the dash to cut out an exact fit for that switch you purchased?
This way you wouldn't lose out on the money spent on that switch and it could still serve it's purpose for what you brought it for, just saying.
If not, might I suggest that you make precise measurements of the actual area (maybe a small template?) that you would like to mount it in and make a trip to either an electronics store, Autozone, O'Reilly's, Lowe's, etc. and see it you could find a switch with an almost exact fit?
Mr. Mower
Has anyone found a rocker switch that will mount in the extra hole in the dash panel?? I bought a set of lights on Amazon last weekend along with this switch......... https://www.amazon.com/gp/product/B013TE56X4/ref=oh_aui_detailpage_o01_s00?ie=UTF8&psc=1 but after receiving the switch & comparing it with my old hour meter it seems a little to thin and skinny to fit in the hole, was wondering if anyone had any better ideas?
Is there anyway possible that there would be enough space on the dash to cut out an exact fit for that switch you purchased?
This way you wouldn't lose out on the money spent on that switch and it could still serve it's purpose for what you brought it for, just saying.
If not, might I suggest that you make precise measurements of the actual area (maybe a small template?) that you would like to mount it in and make a trip to either an electronics store, Autozone, O'Reilly's, Lowe's, etc. and see it you could find a switch with an almost exact fit?
#49
Mr. Mower


Mr. Mower
Back in 2016 when I first purchased my Raptor Flip Up I also purchased a couple of accessories for it.
One being the actual "Light Kit" for it. Purchased through an authorized sales and service dealership.
As well as the rear "Engine Guard".
Both installed by myself.
I also took it a step further and had the actual "Hustler decals" (as viewed) custom made in size to fit each area.
One being the actual "Light Kit" for it. Purchased through an authorized sales and service dealership.
As well as the rear "Engine Guard".
Both installed by myself.
I also took it a step further and had the actual "Hustler decals" (as viewed) custom made in size to fit each area.
Attachments
#50
H
HDCowboy42
https://www.oreillyauto.com/detail/...nduct-tite-20-amp-rocker-switch/84944/4176468
Aint went out and tried it yet, but I checked its dimensions at the store against an old hour meter I had laid up beside it before I bought it and it looks like it will fit almost perfectly!!
H
HDCowboy42
Ah no big deal, I'm sure I'll find some use for the switch here sooner or later!! Went down to O'Reilly's this afternoon and found this switch.........Is there anyway possible that there would be enough space on the dash to cut out an exact fit for that switch you purchased?
This way you wouldn't lose out on the money spent on that switch and it could still serve it's purpose for what you brought it for, just saying.
If not, might I suggest that you make precise measurements of the actual area (maybe a small template?) that you would like to mount it in and make a trip to either an electronics store, Autozone, O'Reilly's, Lowe's, etc. and see it you could find a switch with an almost exact fit?
https://www.oreillyauto.com/detail/...nduct-tite-20-amp-rocker-switch/84944/4176468
Aint went out and tried it yet, but I checked its dimensions at the store against an old hour meter I had laid up beside it before I bought it and it looks like it will fit almost perfectly!!
#51
mhavanti
mhavanti
Cowboy,
That should work fine. You could have also cut a spot in front of your dash on the fender to fit the first switch. Or right behind the dash on fender. My original plan was to do the three little switches on the flat space behind the dash. Simple cut out for a rectangular switch in the event you want to use that first switch for something on your mower such as a power socket. If you install a power socket (cigarette lighter), put it on a pilot light switch such as you've purchased.
Be sure to show us your installations.
By the way, November 10, 2018 at 3:00 PM I'll be on the video premiere on MaxsGarajMahal Youtube channel showing the lights demonstration. Everyone come by, say hello and chat. It would be great getting to hear your comments live.
https://www.youtube.com/watch?v=vF-PWkuouqQ&feature=youtu.be
Have a great weekend everyone.
Max
#52
Mr. Mower
Cool! :thumbsup:
The deal with the installation of the LED light kit on mine is that it did not come with a power on/off switch.
The LED kit came with an electrical harness (along with the front metal frame attachment that the LED lights are installed in) that plugs into another existing electrical harness, within the electrical system, that is controlled by the start on/off key switch, so that every time you start the mower the LED lights automatically turn on and then off once the key switch is switched off.
Hence the reason why there is no individual switch for LED lights. I would have liked to have had a separate switch by itself.
I guess I could install a separate switch if needed, kinda like what you're doing.
Mr. Mower
Ah no big deal, I'm sure I'll find some use for the switch here sooner or later!! Went down to O'Reilly's this afternoon and found this switch.........
https://www.oreillyauto.com/detail/...nduct-tite-20-amp-rocker-switch/84944/4176468
Aint went out and tried it yet, but I checked its dimensions at the store against an old hour meter I had laid up beside it before I bought it and it looks like it will fit almost perfectly!!
Cool! :thumbsup:
The deal with the installation of the LED light kit on mine is that it did not come with a power on/off switch.
The LED kit came with an electrical harness (along with the front metal frame attachment that the LED lights are installed in) that plugs into another existing electrical harness, within the electrical system, that is controlled by the start on/off key switch, so that every time you start the mower the LED lights automatically turn on and then off once the key switch is switched off.
Hence the reason why there is no individual switch for LED lights. I would have liked to have had a separate switch by itself.
I guess I could install a separate switch if needed, kinda like what you're doing.
#53
mhavanti
mhavanti
I would definitely uncouple from the ignition on situation. You'll need to do something with the ignition key on and won't need or want the lights on draining the battery unnecessarily.
I'd install the switch first chance you get this winter.
Max
I'd install the switch first chance you get this winter.
Max
#54
Mr. Mower
Really can't do that right now due to the fact that my mower is still under warranty.
Not only that but then I would have to look at the electrical diagram layout on my particular mower, modify the existing electrical harness that the LED lights have, in order to install an electrical power on/off switch.
Yes it may be a bit of a task and can be done but so far I've not had any issue's with my mowers battery. My mowers battery is always fully charged prior to actually using it before cutting the grass.
Reason is I've installed an external charging system, connected directly to my mower that allows me to check the battery's power capability, from fully charged (blinking GREEN LED light indicator), to needs charging (blinking YELLOW LED light indicator), or dead battery (blinking RED LED light indicator).
So really no problems or worries on my part with the battery there.
I liked it so much that I even installed the same kit on my vehicle to check and charge the battery if necessary! No need to remove the battery, mess with tools, etc. just to charge a battery. Simply plug in the connector to an existing installed port, plug in the charger to the wall outlet and start charging!
https://smartercharger.com/products/batterychargers/ctek-mus-4-3-testcharge/

Mr. Mower
I would definitely uncouple from the ignition on situation. You'll need to do something with the ignition key on and won't need or want the lights on draining the battery unnecessarily.
I'd install the switch first chance you get this winter.
Max
Really can't do that right now due to the fact that my mower is still under warranty.
Not only that but then I would have to look at the electrical diagram layout on my particular mower, modify the existing electrical harness that the LED lights have, in order to install an electrical power on/off switch.
Yes it may be a bit of a task and can be done but so far I've not had any issue's with my mowers battery. My mowers battery is always fully charged prior to actually using it before cutting the grass.
Reason is I've installed an external charging system, connected directly to my mower that allows me to check the battery's power capability, from fully charged (blinking GREEN LED light indicator), to needs charging (blinking YELLOW LED light indicator), or dead battery (blinking RED LED light indicator).
So really no problems or worries on my part with the battery there.
I liked it so much that I even installed the same kit on my vehicle to check and charge the battery if necessary! No need to remove the battery, mess with tools, etc. just to charge a battery. Simply plug in the connector to an existing installed port, plug in the charger to the wall outlet and start charging!
https://smartercharger.com/products/batterychargers/ctek-mus-4-3-testcharge/
Attachments
#55
mhavanti
mhavanti
Mr.Mower,
Very nice. I have a pair of those. Never seem to hook them up for some reason. I did use one last winter toward the end of the extremely cold weather. Otherwise, I leave it connected to the 110 with being connected to the mower. I'll try to do better in the future. lol
Max
Very nice. I have a pair of those. Never seem to hook them up for some reason. I did use one last winter toward the end of the extremely cold weather. Otherwise, I leave it connected to the 110 with being connected to the mower. I'll try to do better in the future. lol
Max
#56

DB725
DB725
Hustler Fastrak SDX 2019 model year. I bought the Dorman rocker switch (84944). HDCowboy recommended from AutoZone for $16. The switch was labeled SW14523 on the package. I bought Cutequeen 4 X 36w 3600 Lumens Cree LED Spot Light for Off-road Rv Atv SUV Boat 4x4 Jeep Lamp Tractor Marine Offroad Lighting (pack of 4) on Amazon for $36.
Album link https://www.lawnmowerforum.com/media/albums/hustler-fastrak-sdx-lights.7315/
Video on youtube:
Album link https://www.lawnmowerforum.com/media/albums/hustler-fastrak-sdx-lights.7315/
Video on youtube:
#57

tom3
tom3
If my JD mower deck wasn't so noisy I'd really like to mow after dark in the summer here. But I'd probably get on the $h!t list of those nearby. Day time sun and high humidity is pretty bad even when riding. Kind of amazing what is being done with LEDs these days.
#58
DB725
DB725
Good thing about living out in country, neighbors can't hear the mower
#59
E
Eliot Ness

E
Eliot Ness
I was mowing a couple of weeks back and it got dark on me also and I was having trouble seeing where I had cut. I went inside and got my Light-N-Carry rechargeable LED light and the extra strong magnet held it securely to the front of my Raptor SD. It was perfect for the job and requires no wiring, although it is not as elegant as the OP's light install it got the job done for me. They come in three sizes: 200, 300, and 500 lumen but mine is the smaller 200 lumen. The magnet on these is much stronger than any other LED light I have except for a larger BRAUN that I have.
I bought my first one at NAPA but after that a few more to have around the car and workshop at Amazon, just search for 'Light-N-Carry LNC1241'.
I bought my first one at NAPA but after that a few more to have around the car and workshop at Amazon, just search for 'Light-N-Carry LNC1241'.