You are using an out of date browser. It may not display this or other websites correctly.
You should upgrade or use an alternative browser.
You should upgrade or use an alternative browser.
Export thread
721D Grasshopper Gemini final drive
#1
6
6gunn
6
6gunn
I have a leak on the right side of the final drive of my 1996 721D at the axle. I read the post by the Hemikid on replacing his bearing on his GH axle, but there was no mention of the planetary gears and how to remove them. I called Grasshopper and they would not give me any info on how to take the final drive apart. They said basically to take it to the dealer, but I don't have the money for that right now.
Just wondered if anyone has any suggestions, or insight in this tear down and reassembly. I've done plenty of car repairs, but planetary gears are new to me.
Thanks for any help you can give me.
Just wondered if anyone has any suggestions, or insight in this tear down and reassembly. I've done plenty of car repairs, but planetary gears are new to me.
Thanks for any help you can give me.
#3
6
6gunn
6
6gunn
mechanic mark, I'm not sure if your answer didn't post, or I'm missing something, but I could use some help on this subject.
Thanks
Thanks
#4

MBDiagMan
MBDiagMan
6gunn,
Many manufacturers of different items have moved toward posting manuals in .pdf form for free download, EXCELLENT customer support philosophy and a gesture of how much they value their customers. Some manufacturers continue to make service manuals unavailable unless you're willing to pay a high price.
Grasshopper appears to be somewhere in the middle since their manuals are $7 as I recall. At least that's a digestible price.
I expect that in your situation, that $7 might be well spent.
Best of luck with it, and keep us informed about the outcome.
#5
M
mechanic mark
Part 4: Removal Planetary Gear Sets, One Way Clutch, Output Shaft, Servo Assemblys - YouTube
M
mechanic mark
I have a leak on the right side of the final drive of my 1996 721D at the axle. I read the post by the Hemikid on replacing his bearing on his GH axle, but there was no mention of the planetary gears and how to remove them. I called Grasshopper and they would not give me any info on how to take the final drive apart. They said basically to take it to the dealer, but I don't have the money for that right now.
Just wondered if anyone has any suggestions, or insight in this tear down and reassembly. I've done plenty of car repairs, but planetary gears are new to me.
Thanks for any help you can give me.
Part 4: Removal Planetary Gear Sets, One Way Clutch, Output Shaft, Servo Assemblys - YouTube
#6

thehemikid
thehemikid
I'll try'n chime in later, though a lot of what I did has faded from memory, sense that was about 2 yrs ago & I'm in my mid 50's :tongue:
Here's a explosive view. You can see the planetaries aren't caged like in automotive trans, & there are 2 sets per drum per final drive.

Here's a explosive view. You can see the planetaries aren't caged like in automotive trans, & there are 2 sets per drum per final drive.
#7
thehemikid
thehemikid
6gunn, how big of a leak is it?
How big of a puddle does it leave on the floor over what time period?
Or how much does the reservoir lose during mowing for how long?
How big of a puddle does it leave on the floor over what time period?
Or how much does the reservoir lose during mowing for how long?
#8
thehemikid
thehemikid
6gunn, if you haven't already taken it apart. If you have, then here's some pic's to start with (if I can get the photobucket thingy to work) for whoever may need then.
I think when I took it apart the 1st time it looked like in the 1st pic with the black Reaction Plate sticking to the Back UP Plate. I don't remember if the Primary Sun Gear stuck & came out also. When I mean stuck I mean the trans fluid causes the parts with flat surfaces to cling together.


Missing in the pic below, is a little black Friction Pad (for parking brake) that looks like a tiny car disc brake pad with a small steel plate that goes behind it, to spread the load of the rod that pushes against it from behind. Which seems to me to sandwich the Reaction Plate (composit (sp)) against the Back up plate that you see in the 2nd pic with 4 ears/lugs.


...on into the planetary(s) next.
I think when I took it apart the 1st time it looked like in the 1st pic with the black Reaction Plate sticking to the Back UP Plate. I don't remember if the Primary Sun Gear stuck & came out also. When I mean stuck I mean the trans fluid causes the parts with flat surfaces to cling together.
Missing in the pic below, is a little black Friction Pad (for parking brake) that looks like a tiny car disc brake pad with a small steel plate that goes behind it, to spread the load of the rod that pushes against it from behind. Which seems to me to sandwich the Reaction Plate (composit (sp)) against the Back up plate that you see in the 2nd pic with 4 ears/lugs.
...on into the planetary(s) next.
#9
thehemikid
thehemikid
Before I go into the primaries in the Axle housing, I'd like to finish up here first, ...& I'd like to say I'm no ace mechanic here giving out instructions on a "How to" do this. Just some helpful pic's for those that might attempt to try'n repair their self.
The primary sun gear will have oil grooves like this on both ends.

I mentioned before about the little disc, it goes in the area between the red arrows. When you first separate the Axle Housing from the trans housing there will still be some fluid come out even though you drain the reservoir iirc. How much I don't remember. I think I left 2 upper bolts in to hold everything while I separated just enough to drain. After its drains, you might put a small screen over your drain pan to catch the little disc pad & steel, that will probably stick to the Reaction Plate & fall out when you separate the Axle Housing from the rest of the trans housing.
Also I remember reading some where that you DON'T want to take the Motor Rotor out of its seat unless you really, really have to because the 5 balls are supposedly sleeve specific. In other words, each ball & sleeve are a matched set (blue arrows). I don't remember for sure but I think this may be where I read of the .0001" fit in these trans, & that they "don't like ant dirt". Any one can correct me if I'm wrong here.

Also you can see in the very center where mine had some side load "thrust" (on the primary sun gear) causing some ware in a circle up in the sun gears seat. I'm not sure it should be doing that. In other words, if the thrust washers & other washers, that are between the Snap Rings on the Axle are right,... this probably wouldn't happen (just my opinion). I'll talk about that again when I can get to the Axle itself pic's.
Now maybe I can move on to the Planetary Gears. :tongue:
The primary sun gear will have oil grooves like this on both ends.
I mentioned before about the little disc, it goes in the area between the red arrows. When you first separate the Axle Housing from the trans housing there will still be some fluid come out even though you drain the reservoir iirc. How much I don't remember. I think I left 2 upper bolts in to hold everything while I separated just enough to drain. After its drains, you might put a small screen over your drain pan to catch the little disc pad & steel, that will probably stick to the Reaction Plate & fall out when you separate the Axle Housing from the rest of the trans housing.
Also I remember reading some where that you DON'T want to take the Motor Rotor out of its seat unless you really, really have to because the 5 balls are supposedly sleeve specific. In other words, each ball & sleeve are a matched set (blue arrows). I don't remember for sure but I think this may be where I read of the .0001" fit in these trans, & that they "don't like ant dirt". Any one can correct me if I'm wrong here.
Also you can see in the very center where mine had some side load "thrust" (on the primary sun gear) causing some ware in a circle up in the sun gears seat. I'm not sure it should be doing that. In other words, if the thrust washers & other washers, that are between the Snap Rings on the Axle are right,... this probably wouldn't happen (just my opinion). I'll talk about that again when I can get to the Axle itself pic's.
Now maybe I can move on to the Planetary Gears. :tongue:
#10
thehemikid
thehemikid
On to the Planetary Gears.
Again, most likely it'll have the Black Reaction Plate sticking to the Back Up Plate like this when it comes apart but not necessarily. Everything will come out a lot easier to just remove the Sun Gear, hold the Black Reaction plate with one hand, (to keep everything inside) while you stand the Housing on end & then lift the housing up. Everything should just stay on the table. But I'm doing it this way just to show how everything goes. This is how I did it the first time, being cautious.

You can just tell the Primary Sun gear has a little ware on this end from the thrust I mentioned.


The shinny area around the primary planetary gears appears to be where they rub the Back Up Plate.

Sense I took the panetaries out, the pins their on were to slippery to pull on, so I just pulled the Drum,...

...then I could get fingers around the carriers.

Secondary Sun removed.


The rear carrier (secondary) is thicker than the Primary carrier & finer internally splined to fit this end of the axle, so you can't get them mixed up. Also I think the secondary Planetaries are thicker also. I think the only thing you can get mix up are the Primary & Secondary Sun gears. But I think,...iirc,...if you put the Primary sun in the Secondary's place, it doesn't have the little "nub" with no teeth, which allows that little needed clearance of the inside corner of the Primary Planetary gears.

...next,...removing the axle from its housing.
Again, most likely it'll have the Black Reaction Plate sticking to the Back Up Plate like this when it comes apart but not necessarily. Everything will come out a lot easier to just remove the Sun Gear, hold the Black Reaction plate with one hand, (to keep everything inside) while you stand the Housing on end & then lift the housing up. Everything should just stay on the table. But I'm doing it this way just to show how everything goes. This is how I did it the first time, being cautious.
You can just tell the Primary Sun gear has a little ware on this end from the thrust I mentioned.
The shinny area around the primary planetary gears appears to be where they rub the Back Up Plate.
Sense I took the panetaries out, the pins their on were to slippery to pull on, so I just pulled the Drum,...
...then I could get fingers around the carriers.
Secondary Sun removed.
The rear carrier (secondary) is thicker than the Primary carrier & finer internally splined to fit this end of the axle, so you can't get them mixed up. Also I think the secondary Planetaries are thicker also. I think the only thing you can get mix up are the Primary & Secondary Sun gears. But I think,...iirc,...if you put the Primary sun in the Secondary's place, it doesn't have the little "nub" with no teeth, which allows that little needed clearance of the inside corner of the Primary Planetary gears.
...next,...removing the axle from its housing.
#11
thehemikid
thehemikid
A bit more info on the Planetary stuff. Here's the back side (well the way mine came apart anyway) of the Drum. Well, It's actually called the Double Ring Gear. The 4 long lugs don't seem to care what slot they need to go back in, but I used the little shinny witness marks at the rear of the lugs & slots verify which way this one was indexed.

One of the lugs has a 7 on the back of it & doesn't line up with anything,...so you tell me & we'll both know :smile:

One of the lugs has a 7 on the back of it & doesn't line up with anything,...so you tell me & we'll both know :smile:
#12
thehemikid
thehemikid
On to the Axle removal.
Ha,...another 7 :cool2:,...but it doesn't line up with anything.:laughing:

There's the snap ring, thick washer, thrust bearing, thick washer, & that last thin washer was my doings, try'n to fix some of the problem mine had with,...for some reason, to much material for everything to go back in. It was weird, & ever did find out why, so I had a shop grind me a pair of (I think It was .055") spacers. One on this side of the Pressed in Housing bearing that I'll get to here in a minute.

You can just see the needle bearing that's pressed (I think :laughing") into the housing
into the housing

Pull the outer bearing snap ring, then just take a rubber mallet or hammer handle & tap on the splined end of the axle. I believe most of the resistance will be the other snap ring (that's mid way on the axle & on the other side of the housing needle bearing) catching the back side of the oil seal & driving it off it's seat. But there may be some resistance from the outer bearing but I don't think much.

These are approximately where everything goes on the axle.


Looking through the outer axle bear seat. The oil seal seat starts at about 2.5" & seats at about 2.75". But I don't think I pushed mine all the way down to its seat trying to keep it off the the middle snap ring. Though the factory seat probably takes care of that for ya.

While I'm thinking of it here's a pic of the 1st snap ring that was behind the planetarys & against the thick thrust washer pack. It's seems to have had some side loads in its previous life so I turned it around.

...the end.
Ha,...another 7 :cool2:,...but it doesn't line up with anything.:laughing:
There's the snap ring, thick washer, thrust bearing, thick washer, & that last thin washer was my doings, try'n to fix some of the problem mine had with,...for some reason, to much material for everything to go back in. It was weird, & ever did find out why, so I had a shop grind me a pair of (I think It was .055") spacers. One on this side of the Pressed in Housing bearing that I'll get to here in a minute.
You can just see the needle bearing that's pressed (I think :laughing
into the housing
Pull the outer bearing snap ring, then just take a rubber mallet or hammer handle & tap on the splined end of the axle. I believe most of the resistance will be the other snap ring (that's mid way on the axle & on the other side of the housing needle bearing) catching the back side of the oil seal & driving it off it's seat. But there may be some resistance from the outer bearing but I don't think much.
These are approximately where everything goes on the axle.
Looking through the outer axle bear seat. The oil seal seat starts at about 2.5" & seats at about 2.75". But I don't think I pushed mine all the way down to its seat trying to keep it off the the middle snap ring. Though the factory seat probably takes care of that for ya.
While I'm thinking of it here's a pic of the 1st snap ring that was behind the planetarys & against the thick thrust washer pack. It's seems to have had some side loads in its previous life so I turned it around.
...the end.
#13
L
lapeer20m
L
lapeer20m
Thank you so much for this thread!
I know it's older, but it really helped me out.
I just bought a woods 6210 with the left side wheel locked up. After reading this thread i took it apart and found a piece of metal inside which i believe was part of the parking brake.
.JPG")
.JPG")
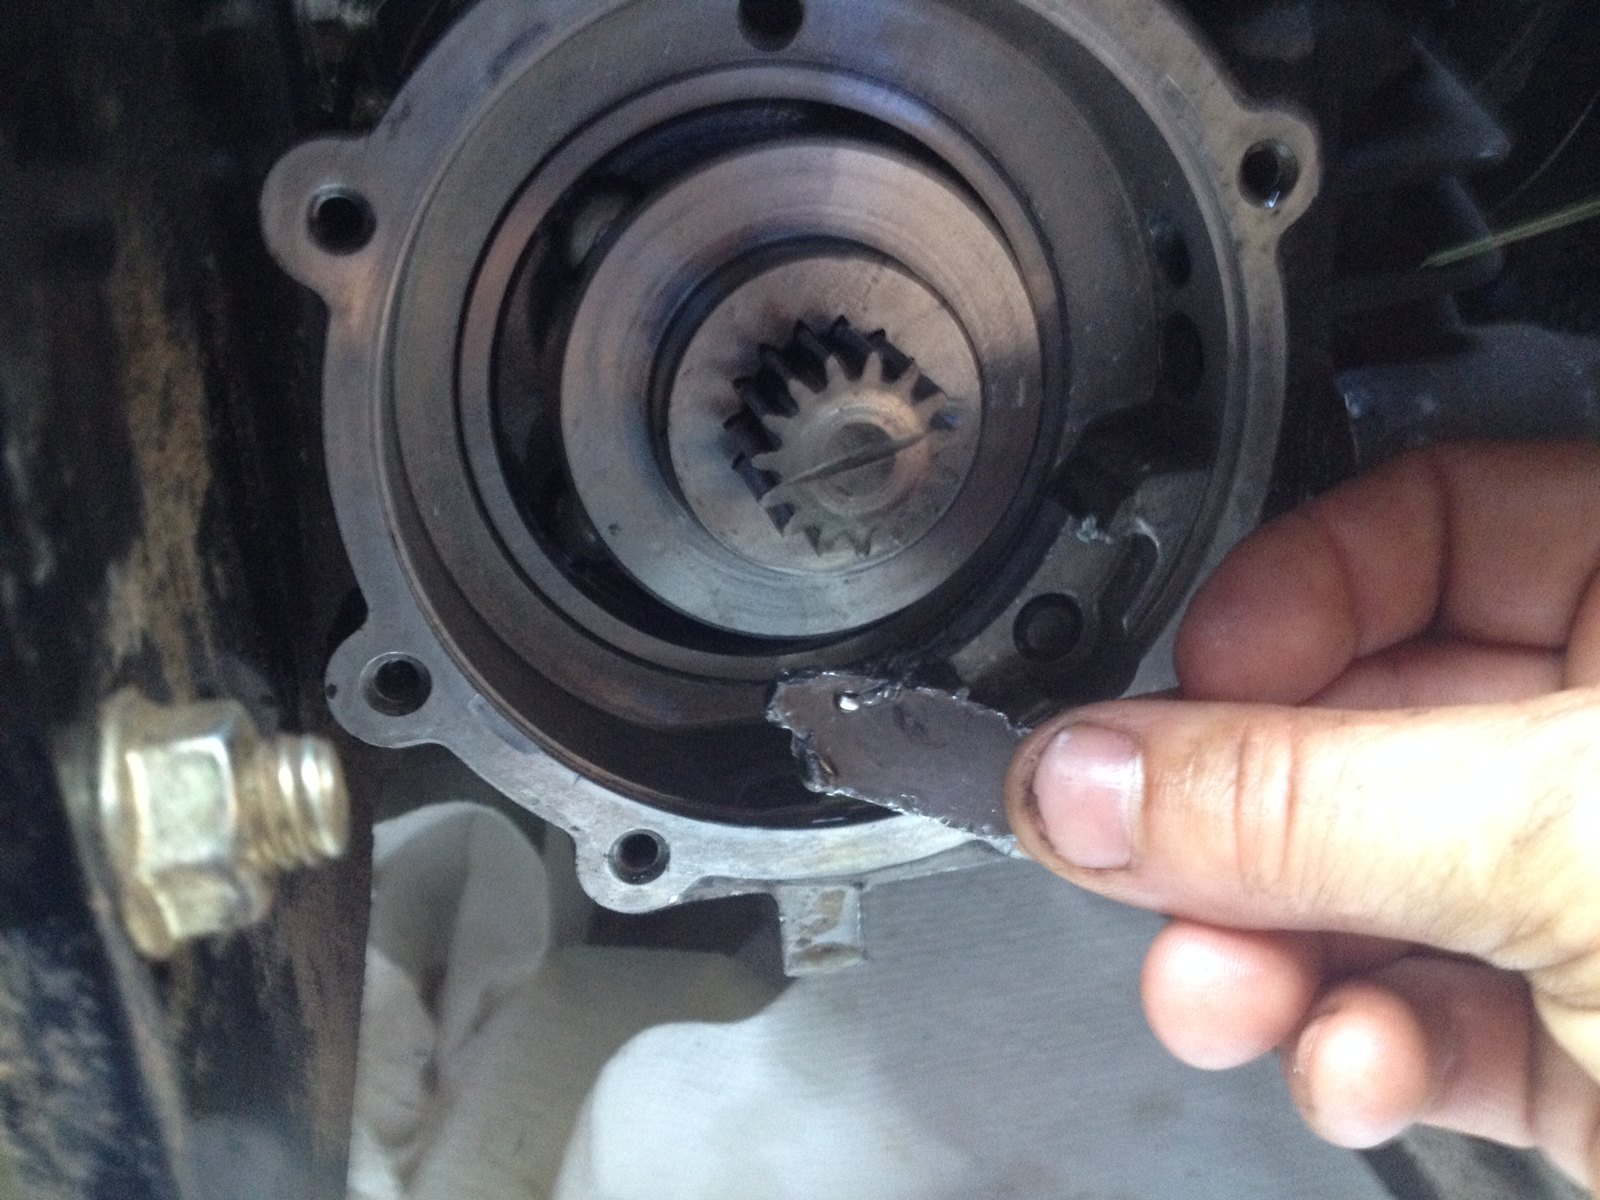 photo 3 by Lapeer20m, on Flickr
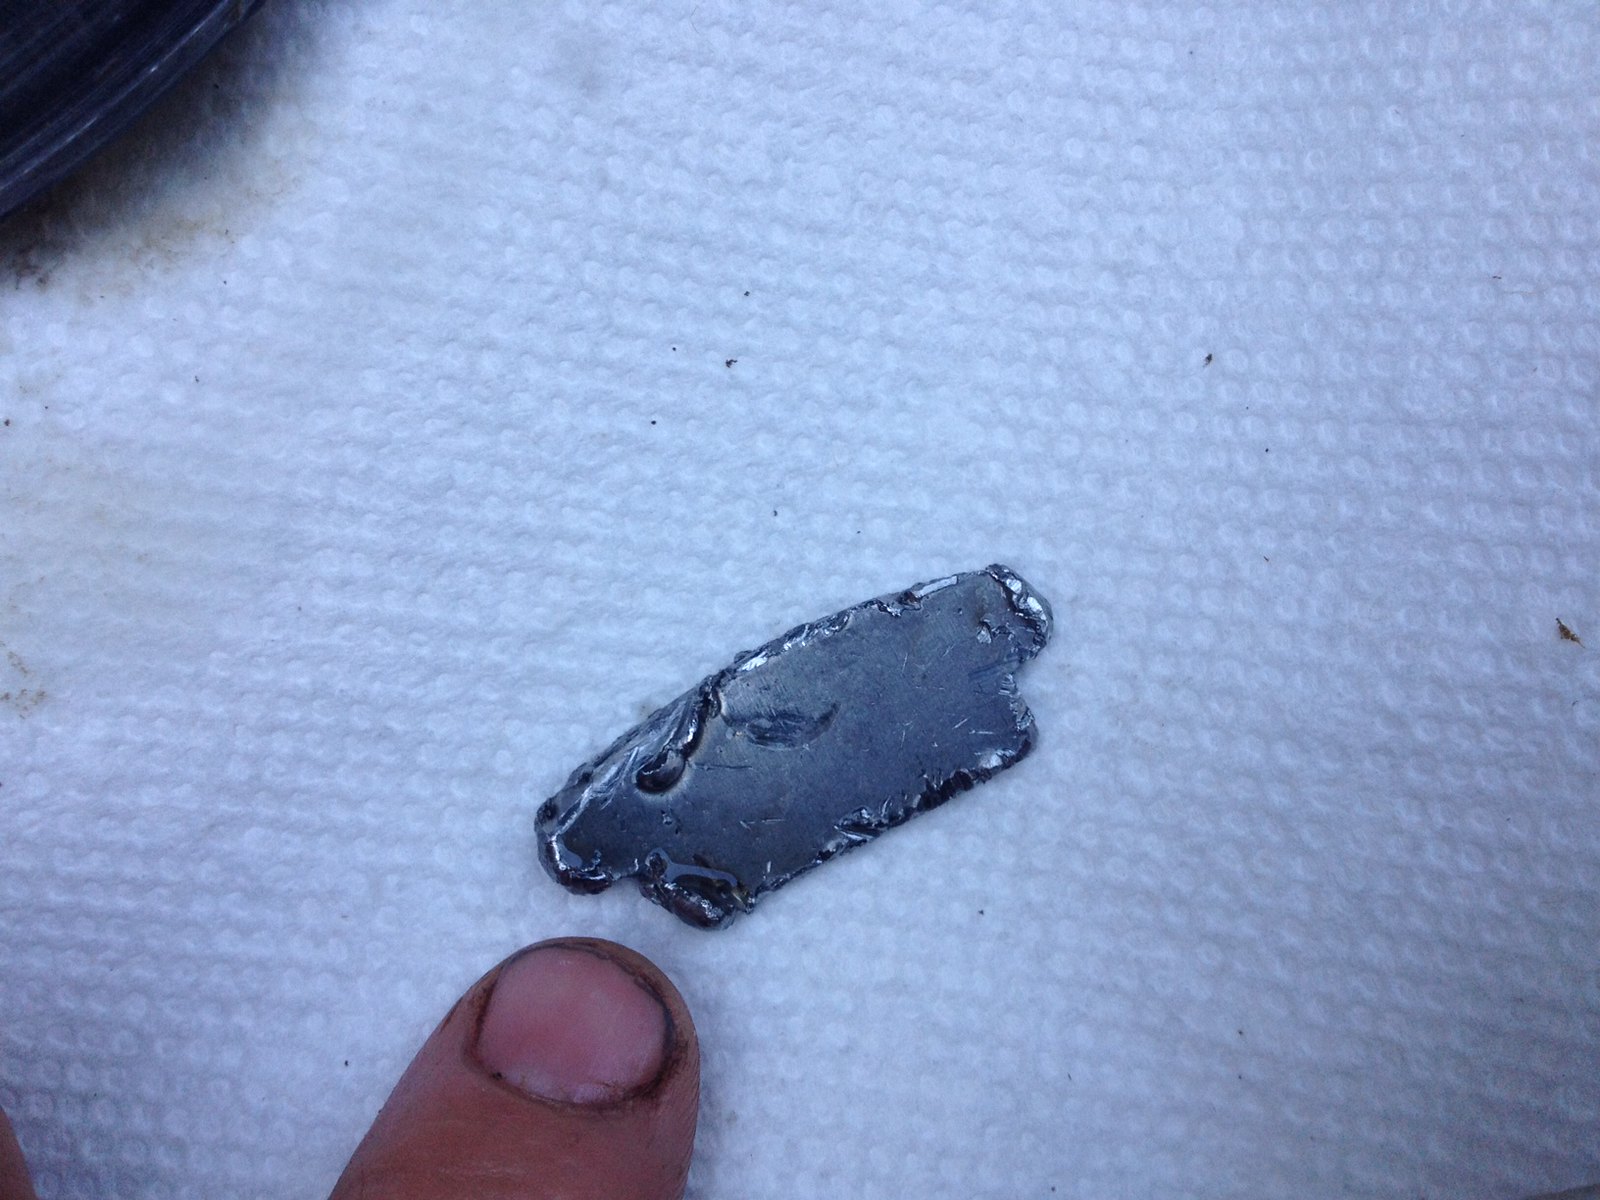 photo 4 by Lapeer20m, on Flickr
I bought this machine for $900. It only has under 850 hours and has always been garage kept.
I know it's older, but it really helped me out.
I just bought a woods 6210 with the left side wheel locked up. After reading this thread i took it apart and found a piece of metal inside which i believe was part of the parking brake.
photo 3 by Lapeer20m, on Flickrphoto 4 by Lapeer20m, on FlickrI bought this machine for $900. It only has under 850 hours and has always been garage kept.
#14
6
6gunn
6
6gunn
I'm revisiting this thread again because my '97 721D's RH final drive is leaking again. Same side as last time, so I did more digging on the problem and found that the housing has an egg shape hole where the axle contacts the housing. It was like this the last time I had it torn down but it didn't seem like a big deal to me. Well, it's a big deal.
The Grasshopper dealership I use for parts stated that the seal will fail again because of this. They checked on a new housing, and best they could find was a housing for a 2004 model that's $589.00.
I looked at thehemikid's pictures and noticed the his housing has a bearing where my housing is wearing. If thehemikid reads this, would you tell me what year mower you have?
If my housing had that bearing in same area, I wouldn't be dealing with this problem.
#15
thehemikid
thehemikid
Wow, another yr has passed and memory has too! I haven't had to do anything to the mower sense that time except change some fuel filters in order to get that last mow in before winter.
I'd have to go back & study my way through this thread to familiarize myself with all the parts of what I was doing in order to help at all. :laughing:
Anyway,... for starters can you post a pic or tell me which one of my pics has the bearing your talking about.
Where is this egg shaped wear in the housing at?
In my pics what bearing does mine have that yours don't?
...the outer axle bearing,
...inner housing bearing (needle bearings roughly about an inch long),
...or the flat thrust bearing/washer/spacers area?
Mine is a 2003 721D. Serial # 53-----
#16
thehemikid
Well guys I've been busy with life and other toys,...and bummer,... should of realized when my pics disappeared on other sites & forums that my mower stuff here had disappeared too. Sorry Photobucket has shut down my pic's. :ashamed:
If I can find another hosting site I like. I guess I wont be able to redo my pics in this thread tho, may have to start another thread and work on it over time. Pretty sure I still have the pic's in my laptop. Again would take some time tho. Let me know if anybody cares. :smile:
thehemikid
Wow, another yr has passed and memory has too! I haven't had to do anything to the mower sense that time except change some fuel filters in order to get that last mow in before winter.
I'd have to go back & study my way through this thread to familiarize myself with all the parts of what I was doing in order to help at all. :laughing:
Anyway,... for starters can you post a pic or tell me which one of my pics has the bearing your talking about.
Where is this egg shaped wear in the housing at?
In my pics what bearing does mine have that yours don't?
...the outer axle bearing,
...inner housing bearing (needle bearings roughly about an inch long),
...or the flat thrust bearing/washer/spacers area?
Mine is a 2003 721D. Serial # 53-----
Well guys I've been busy with life and other toys,...and bummer,... should of realized when my pics disappeared on other sites & forums that my mower stuff here had disappeared too. Sorry Photobucket has shut down my pic's. :ashamed:
If I can find another hosting site I like. I guess I wont be able to redo my pics in this thread tho, may have to start another thread and work on it over time. Pretty sure I still have the pic's in my laptop. Again would take some time tho. Let me know if anybody cares. :smile:
#17
6
6gunn
6
6gunn
Hemikid, If these are the pictures I'm thinking of, they were great. On my old 721D the final drive housing had a bushing (bushing had worn to an egg shape, and the seal would work itself out.), not a bearing that supported the shaft. I saw in one of your pictures the bearing number in your housing, bought that bearing, and took the housing and the bearing to a machinist I know. He machined a space for the bearing, pressed it in. I haven't had trouble with that side since. And I mow 7 acres. Some of it very rough. So knock on wood, the old 721D is still running great, and not leaking.
Thanks again for helping me get my mower going again.
John
Thanks again for helping me get my mower going again.
John
#18
thehemikid
thehemikid
Pic test of new pic host.
https://www.flickr.com/gp/151818164@N08/S7U73F
PS: Well!, it only shows the link. Got more work to do, or find another host.
PSS: Also, does the link work, and if so, does it show any of my personal info?
https://www.flickr.com/gp/151818164@N08/S7U73F
PS: Well!, it only shows the link. Got more work to do, or find another host.
PSS: Also, does the link work, and if so, does it show any of my personal info?
#20
thehemikid
thehemikid
fellow on another forum posted a link for the photobucket problem,...pics are back for now! :smile: