Yamaha Water Pump Kit
Sunday was a beautiful day here, although I understand it got quite hot inland. It hit about 80 here along the coast. After doing some more work on grand daughters curio cabinet, I had to let glue dry, so I decided to start my yearly maintenance on my outboard. I got the engine oil and filter changed, (it's a four stroke), then replaced the fuel and water separating filter and the on-board engine fuel filter. I hadn't bought any spark plugs yet and didn't want to change the lower unit lube until I had replaced the water pump impeller, so I tackled that.
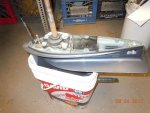
There are some great videos on YouTube showing you what you need to do, so I watched one again and then started removing bolts. The lower unit came off the engine fairly easily and I had made a sort of 'jig' out of a large plastic bucket to support it while I worked on it. I took it in the shop and intended to take pictures as the work progressed, but honestly, it was so simple I never got beyond the first two pictures of what it looked like before I started.
You may note in the first picture a small black plastic pipe at the front of the unit, sticking a few inches straight up. That connects to a pipe like a fish tank air line that runs all the way to the Yamaha gauge cluster. There is a tiny orifice in the leading edge of the lower unit below the cavitation plate, which I would call a "pitot tube". The pipe connects it to a bourdon tube, or some other sort of pressure sensor in the gauge cluster. Water pressure from the lower unit passing through the water at speed pressurizes the air in the pipe and the bourdon tube (or electronic pressure sensor) causes a readout on the gauge to change that pressure information into speed. However, my speedometer hasn't worked for three years or more. The opening in the pitot tube was plugged and although I had made several half-hearted attempts to clear it, I hadn't been successful. With the lower unit removed from the engine I was determined to clean it out once and for all!
Long story-short, I discovered that the tiny orifice penetrated into the lower unit housing a total of nearly 1-1/2" before entering a larger cavity that the plastic pipe was connected to and the entire inch and a half was plugged solid with detritus of one sort or another. I was able to remove it with a tiny drill bit and finally blow HP air through it, so now my dashboard speedometer will probably work again! (I didn't need it as the GPS provides a much more accurate speed readout.)
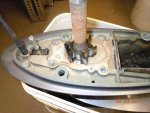
Feeling quite pleased with myself for having replaced the water pump so easily (I had purchased a "kit" that replaced everything, not just the impeller) and having finally cleaned out the speedometer tube, that I took the lower unit out to reinstall it on the engine full of confidence. That was short lived, as the unit would not slide all the way up against the engine body! I worked at it for over half an hour without making any headway at all and I could not see what was hitting. There are three things that must slide together in order for the unit to go back into position, the drive shaft, which is splined on top, the shift lever, also splined, and the water pump outlet tube, which slides through the white plastic coupling that can be seen in the picture and then into a rubber fitting. I suspected that was the cause of my problem, but as I had greased everything with either marine grease or pure silicone grease (for rubber) I couldn't understand what was holding everything from going together.
Finally in desperation I caught the threads of two of the bolts and gently tightened them until there was quite a strain, when suddenly something went "thunk" and everything slid into place! Hopefully nothing was damaged!! I will water test the engine as soon as I have replaced the spark plugs and lower unit lube.
It was 5:30 PM before I had myself and all my tools cleaned up. So much for the 'easy' job I watched on YouTube!! LOL
Roger