2012 CC Z-force-S not zero turning right

philwarner

Member
Joined
Aug 4, 2016
Threads
3
Messages
10
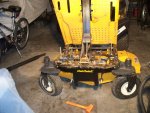
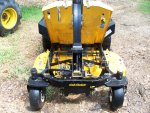
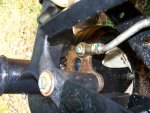
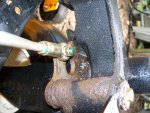
When I mowed today my Cub Cadet Z-force-S 48 would zero turn to the left OK but when turning right, a 10 to 15 foot radius was as close as it would turn and going straight on level ground the steering wheel was turned maybe 15 degrees to the left. It had zero turned both ways one month and 7 operating hours ago when I bought it used, and while I had noticed some increase in right turn radius my previous mowing time, it was much worse today so it appears to be a progressive thing. It also had some trouble getting started up a 20 degree slope today if the front wheels were turned at all and it felt more like a belt was slipping than the wheels slipping.

This is a 2012 Z-force-S 48 model with a mulching kit installed and 175 hours on it. Half of the acre of property I mow is sloped 15 to 20 degrees and half of the rest is pretty rocky and bumpy. I weigh 160 pounds and am running 8 PSI in the rear tires to soften the ride on my rocky Arkansas hillside. I usually mow across slope on the steep part and zero turn downhill on succeeding passes because there is not enough traction (or maybe not enough drive belt friction?) to zero turn uphill which I assumed was because only one rear tire was driving forward on a zero turn.

Do you guys have any suggestions on where to start with correcting the steering situation? Or the drive belt adjustment? I found a Z-force service/repair manual on line but it is for the L model and not the S; another case of Murphy’s Law that “the repairman will not have seen a model quite like yours”.

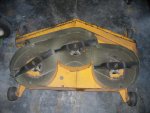
Also, this unit may have been sold with the mulch kit already installed by the dealer and while it does a really nice job on the grass and leaves no clumps or even any visible clippings, even a slight bare spot creates a whole lot of dust and it builds up a ton of dry clippings covering the mowing deck in an hour’s time that takes almost as much time to clean it off as it took to mow. I am considering removing the blocking plate on the right side and am wondering if it will then discharge without causing a dust storm or if I would need different blades for side discharge. The blades are marked 02005017 on one end and MB 0 2D on the other.


Edit 1: I found a service manual at http://service.mtdproducts.com/Training_Education/769_05513_z_force_s/769-05513.htm Whoope! I can still use advice before pull the deck again and dig into the steering, but at least I have a place to start and some photos to go by.

Edit 2: When I added edit 1 it blew away my original post, but fortunately I had it saved in my notes on the Cub so I put it back ( at least I hope I did)
 

Attachments

  • 100_2402.jpg
    100_2402.jpg
    130 KB · Views: 13
  • 100_2388.jpg
    100_2388.jpg
    146.1 KB · Views: 13
Last edited:

philwarner

Member
Joined
Aug 4, 2016
Threads
3
Messages
10

Thanks for the link to the RZT-S manual. I took a look and it is a little different setup than the Z-force-S, but a guy can't have too many repair manuals in case one has something explained better than another.

I really miss the old Haines and Chilton manuals that were models and year specific, and they disassembled a car exactly like yours and took photos as they went and did not have cryptic instructions like "remove exhaust system". The MTD manuals are pretty good, though.
 

Jack17

Well-Known Member
Joined
Jan 12, 2015
Threads
13
Messages
368
Looking at the manuals I think that the only problem you're having there is that the steering shaft somehow got spun inside the connecting hub (figure 6.23). Drive your unit straight and true to your liking and stop. Shut it off, loosen two bolts that hold steering shaft in place (6.23 on diagram) true the steering wheel and re-secure both bolts that hold it in place. I think that should do it!
 

bertsmobile1

Lawn Royalty
Joined
Nov 29, 2014
Threads
64
Messages
24,702
having seen all the linkages and control rods under the floor plate I can only say good luck.
It might be a long shot but pull the floor plate and check for debris I have only one of these on the service run & it is 1 season old so still running like a top.
However he was having some steering problems which I was not told about and there was a lot of debris that I cleaned out before lubricating the steering gear.
The customer said it was steering a lot better after it was serviced.
Because of the way the belt tensioner is configured you do not get even contact between the left & right hydros and while at 175 hours the belt should be good, it is worth a consideration.
Get it up in e air and check both hydros for signs of leaking and clean them thoroughly.
Accumulation of dust on the hydros will make them overheat and when hot the output is greatly reduced.
Also check the fan gear that turns the front wheels sticks ( stones perhaps ) can get in between the teeth which will jamb the gears and prevent them turning full lock.
 

philwarner

Member
Joined
Aug 4, 2016
Threads
3
Messages
10
having seen all the linkages and control rods under the floor plate I can only say good luck.
It might be a long shot but pull the floor plate and check for debris I have only one of these on the service run & it is 1 season old so still running like a top.
However he was having some steering problems which I was not told about and there was a lot of debris that I cleaned out before lubricating the steering gear.
The customer said it was steering a lot better after it was serviced.
Because of the way the belt tensioner is configured you do not get even contact between the left & right hydros and while at 175 hours the belt should be good, it is worth a consideration.
Get it up in e air and check both hydros for signs of leaking and clean them thoroughly.
Accumulation of dust on the hydros will make them overheat and when hot the output is greatly reduced.
Also check the fan gear that turns the front wheels sticks ( stones perhaps ) can get in between the teeth which will jamb the gears and prevent them turning full lock.

Thanks for the suggestions. With the amount of debris that collects on top of the deck, your suggestion to check for debris limiting the steering is a good one and what I was experiencing could be just that. I had some other honey-dos to take care of yesterday and today but should be able to pull the cover tomorrow to see what gives. The procedure for aligning the front wheels seems pretty straightforward as a start, but maybe I'll find a stick or stone stuck in there that will fix the steering problem. I'll see what I can see on the drive belt too; the amount of dust it kicks up may be causing it to slip as well.

I bought this unit from a condo association and the maintenance guy said he had not used it himself but he thought it had been used to mulch leaves. The CPA selling it for the condo said they had hired out the mowing and didn't need it anymore. I didn't know the service history so I immediately changed the oil and will change it again with a new filter before next mowing season. The spark plugs still looked good, so I am hopeful it had some care and will last me a long time. I talked them down to $1500 cash which seemed like a very good deal even though it was 4 years old and out of warranty; I hope that proves to be the case.

One thing I haven't found is tire pressure recommendations. It had very high pressure in one rear tire when I bought it and really road rough, but dropping them to 8 PSI helped that. Any recommendations for the front tires?
 

bertsmobile1

Lawn Royalty
Joined
Nov 29, 2014
Threads
64
Messages
24,702
Go to the cub web site, type in your numbers and download the owners & parts manuals.
If you are really lucky there might be a workshop manual there as well.
With any second hand mower I always suggest doing a major service .
Not only will this make sure everything has been serviced but you will end up looking at everything very close.
Pulling the floor pan off is not easy you need to remove the right hand side pedals and the cover at the base of the steering stem, just to lift it far enough to get limited access.
To get the pad completely off you have to pull the steering wheel right off.
Pop a little anti -sieze on the tiny screws that hold the floor pan down ( 8 from memory ) .
The one I did was less than 1 season old and one had rusted in solid already.
Also if you use the washout port make sure you leave the blades spinning for a good 10 minutes after you turn the water off while standing on a solid dry surface.
I also replaced all of the spindle bearings and both idlers because of a bad wash down proceedure.
He has now got a 4' dust gun for his compressor and leaves the hose for the garden.

These things steer 2 ways.
The front casters turn and the drive from the rear wheels varies like a std zero turn with lap bars and both of these need to be in sync to steer properly.
 

philwarner

Member
Joined
Aug 4, 2016
Threads
3
Messages
10
I took the deck plate loose and checked for obstructions in the steering. There was a lot of old hard grass and dirt, but no sticks or rocks found so far. I might be wrong about it having zero turned to the right before because it definitely does not turn as far right as it turns left now, but I don't think so.

The steering rack looks like it goes as far left and right as it can, but the right front wheel will only turn 75 to 80 degrees to the centerline. The manual says when zero turning the inside front wheel should be able to go past 90 degrees to 108 degrees which will cause the inside rear wheel to drive in reverse. It does appear to turn that far to the left but not the right. Any chance it is designed that way to turn sharper on the non-discharge side?


I'll go through the steering alignment and then see if I can find some obstruction on the right wheel or transmission rod that I just haven't seen yet. Here's how it looks at full left and right turns now.
 

Attachments

  • Before Steering adjustment full left (11).jpg
    Before Steering adjustment full left (11).jpg
    154.2 KB · Views: 16
  • Before Steering adjustment full right (12).jpg
    Before Steering adjustment full right (12).jpg
    138.2 KB · Views: 15

bertsmobile1

Lawn Royalty
Joined
Nov 29, 2014
Threads
64
Messages
24,702
Remove those black cover plates between the wheels and the mower.
Under there are two fan gears ( quadrant gears to some ) that move the wheel.
Good chance there will be something between the teeth preventing full travel.
From memory there was alignment marks on the gears for pointing directly forward.
Could also be some one undid the top pivot nut to work on the pivot bearings and allowed the wheel to fall out then did not replace it in the correct position.
While you are in there some dry lithium grease on the teeth would not go astray.
 

philwarner

Member
Joined
Aug 4, 2016
Threads
3
Messages
10
Remove those black cover plates between the wheels and the mower.
Under there are two fan gears ( quadrant gears to some ) that move the wheel.
Good chance there will be something between the teeth preventing full travel.
From memory there was alignment marks on the gears for pointing directly forward.
Could also be some one undid the top pivot nut to work on the pivot bearings and allowed the wheel to fall out then did not replace it in the correct position.
While you are in there some dry lithium grease on the teeth would not go astray.

I backed the Z-force-S outside, raised the deck plate, washed off the old debris from the frame that the shop vac didn't get, and used a jet nozzle on the garden hose to thoroughly wash around the steering box and into the fan gears. The fan gears appeared to not quite be in mirror image positions with the wheels turned straight ahead so I thought that might be the problem, but after driving back into the garage I checked it again and this time it did turn all the way in both directions, so I didn't just imagine that it had zero turned both ways before and I'm not crazy. Eureka! You were absolutely right - there must have been a piece of something I couldn't see limiting the right fan gear that made it feel like it was hitting a solid stop.

The front wheels don't look quite parallel, so I'll do the wheel alignment procedure (now that I can see the steering rack centering hole) and check the transmission rod alignment too, and then off to TSC for some CC yellow spray enamel for the deck plate before I put it back on.

Two things I am really liking about this mower are (1) it is not Chinese and (2) it is not Metric! Made in America by Americans! Go USA!
 

Attachments

  • Steering alignment (1).jpg
    Steering alignment (1).jpg
    277.6 KB · Views: 21
  • Steering alignment (4).jpg
    Steering alignment (4).jpg
    147.8 KB · Views: 20
  • Steering alignment (5).jpg
    Steering alignment (5).jpg
    187.9 KB · Views: 18
Top