My First Modification: Chute

Have_Blue

Member
Joined
May 19, 2014
Threads
4
Messages
37
Add to that I've got a lot of people that walk by my house on the street and it's a little nerve racking to have anything but the normal stuff on there just in case a little stone happens to get picked up.

Learned my lesson on this last week. My wife was mowing while I was picking up branches from a recent windy thunderstorm. I kept a respectful distance from the Raptor, but I caught a thumb-sized piece of branch right on the temple. I saw stars, and it drew blood... and it was 30 feet away. I turned my back on the mower the rest of the mowing session. Later, a small piece of wood hit me right in the butt, and it stung like a BB hit me. No more! I will now pick up the yard before the mower is even cranked from now on.

I got hit with debris from my old mowers many times, but it never felt like a bullet. I have never been afraid to re-design things, but I will try my best to get along with the stock equipment before I modify the bullet deflector.
 

primerbulb120

Moderator
Joined
Nov 3, 2014
Threads
43
Messages
1,315
Learned my lesson on this last week. My wife was mowing while I was picking up branches from a recent windy thunderstorm. I kept a respectful distance from the Raptor, but I caught a thumb-sized piece of branch right on the temple. I saw stars, and it drew blood... and it was 30 feet away. I turned my back on the mower the rest of the mowing session. Later, a small piece of wood hit me right in the butt, and it stung like a BB hit me. No more! I will now pick up the yard before the mower is even cranked from now on.

I got hit with debris from my old mowers many times, but it never felt like a bullet. I have never been afraid to re-design things, but I will try my best to get along with the stock equipment before I modify the bullet deflector.

Wow, that was close! :eek: I'm with you, I don't modify any of the safety equipment on my mowers. I might if it were just my lawn and nobody was nearby while I was mowing. But since I do lawn care for other people I like to keep the "bullet deflector" in good working condition.
 

577jersey

Well-Known Member
Joined
Jun 3, 2016
Threads
14
Messages
436
The opening on the deck also needs to be made bigger on the SD,,the little bar/ramp on the bottom needs to be cut off,,the mower leaves a windrow in wet weedy lawns,,even good grass too,,first thing Im doing is cutting the deck chute hole bigger when my warranty runs out if i still have the machine.
 

Nate243

Forum Newbie
Joined
Jul 3, 2015
Threads
1
Messages
2
Hello,

While agonizing over what mower to purchase, the discharge opening on the Raptor SD deck was a detractor. I read several posts were individuals groused about it. For a number of reasons I purchased it anyway with the idea that I would work on the discharge fairly soon. The chute itself sticks out about 1/2 mile and prevents you from getting remotely close to anything. On my first mow I just used a bungee to hold it up. This weekend I took off the chute and modified the deck using Lexan to cover the big hole on top of the deck. Images are attached. For some reason they are in reverse order but I have them numbered for you to see.

View attachment 27897View attachment 27896View attachment 27894View attachment 27895View attachment 27893

I made a pattern with some poster board, cut the Lexan with tin snips, made a few small holes in the deck and voila. I had enough material to make two pieces so I did just to get a little added strength. Lexan is pretty tough material and I can trim or fiddle with until I finalize exactly what I want. I've not cut with it just yet but for now I have a see-through deck. :smile:

Thought some others might be interested in this.

Rhett,
Although an older thread, curious on your thoughts on how well the chute mod has worked. I've looked into the GrassFlap for the Raptor, which covers about the same amount of the top chute area as the lexan cover you made, and curious if it has negative effects on the clippings discharge in any way.
 

Bigmks

Member
Joined
Nov 1, 2014
Threads
6
Messages
26
Mulch kit plate solves this problem as well and it looks more neater.
 

Attachments

  • IMG_0283.jpg
    IMG_0283.jpg
    281.4 KB · Views: 126
  • IMG_0284.jpg
    IMG_0284.jpg
    247.3 KB · Views: 87

RhettWS

Well-Known Member
Joined
Dec 4, 2015
Threads
14
Messages
145
Rhett,
Although an older thread, curious on your thoughts on how well the chute mod has worked. I've looked into the GrassFlap for the Raptor, which covers about the same amount of the top chute area as the lexan cover you made, and curious if it has negative effects on the clippings discharge in any way.

Nate,

Sorry for the slow reply. Between work and flood recovery I've been a bit distracted for a while. To your question, I still have my modification in place and I still like it. The clippings disperse better than with the chute in place without a doubt. As others have pointed out it is less safe than with the chute but I have so much room between houses, etc. that it is not an issue for me. I think a grass flap chute would be even better so you can shut the hole as needed.

However, a modification of the deck opening will be my next project. I had no issues with grass plugging the discharge outlet last year. I planted rye grass in November 2016 to add a green crop to my yard through the winter. Rye by nature is high in moisture, low in lignin, and grows fast. Thus it has a tendency to start clogging the opening. Others have made the opening a little wider by cutting a triangle out. I will move in this direction once all flood repairs are finished.

I hope this helps. Rhett
 

mhavanti

Well-Known Member
Joined
Oct 12, 2014
Threads
12
Messages
924
Alrighty ladies and gentlemen, I too have entered the world of Hustler Modifications. Now I can say I'm running a Modified SD if this is a class. I know how this is going to work out. Next thing I'll be doing is trying to find another mile per hour, a quicker hole shot, better traction for a better hole shot. This isn't going to ever end and before we know it, this ugly yellow machine is going to end up painted Coca-Cola Can Red.

Well, to the mod.

I've adopted 577Jersey's belt guard mod and it works nicely, although I think Jersey's looks a bit better. The way I made my mod was to keep some dumb arse from sticking a toe into the pulley if for some reason they manage to get near the mower while it is running with the blades engaged. That's my excuse and I'm sticking to it. Hopefully the photos will attach today.

There is one more modification planned for the current mod and that is to place plastic 1/4 inch black expanded wire behind the holes when I give the mower to a kinfolk at some point in time.

Let me know what you think.

DSC04687.JPGDSC04688.JPG
 

Bigmks

Member
Joined
Nov 1, 2014
Threads
6
Messages
26
Alrighty ladies and gentlemen, I too have entered the world of Hustler Modifications. Now I can say I'm running a Modified SD if this is a class. I know how this is going to work out. Next thing I'll be doing is trying to find another mile per hour, a quicker hole shot, better traction for a better hole shot. This isn't going to ever end and before we know it, this ugly yellow machine is going to end up painted Coca-Cola Can Red.

Well, to the mod.

I've adopted 577Jersey's belt guard mod and it works nicely, although I think Jersey's looks a bit better. The way I made my mod was to keep some dumb arse from sticking a toe into the pulley if for some reason they manage to get near the mower while it is running with the blades engaged. That's my excuse and I'm sticking to it. Hopefully the photos will attach today.

There is one more modification planned for the current mod and that is to place plastic 1/4 inch black expanded wire behind the holes when I give the mower to a kinfolk at some point in time.

Let me know what you think.

View attachment 31721View attachment 31722


Sweet modification how did you get the hole so uniformed and neat? Did you use some type of machinery to cut holes? This is a great idea being the guard is completely covering the belt!
 

577jersey

Well-Known Member
Joined
Jun 3, 2016
Threads
14
Messages
436
Man that mower is clean,how many hours on her now?? lol
 

mhavanti

Well-Known Member
Joined
Oct 12, 2014
Threads
12
Messages
924
I should have done a video on it.

It is very simple really. I'll see if I can explain it step by step clearly. If you don't understand, please let me know.

Items required include: 3/8 inch socket and driver of some sort, Pencil Compass, 1/8 inch drill bit, 3/16 to 1 3/8 inch step drill bit, drill motor, pencil compass.

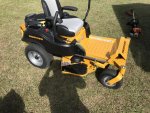
1. Remove your guards.
2. Wipe them clean on the bottom contact areas so they will make a good flat contact on the work surface.
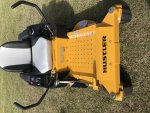
3. Find the distance between the roll over at the top where it makes a tapered area down to the bottom ridge. You'll be finding the width of the flat area that wraps around the guard where you see the holes in my cover . Once you have found the distance, divide it by two, set the pencil compass so that it scribes dead center.
4. Once you have this center point located and the compass set, place the pointed side of the compass on the work surface against the very bottom of the belt guard and the pencil side on the belt guard in the center of the wide flat area. Keep the compass vertical, drag the pencil against the belt guard while holding it upright and perpendicular to the world.
5. Once you have the line drawn, lay the guard back over your deck and align the guard retainer holes over the holes in the deck.
6. Stand back, square up with the deck at a 90 degree and find the center as if you're making a ninety degree line from the mower frame rail to the center of the round area near the pulley area.
7. Draw a thin line to mark that center. It will appear off center once you pick up the guard. That is fine as it is where you want it.
8. Drill the 1/8th hole where the two lines intersect.
9. Using the step drill thru the guard until you are slightly smaller, your choice, than the flat surface and then chamfer it with the next size step. Do not drill thru.
10. Turn over the guard, chamfer the back side.
11. Lay a measuring device at the edge of the first hole, measure over .750 thousandths (3/4") and make a mark. Repeat your first 10 steps until you are satisfied with the amount of holes required to blow out the guard efficiently.

There you have it. Happy hole drilling.
 
Top