721D Grasshopper Gemini final drive

6gunn

Forum Newbie
Joined
Sep 20, 2011
Threads
4
Messages
9
I have a leak on the right side of the final drive of my 1996 721D at the axle. I read the post by the Hemikid on replacing his bearing on his GH axle, but there was no mention of the planetary gears and how to remove them. I called Grasshopper and they would not give me any info on how to take the final drive apart. They said basically to take it to the dealer, but I don't have the money for that right now.

Just wondered if anyone has any suggestions, or insight in this tear down and reassembly. I've done plenty of car repairs, but planetary gears are new to me.

Thanks for any help you can give me.
 

6gunn

Forum Newbie
Joined
Sep 20, 2011
Threads
4
Messages
9
mechanic mark, I'm not sure if your answer didn't post, or I'm missing something, but I could use some help on this subject.
Thanks
 

MBDiagMan

Well-Known Member
Joined
Aug 28, 2013
Threads
7
Messages
140
6gunn,

Many manufacturers of different items have moved toward posting manuals in .pdf form for free download, EXCELLENT customer support philosophy and a gesture of how much they value their customers. Some manufacturers continue to make service manuals unavailable unless you're willing to pay a high price.

Grasshopper appears to be somewhere in the middle since their manuals are $7 as I recall. At least that's a digestible price.

I expect that in your situation, that $7 might be well spent.

Best of luck with it, and keep us informed about the outcome.
 

mechanic mark

Lawn Pro
Joined
Jul 15, 2013
Threads
175
Messages
7,407
I have a leak on the right side of the final drive of my 1996 721D at the axle. I read the post by the Hemikid on replacing his bearing on his GH axle, but there was no mention of the planetary gears and how to remove them. I called Grasshopper and they would not give me any info on how to take the final drive apart. They said basically to take it to the dealer, but I don't have the money for that right now.

Just wondered if anyone has any suggestions, or insight in this tear down and reassembly. I've done plenty of car repairs, but planetary gears are new to me.

Thanks for any help you can give me.

Part 4: Removal Planetary Gear Sets, One Way Clutch, Output Shaft, Servo Assemblys - YouTube
 

thehemikid

Active Member
Joined
Jul 31, 2011
Threads
10
Messages
97
I'll try'n chime in later, though a lot of what I did has faded from memory, sense that was about 2 yrs ago & I'm in my mid 50's :tongue:

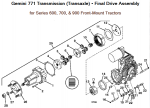
Here's a explosive view. You can see the planetaries aren't caged like in automotive trans, & there are 2 sets per drum per final drive.

771 Final Drive explosive view.PNG
 

thehemikid

Active Member
Joined
Jul 31, 2011
Threads
10
Messages
97
6gunn, how big of a leak is it?

How big of a puddle does it leave on the floor over what time period?

Or how much does the reservoir lose during mowing for how long?
 

thehemikid

Active Member
Joined
Jul 31, 2011
Threads
10
Messages
97
6gunn, if you haven't already taken it apart. If you have, then here's some pic's to start with (if I can get the photobucket thingy to work) for whoever may need then.

I think when I took it apart the 1st time it looked like in the 1st pic with the black Reaction Plate sticking to the Back UP Plate. I don't remember if the Primary Sun Gear stuck & came out also. When I mean stuck I mean the trans fluid causes the parts with flat surfaces to cling together.

backtogather9_zps9725cc78.jpg


1planetaries_zps305e1b31.jpg


Mainhousing1_zpsa4ff7b64.jpg


Missing in the pic below, is a little black Friction Pad (for parking brake) that looks like a tiny car disc brake pad with a small steel plate that goes behind it, to spread the load of the rod that pushes against it from behind. Which seems to me to sandwich the Reaction Plate (composit (sp)) against the Back up plate that you see in the 2nd pic with 4 ears/lugs.
Mainhousing2_zps0d42ec13.jpg


Mainhousing3_zps3ece8e10.jpg


...on into the planetary(s) next.
 

thehemikid

Active Member
Joined
Jul 31, 2011
Threads
10
Messages
97
Before I go into the primaries in the Axle housing, I'd like to finish up here first, ...& I'd like to say I'm no ace mechanic here giving out instructions on a "How to" do this. Just some helpful pic's for those that might attempt to try'n repair their self.

The primary sun gear will have oil grooves like this on both ends.
Mainhousing4_zpsdafc2063.jpg


I mentioned before about the little disc, it goes in the area between the red arrows. When you first separate the Axle Housing from the trans housing there will still be some fluid come out even though you drain the reservoir iirc. How much I don't remember. I think I left 2 upper bolts in to hold everything while I separated just enough to drain. After its drains, you might put a small screen over your drain pan to catch the little disc pad & steel, that will probably stick to the Reaction Plate & fall out when you separate the Axle Housing from the rest of the trans housing.

Also I remember reading some where that you DON'T want to take the Motor Rotor out of its seat unless you really, really have to because the 5 balls are supposedly sleeve specific. In other words, each ball & sleeve are a matched set (blue arrows). I don't remember for sure but I think this may be where I read of the .0001" fit in these trans, & that they "don't like ant dirt". Any one can correct me if I'm wrong here.
Mainhousing7a_zps625ceaf4.jpg

Also you can see in the very center where mine had some side load "thrust" (on the primary sun gear) causing some ware in a circle up in the sun gears seat. I'm not sure it should be doing that. In other words, if the thrust washers & other washers, that are between the Snap Rings on the Axle are right,... this probably wouldn't happen (just my opinion). I'll talk about that again when I can get to the Axle itself pic's.

Now maybe I can move on to the Planetary Gears. :tongue:
 

thehemikid

Active Member
Joined
Jul 31, 2011
Threads
10
Messages
97
On to the Planetary Gears.

Again, most likely it'll have the Black Reaction Plate sticking to the Back Up Plate like this when it comes apart but not necessarily. Everything will come out a lot easier to just remove the Sun Gear, hold the Black Reaction plate with one hand, (to keep everything inside) while you stand the Housing on end & then lift the housing up. Everything should just stay on the table. But I'm doing it this way just to show how everything goes. This is how I did it the first time, being cautious.
backtogather9_zpsa660b480.jpg


You can just tell the Primary Sun gear has a little ware on this end from the thrust I mentioned.
backtogather8_zpsefbdc300.jpg


1planetaries_zps2abf97b2.jpg


2planetaries_zpscb18d327.jpg


The shinny area around the primary planetary gears appears to be where they rub the Back Up Plate.
3planetaries_zpsb532a8af.jpg


Sense I took the panetaries out, the pins their on were to slippery to pull on, so I just pulled the Drum,...
4planetaries_zps4a48cf48.jpg


...then I could get fingers around the carriers.
5planetaries_zps8c245cc3.jpg


Secondary Sun removed.
6planetaries_zpsbd4b85fe.jpg


7planetaries_zps8f922278.jpg


8planetaries_zps274f1e87.jpg


The rear carrier (secondary) is thicker than the Primary carrier & finer internally splined to fit this end of the axle, so you can't get them mixed up. Also I think the secondary Planetaries are thicker also. I think the only thing you can get mix up are the Primary & Secondary Sun gears. But I think,...iirc,...if you put the Primary sun in the Secondary's place, it doesn't have the little "nub" with no teeth, which allows that little needed clearance of the inside corner of the Primary Planetary gears.
9planetaries_zps92112856.jpg


...next,...removing the axle from its housing.
 
Top