torsion spring installation

dollsey74

Forum Newbie
Joined
Aug 1, 2012
Threads
1
Messages
2
Greetings, all.

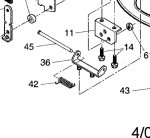
I have a Craftsman Model # 917.375502 and the torsion spring needs to be replaced. According to the manual, the SKU # for this part is 152124, which I've ordered and received. When attempting to install the spring, it looks like it's not big enough since both ends aren't able to "catch" on the mower at the same time. Any suggestions on what I'm doing wrong? I can't get this dang thing installed.

TIA,
Jason
 

EngineMan

Lawn Addict
Joined
Jun 12, 2012
Threads
9
Messages
2,275
Its very difficult to explain, better if you can see one to look at.......but I'll have a go.......look at the pic
Co rod hinge#45 go's through bracket#36 and then through torsion spring#42 but remember that the discharge deflector#38 if that is what you are using, also has to fit on there to I believe, and when fitted right, so that when you left up deflector tension is made to the spring.
This may or may not be any good to you. and if am wrong am sure someone will come along and say.
 

Attachments

  • Screenshot_1.jpg
    Screenshot_1.jpg
    36.6 KB · Views: 90

dollsey74

Forum Newbie
Joined
Aug 1, 2012
Threads
1
Messages
2
Thank you for the response, EngineMan. I figured out that the rod hinge goes through the bracket and torsion spring. The problem is with the torsion spring. I can't figure out what the "hooks" on opposing sides of the torsion spring are supposed to hook onto so that the mulcher door stays down (instead of flopping around while I'm mowing).

Any suggestions?

Thanks,
Jason
 

EngineMan

Lawn Addict
Joined
Jun 12, 2012
Threads
9
Messages
2,275
Thank you for the response, EngineMan. I figured out that the rod hinge goes through the bracket and torsion spring. The problem is with the torsion spring. I can't figure out what the "hooks" on opposing sides of the torsion spring are supposed to hook onto so that the mulcher door stays down (instead of flopping around while I'm mowing).

Any suggestions?

Thanks,
Jason

I believe that the lift side of the spring go's on top of the mulcher door, (under torstion) that will keep it down when you are mowing.
 

bendite

Forum Newbie
Joined
Jun 20, 2014
Threads
0
Messages
2
So far I haven't read anything to help in replacing the torsion spring. I can't figure it out. Can someone who knows how to do it please help us out? Thanks!!
 

bendite

Forum Newbie
Joined
Jun 20, 2014
Threads
0
Messages
2
OK, after spending several hours online and trying to get that torsion spring back in place, I finally gave up and took the mower to a Sears technician. He did succeed in getting it back in place but it wasn't easy. The steps he followed were:
1. leave the bracket on the mower deck bolted down.
2.put one end of the spring through the hole in the rear top of discharge door
3. push the rod hinge about half way through the holes in the discharge door, bracket, and spring.
4. now the hard part. turn the spring to get the other end to lie flat on the top of bracket with the end of the spring facing back- this requires use of needle nose pliers and a screwdriver and a lot of bending over, cussing, fine hand work - and then work the rod through the bracket and door holes on the other end. It took the tech about 30 minutes for this simple task, so I don't feel so bad. Hope this helps someone else.
 

benmul8

Forum Newbie
Joined
Jul 20, 2014
Threads
0
Messages
1
OK, after spending several hours online and trying to get that torsion spring back in place, I finally gave up and took the mower to a Sears technician. He did succeed in getting it back in place but it wasn't easy. The steps he followed were:
1. leave the bracket on the mower deck bolted down.
2.put one end of the spring through the hole in the rear top of discharge door
3. push the rod hinge about half way through the holes in the discharge door, bracket, and spring.
4. now the hard part. turn the spring to get the other end to lie flat on the top of bracket with the end of the spring facing back- this requires use of needle nose pliers and a screwdriver and a lot of bending over, cussing, fine hand work - and then work the rod through the bracket and door holes on the other end. It took the tech about 30 minutes for this simple task, so I don't feel so bad. Hope this helps someone else.

This is a very good explanation, thank you for this!!!!! I finally got mine put back together based on what you described. I would add 2 things:

1. First, remove the whole air filter assembly - the cover, the filter, and the back, so that the carb is exposed. This gives you more room to get leverage with the needle nose pliers.
2. Between steps 3 and 4 above, if your door has the metal slider that allows you to lock the door in a closed position, then push into the locked position. This keeps that side of the door from moving and allowing the end of the spring to come out. Every time I would try to turn the spring with the plier, the end that was inserted through the door would pop out. AFter the afforementioned cussing for 20 minutes, I finally thought to lock that side in place, and I got it on the very next try.

And for what it's worth, I am NOT a very handy type of guy. If I could do this with the instructions above, anyone should be able to. Just know going into it that it's gonna take some trial and error, and the cussing does seem to help. :)
 

jbeckplano

Forum Newbie
Joined
Sep 4, 2017
Threads
0
Messages
1
How I did it, and how I used the screwdriver
The screwdriver is mentioned as needed, but not explained how it is used.
1. I did not partially insert the rod hinge as recommended above. Things were too unstable and moved around too much. My door did not have a metal slider. Instead I inserted the rod all the way, through all the holes.
2. I then used the needle nose pliers to grab and twist the end of the spring backwards as I lowered the mulch cover as much as possible. It’s kind of a tricky procedure as I had to rotate the needle nose pliers in my hand without losing grip on the spring. I saw that I had successfully placed the end of the spring, facing the desired direction, on the base plate, but it as soon as I released it from the pliers it would snap back. I repeated this several times with the same result.
3. Using the screwdriver. I repeated this again, and again got end of the spring bent around, resting on the bracket (base plate). Keeping one hand gripping the pliers and the holding down the cover, with the other hand, I inserted the screwdriver, from the near side, and positioned it behind the end of the spring. I then levered the spring head forward with the screwdriver as far as I could. I released the pliers, and Eureka, the spring held in place. Problem solved.
 
Top